


Tutorials for JABA CMS Version 7
Learning and Support
Find out how to edit your website with these simple text tutorials. We are available from 9am to 5pm, Monday to Friday (excluding public holidays and Christmas period) for free phone support. You can also email us with any queries.
To get started using your JABA CMS v7 website platform, you can view the tutorials below. The JABA content management system (CMSv7) allows you to login to the back end of your website and easily edit, update and create new content.
It is essential you use Google Chrome web browser to edit your JABA website using the CMS.
HOW TO ACCESS YOUR CMS +
Content Management System Tutorials
Basic Functions for JABA CMS Version 7
To learn how to make text changes, change images, update pages and change page tiles follow to below tutorials. If you need to learn more, see the advanced functions tutorial below. If you need any further assistance, you can call the friendly team at JABA on 08 8232 2655 from Monday to Friday, 9am to 5pm (ACST time) and we will walk you through any changes you need to make to your website via the CMS.
 Getting Started with Your Website CMS
First of all, ensure you are editing your PWA with the Google Chrome Browser. If you do not have Google Chrome web browser you can download it at Google Chrome.
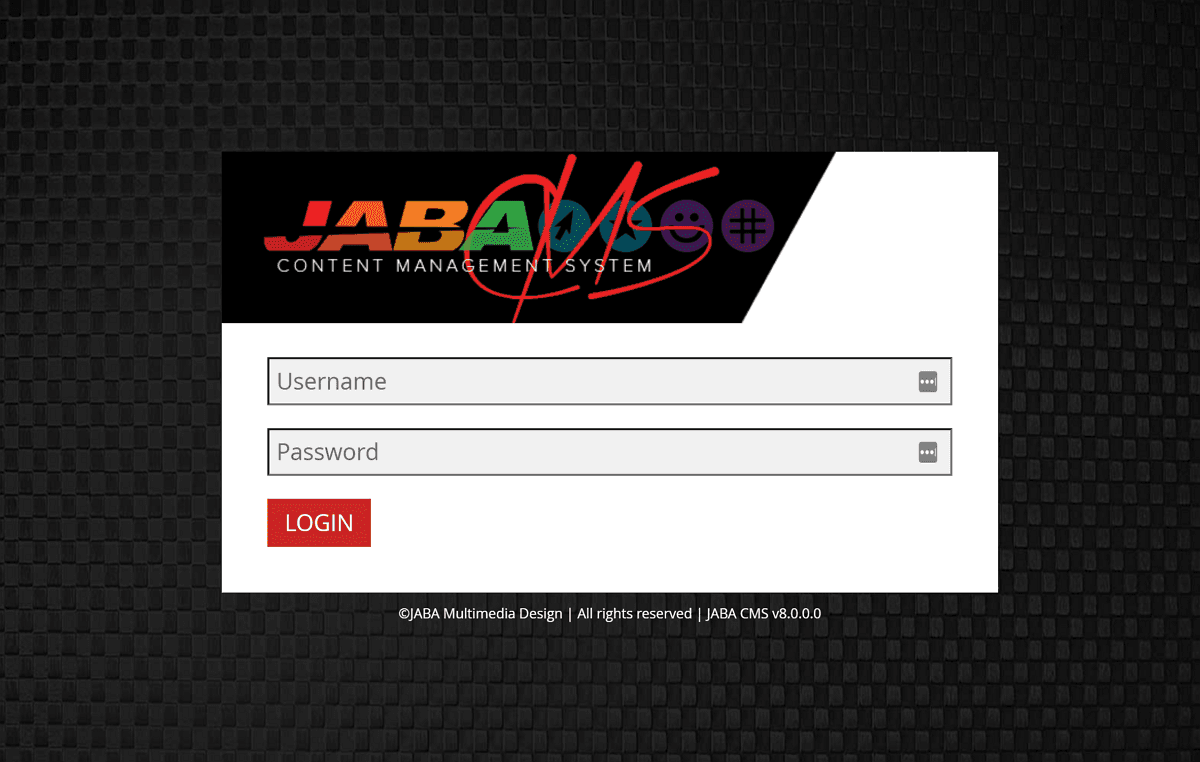
- Using Google Chrome web browser, type in your website URL name and add cms. at the start (cms.). For example: cms.jaba.com.au

- You will be prompted to enter your username and password to log in. (Your username and password would have been provided when your website went live.)
If you forgot your username or password please contact JABA on 08 8232 2655 or team@jaba.com.au to be issued a new log in.
CMS Directory
Once you have logged in to the Content Management System, you will have access to the back end of your website where you can easily edit and update content.
You can see the directory of your web pages on the right and your CMS directory on the left side of the screen. Pages, Media and Menu are list in the top left side.
- Pages are to access CMS pages.
- Media is to upload and edit images in your CMS.
- Menu allows you to edit your websites main menu.
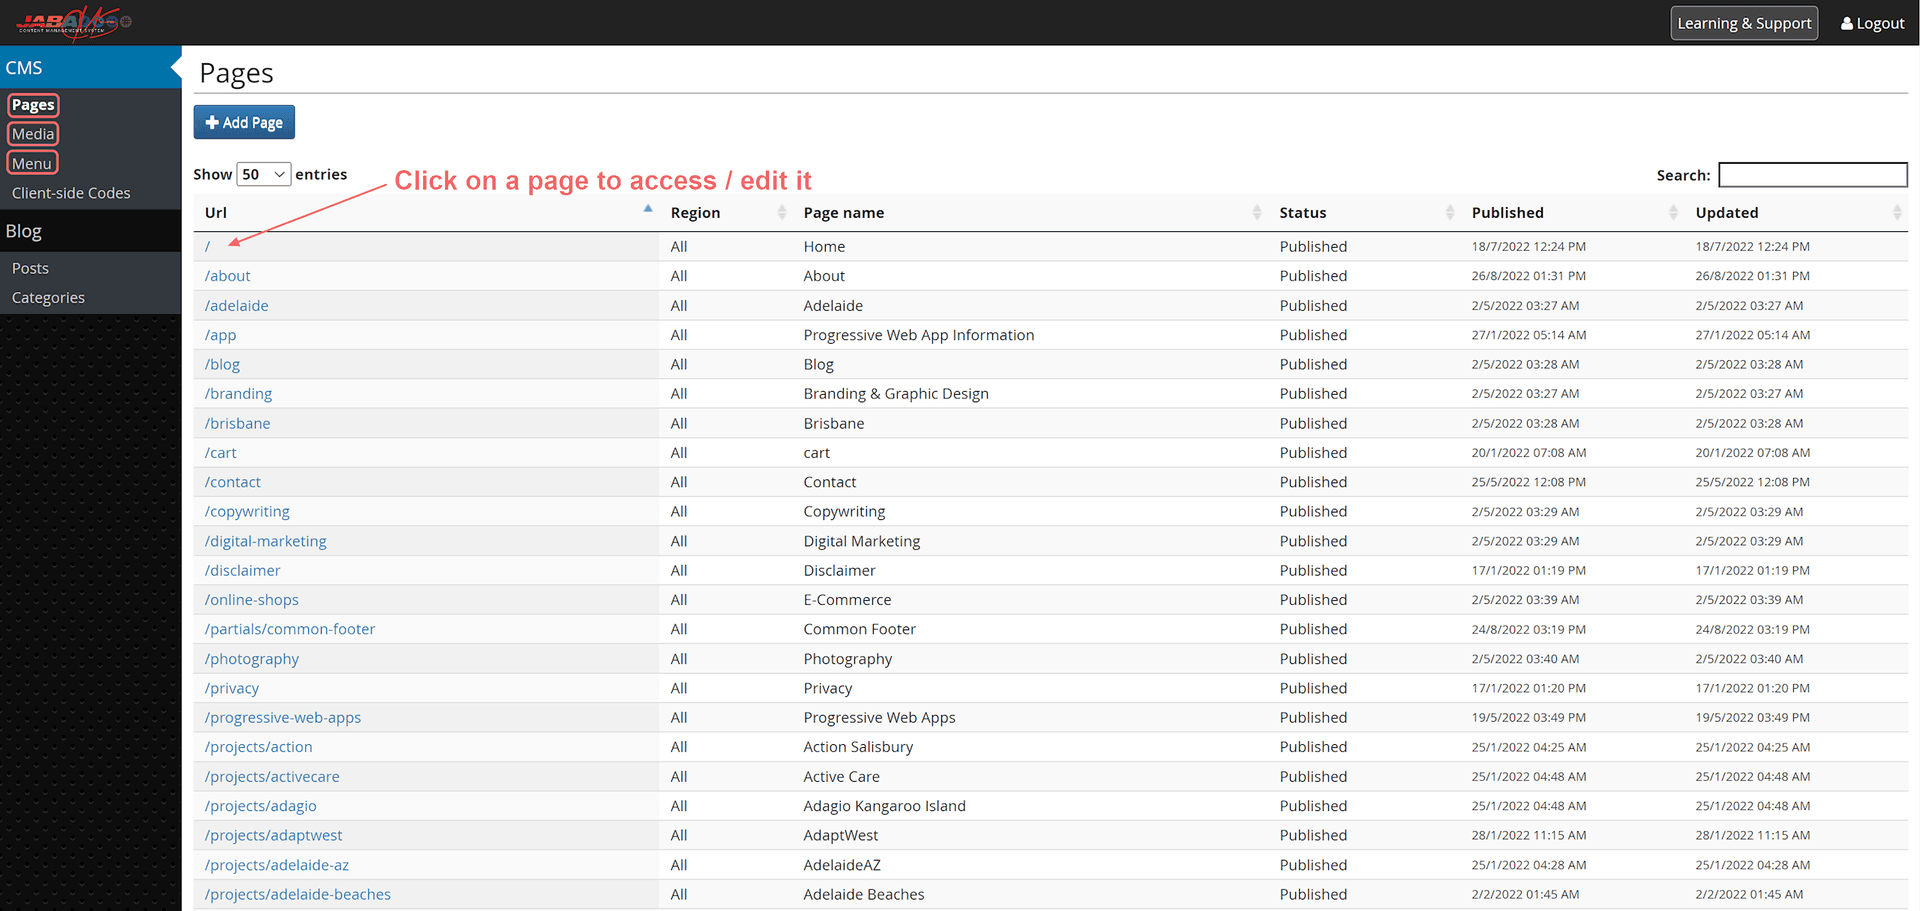
View when you login to the CMS
You can log out of the CMS using the logout button on the top right of the screen.

Logout button in top right of screen.
Now that you have access to your content management system for your website we can begin editing content and building pages.
 Uploading Images to the Media Library
You can add JPEG, PNG, GIF images or PDFs to your website CMS using the media tab on the left side of the screen and selecting upload files.
- When adding an image to the CMS, ensure you have prepared your image appropriately. Upload images to your website in JPEG or PNG format and ensure they do not exceed 400 kb in size.
If your image need to be compressed you can use https://tinypng.com/ to reduce the file size.
-
With your image or PDF ready, navigate to the Media folder on the left side of the screen.

Go to media library
- Select the folder that you want to upload your file to.
- Press the + button
- Select Choose Files or drag and drop files.
- Wait for upload to complete.
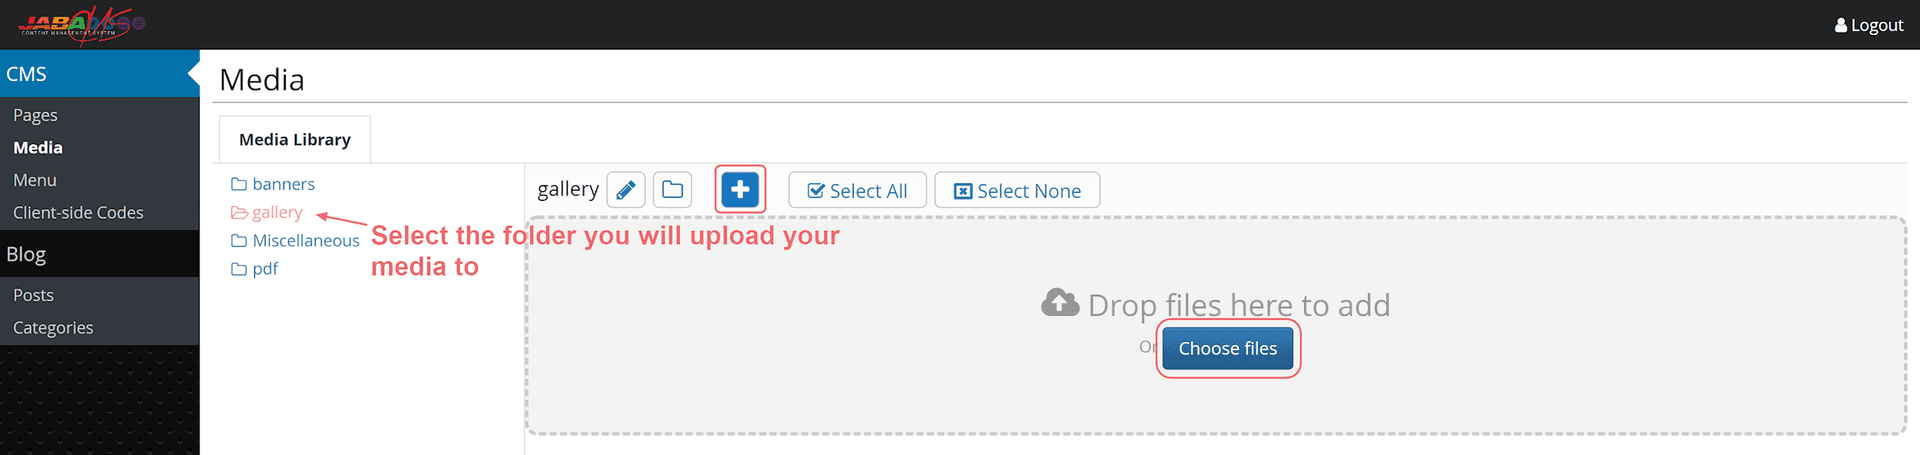
Add files
Edit / Delete a File
You can hover on the image and select the edit / file info button to:
- Delete the file
- Change the file name
- Add an alt tag to the image to improve your SEO (this is highly recommended).
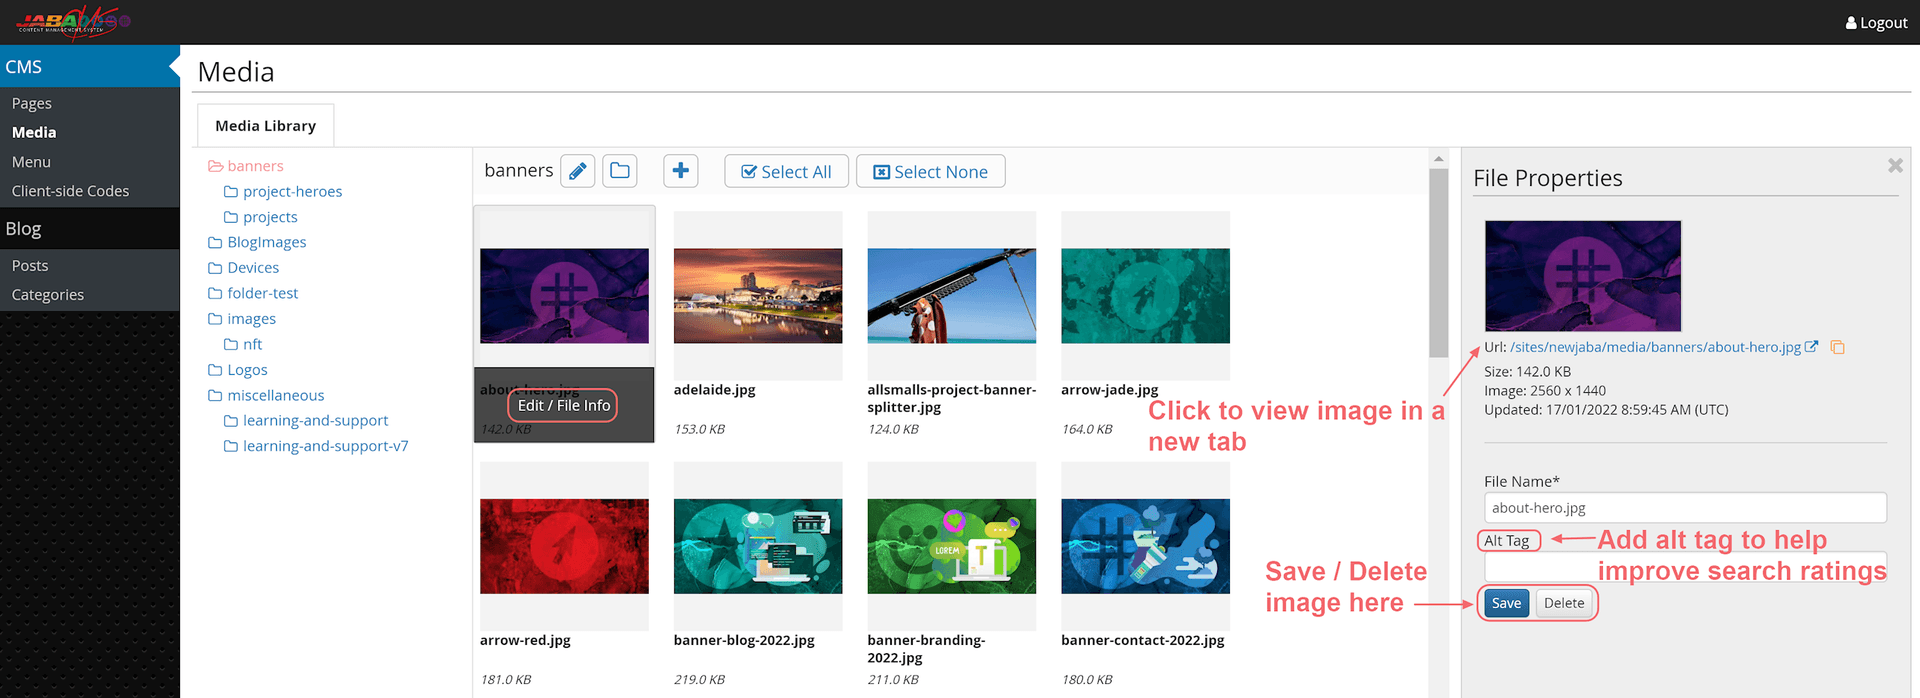
Edit File Name, Add an Alt Tag or Delete a File
Creating a new folder in the Media Library
To create a new folder in the Media Library, go to the Media section of the CMS.
- Select the folder icon to create a new folder
- A create a folder box will appear on the right with Parent Folder and Folder Name
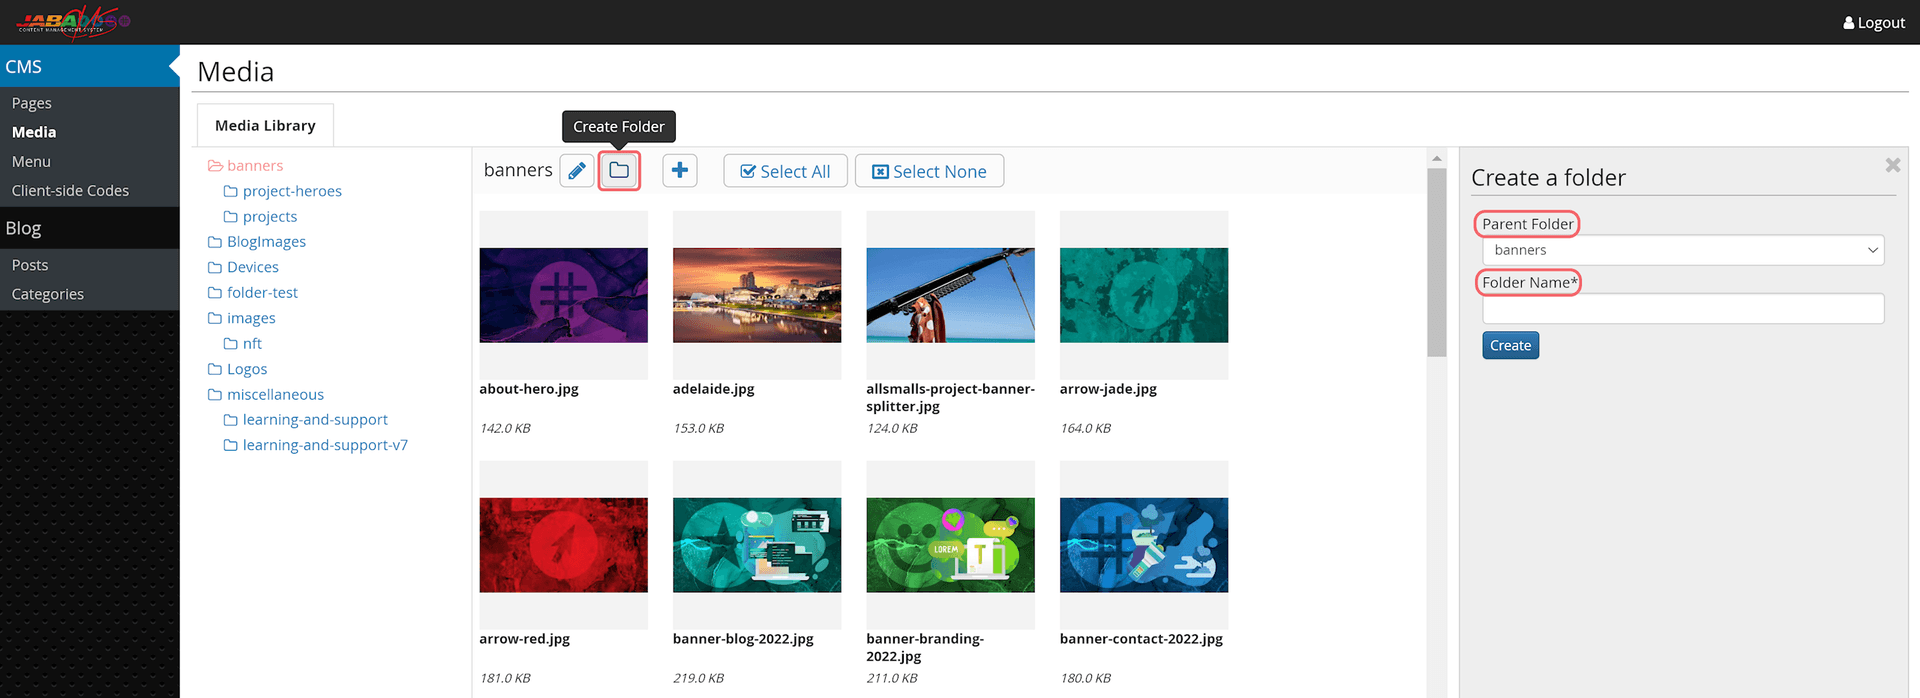
Press the folder icon to create a folder
- Select the Parent Folder drop down list to choose an existing folder to add the new folder under. You can create a top level folder in the main directory by choosing Media Root.
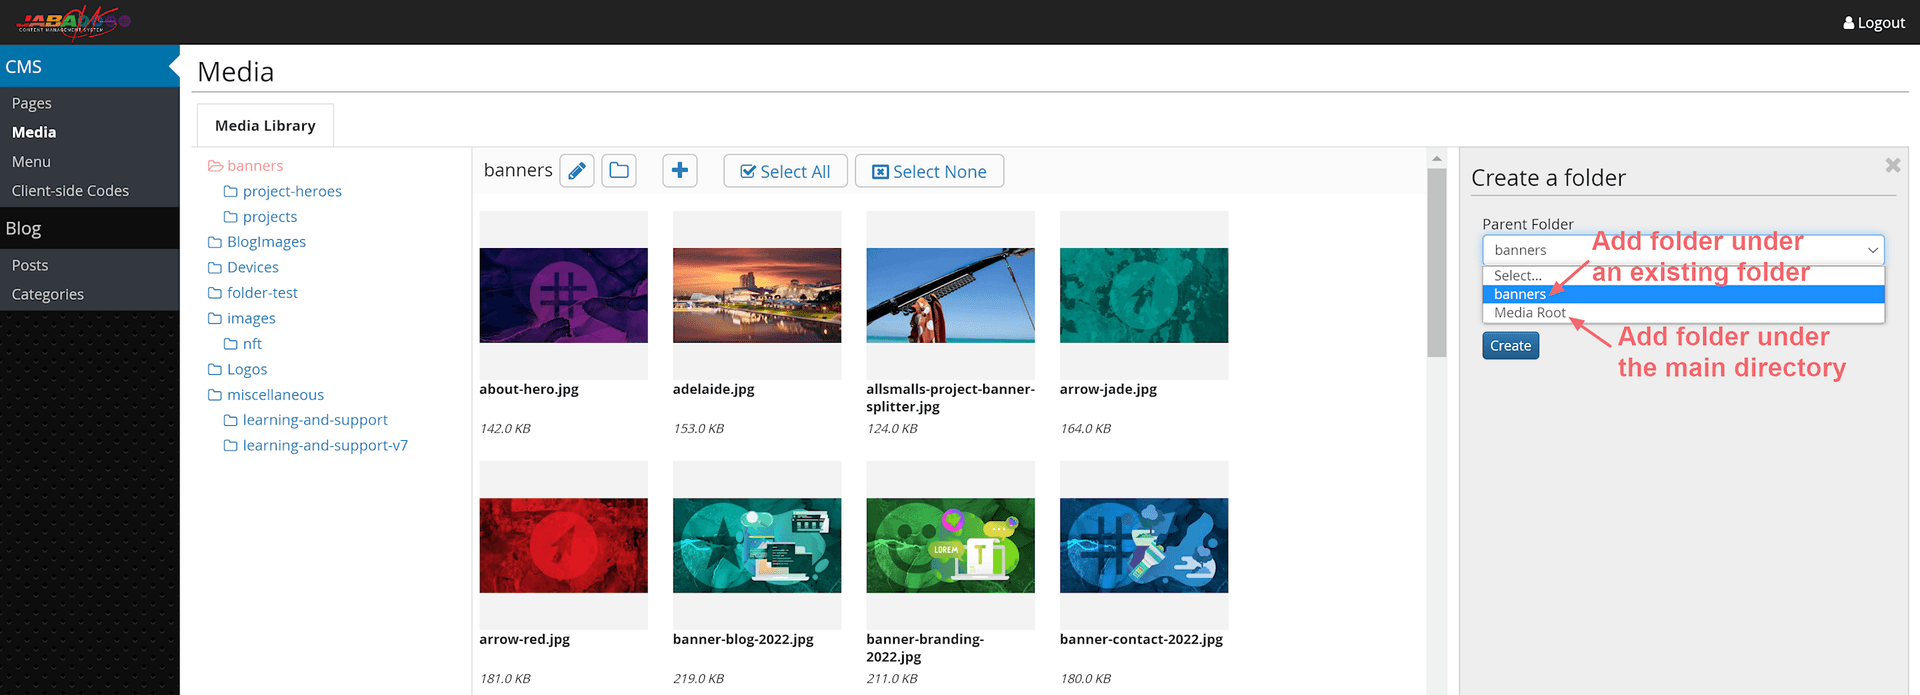
Choose the folder location (under existing folder or media root)
- Enter the Folder Name (*note: it is best not to use special characters, e.g. &)
- Press Create
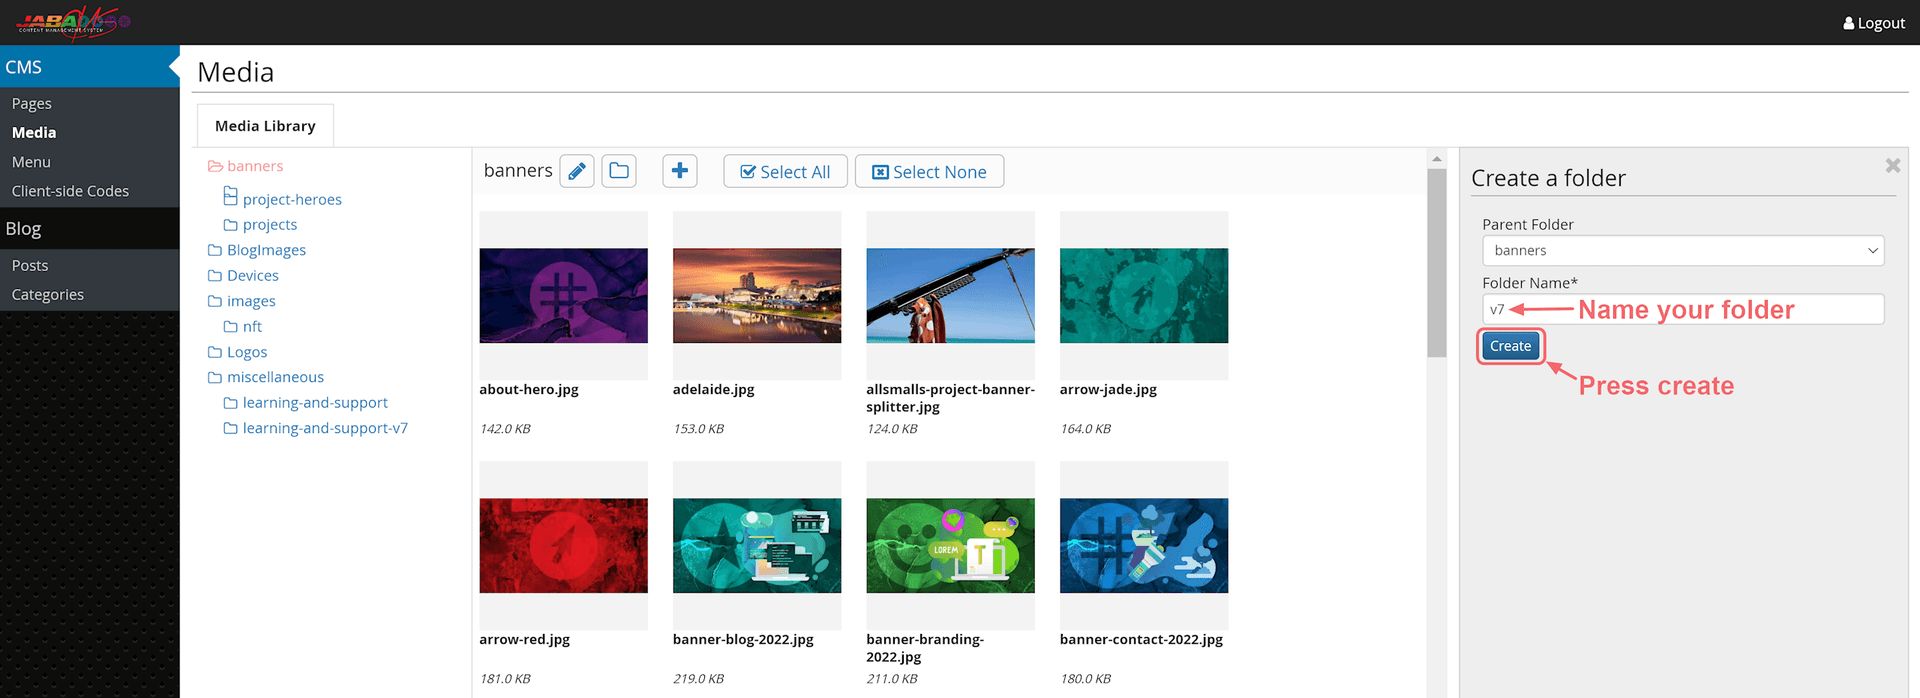
Name the folder and press create.
 Full Width Page Banners
You can create several types of full width banners. You can also change the height of the banners and their positioning on the page.
Select the pages section on the cms to go to the list of all pages.
You can sort the pages by url, page name, status, publish and update status if you need.
You can also use the search bar to find a page.
Find the page you want to edit and select it.

Find your webpage in the CMS
Rotating Banners
The rotating image banner masthead allows you to display multiple images that rotate automatically. You can also add text over the images to display certain messages or calls to action, such as Contact Us Now.
- On the left side of the screen, select the add item button.
A panel will load on the right side of the screen with various element types that you can add to your pages.
- Select Rotating Banner element
- You can name your rotator image panel in the item name box so you can easily identify the element on the CMS.
- Select Add to load the rotating image element on your page.

Add item on left panel, select Rotating Banner element, name and Add
Select your rotator image panel on the left side of the screen. It will highlight yellow and you will be shown a series of buttons to the right. edit, add, delete and copy.
- To add an image to the rotator select add.
- Select banner item
- Fill out the item name
- Select add.

How to add a banner item to a rotator panel and highlighted rotator image panel.
- Select Open Media Library
- Find and select the image you want to add.
- Press Select.
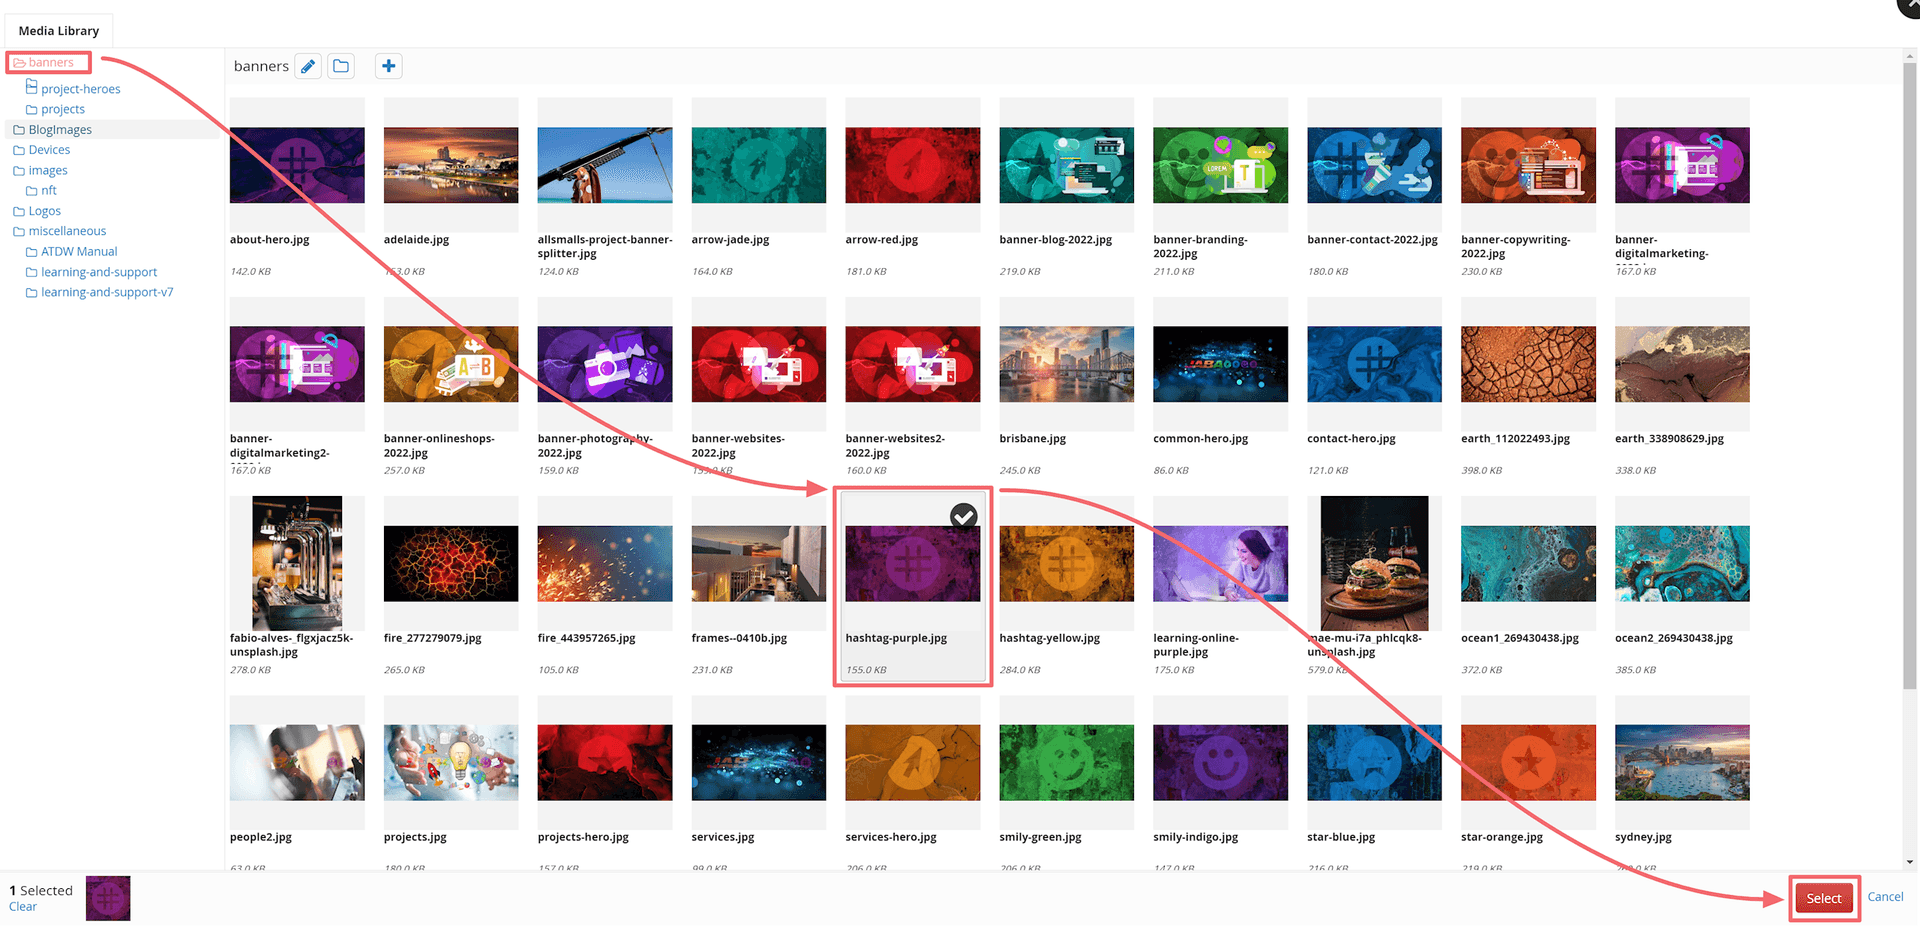
Select Rotating Banner Image.
- Select the image by pressing the Open Media Library button
- You can add a caption header that will appear as a message or call to action over your image.
- You can add a page link for your image banner to direct users to another page.
- Select Save.
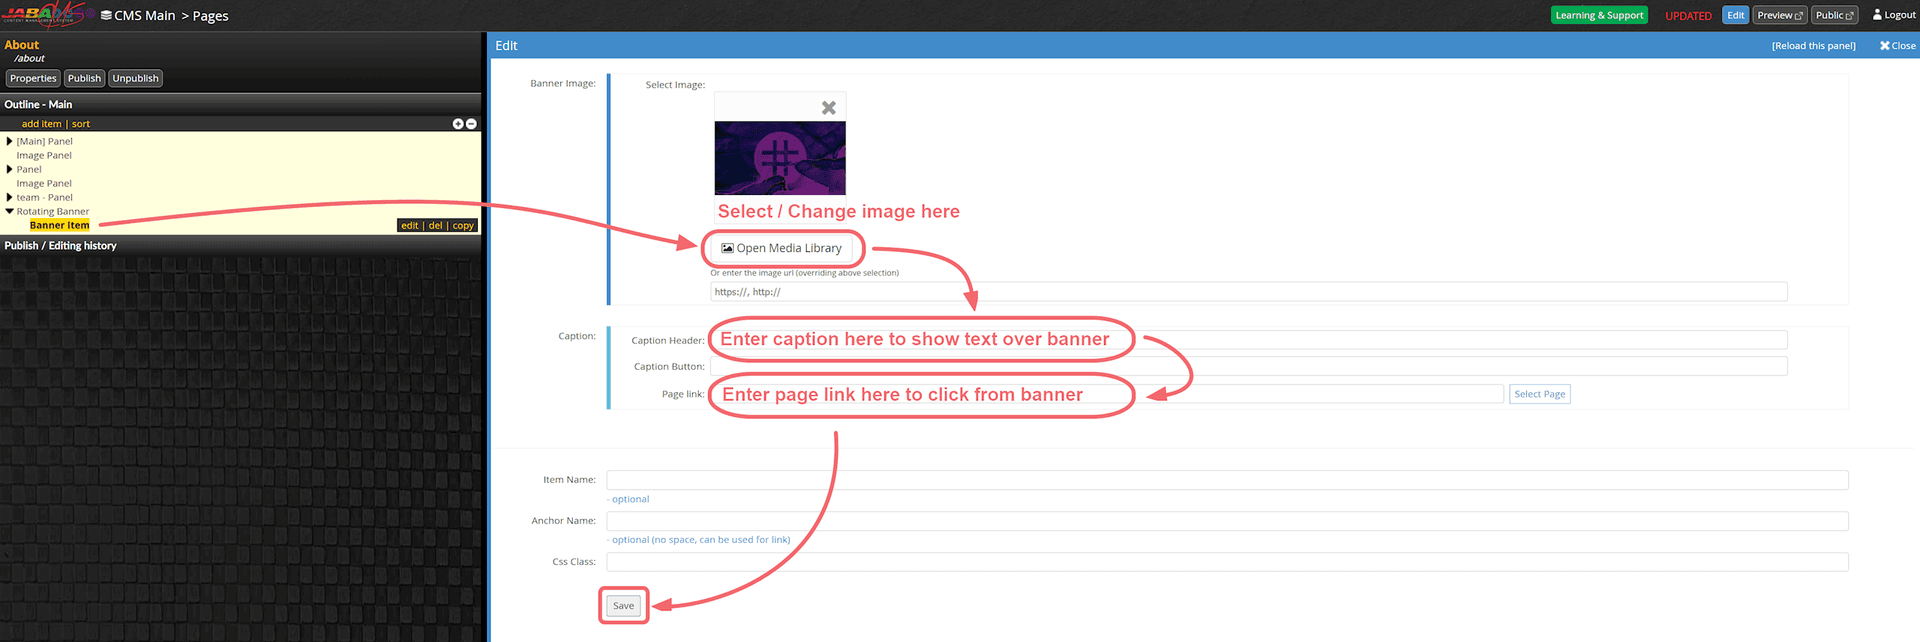
Add Rotating Image.
- You can add additional images by repeating the previous steps.
- Once you have two or more images in the rotating image element, they will automatically rotate through on your page.
It is recommended that you add no more than 3-4 rotating images in one rotating banner. You can edit the images at any time by selecting the item in the left panel and selecting edit. If you want to delete an image, select the rotator item in the left panel and press del.
Single Page Banners
Single page banners have a similar process to the above rotating banners.
- Select Add Item
- Select Single Banner and name the item.
- Press Add

Add a Single Banner.
- Select Open Media Library and find and select the image you want to add.
- Press Select.
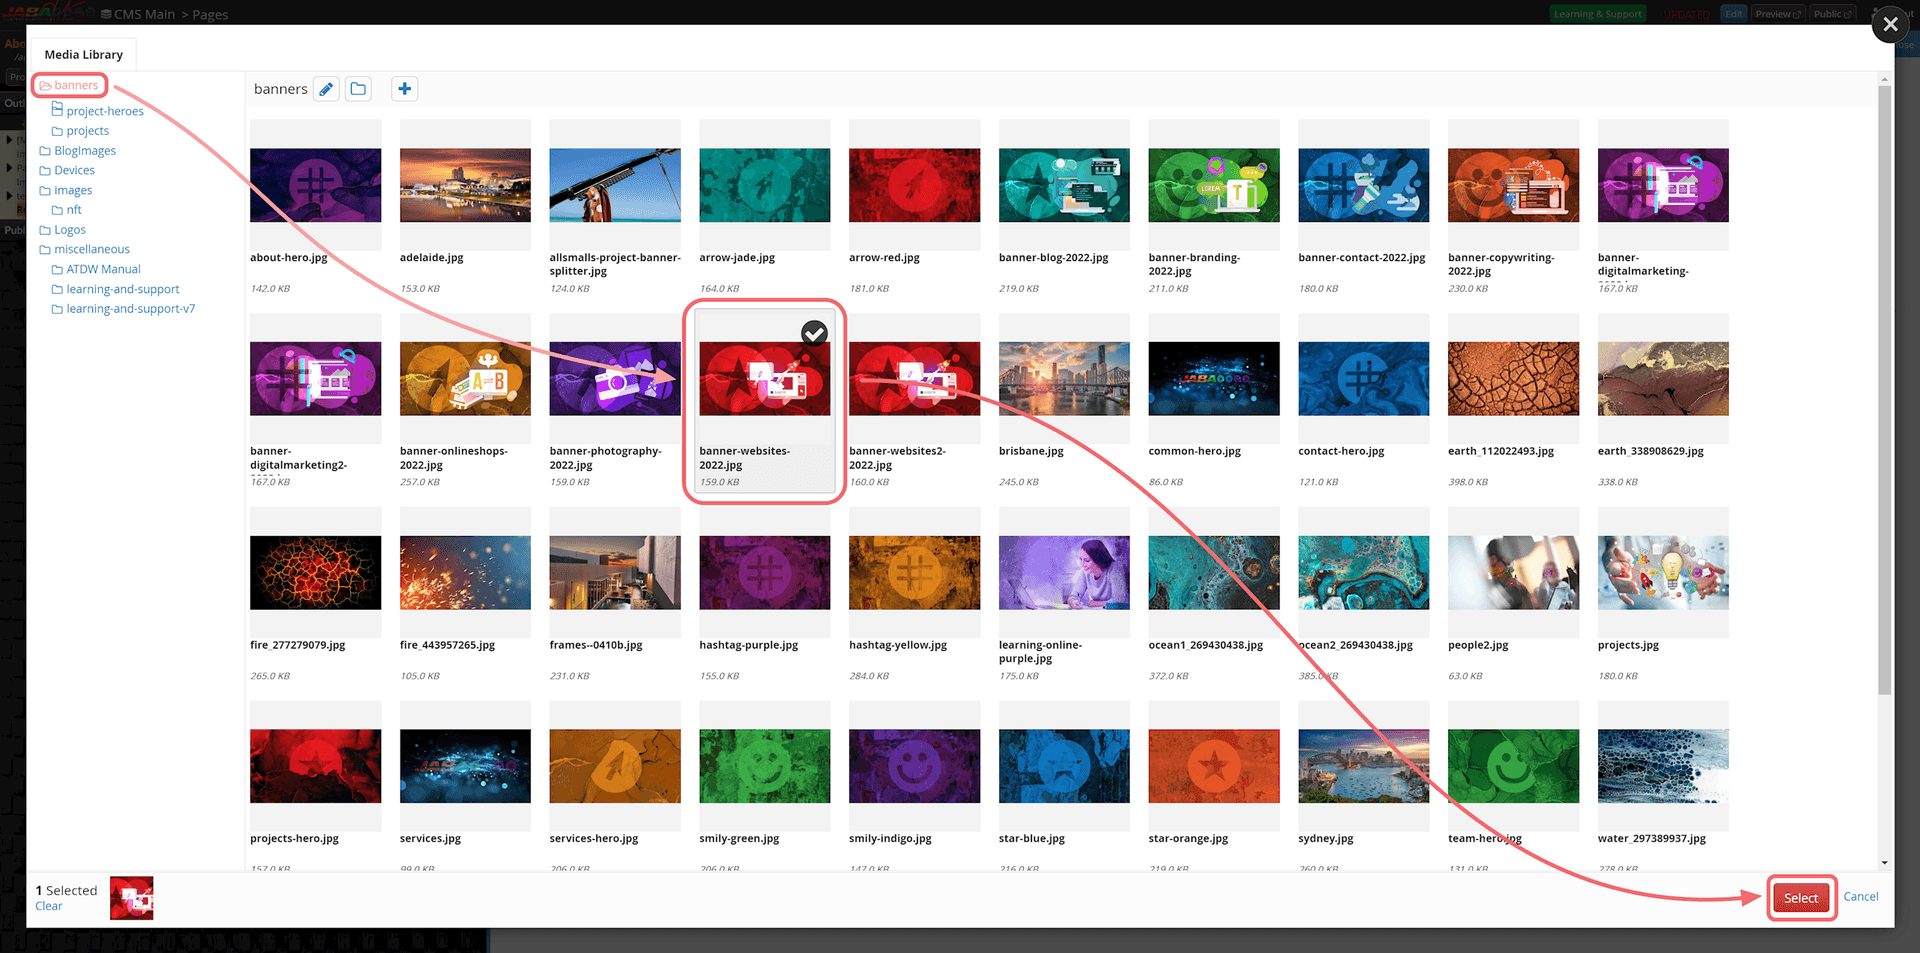
Select Single Banner Image.
- Select your desired banner height + position
- Select / Change an Image from the Open Media Library button
- Add any caption titles, captions or page links.
- Select Save
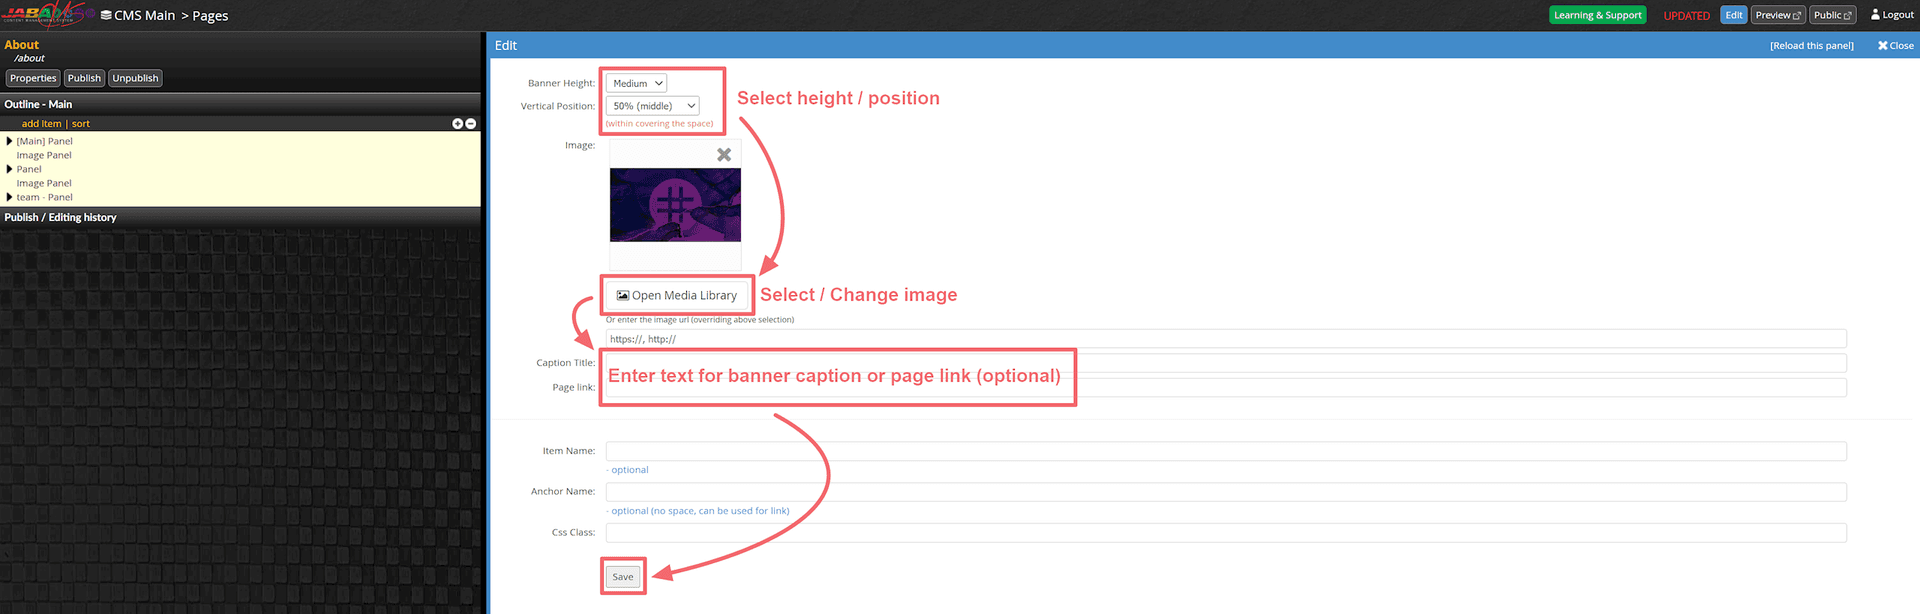
Set Up Single Banner
Image Panels (moving parallax banner images)
Image Panels have a similar process to the above rotating banners.
- Select Add Item
- Select Image Panel and name the item.
- Press Add

Add an Image Panel.
- Select Open Media Library and find and select the image you want to add.
- Press Select.
Select Image Panel Image.
- Select your desired height calculation
- Select Save
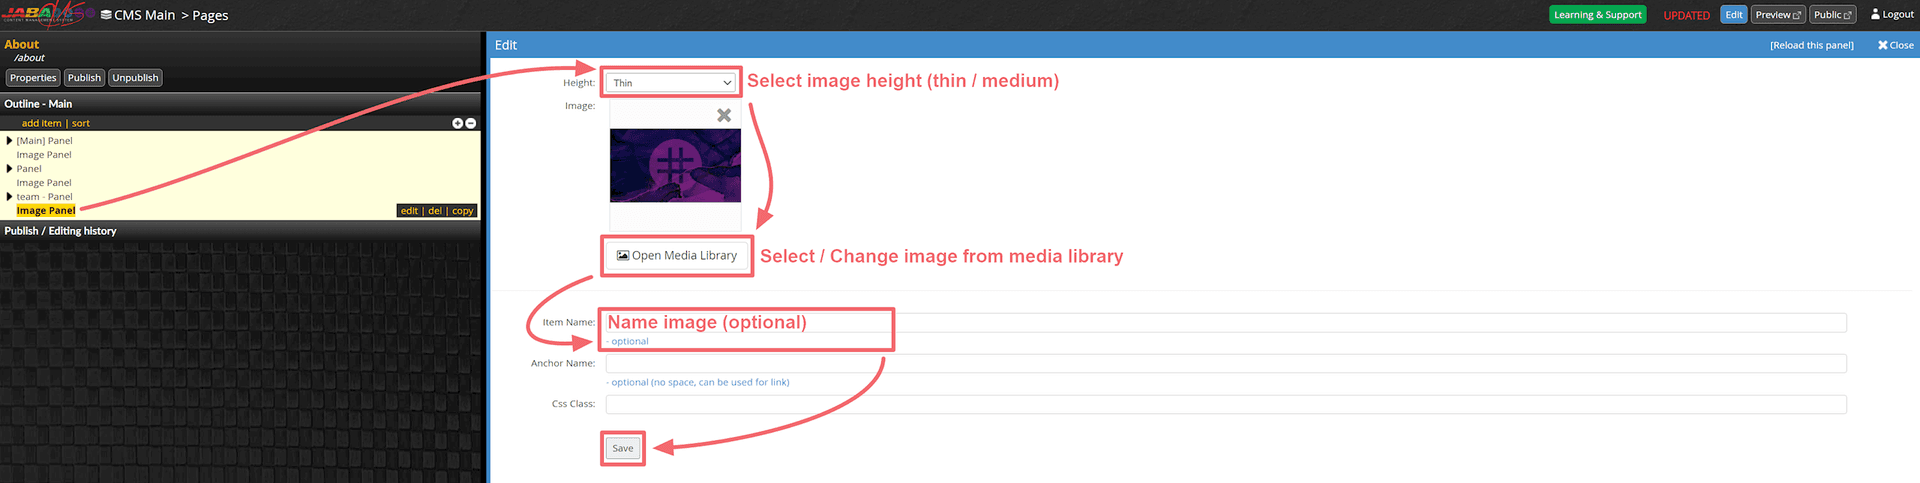
Set Up Image Banner.
Video Banners
Video Banners have a similar process to the above rotating banners.
- Select Add Item
- Select Video Panel and name the item.
- Press Add

Add Video Panel.
- Copy the URL of the YouTube video for the banner.

- Paste the URL of the YouTube video into Youtube URL or ID
- Press Save

Set Up Video Panel.
 Basic Text Formatting and Changes
You can edit, add and delete text on your website. The text is conveniently formatted in different settings such as headings and normal paragraph text so you can quickly and easily format your pages.
- For any body text, images and content on your website (such as galleries) you will need to have a main panel set up.
Add a Panel for Your Content
Choose the page from the CMS directory that you wish to add content to.
- Select Add Item on the top left panel.
- Select Panel.
- Give your panel an item name.
- Select Add.
- Your panel will now be added to the bottom of your page element on the left side of the screen.

Add a Panel for Your Content.
Now that you have added your panel you can edit it.
- Select your panel item on the left side so that it highlights yellow.
- Select Edit to add a background colour or texture to your panel if you wish.
- Select Save
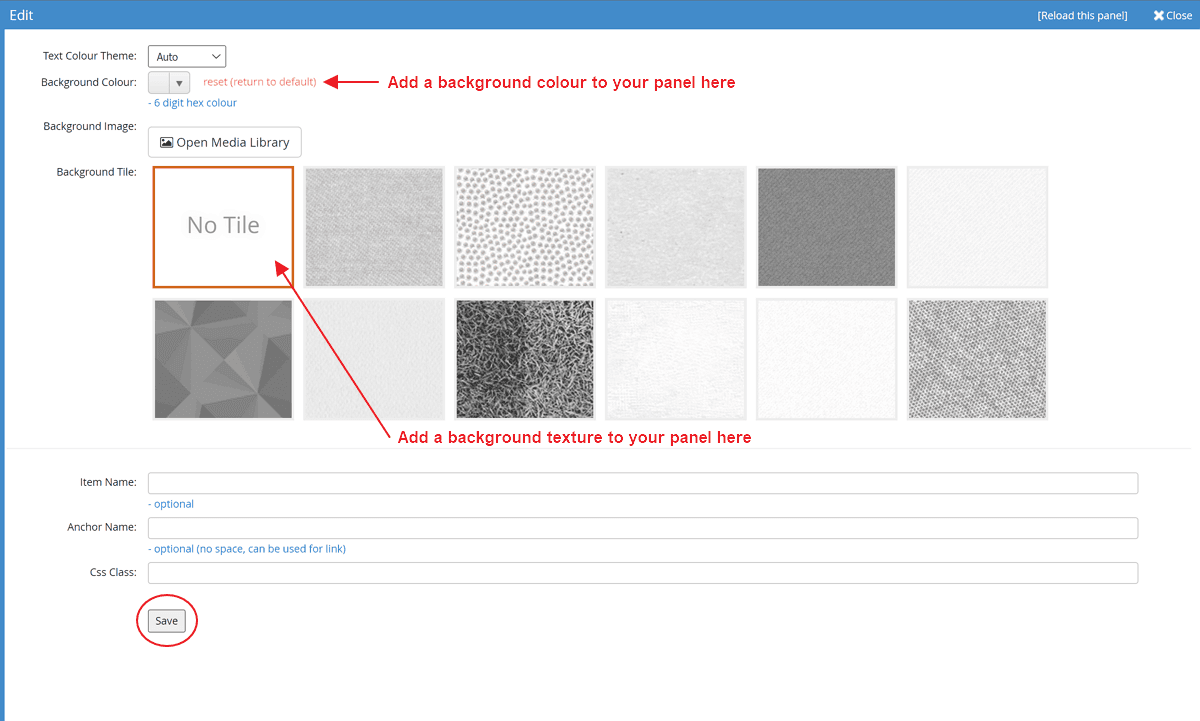
Edit You Content Panel.
Now that you have set up your panel you can and add various elements within the panel.
- Select your panel item on the left side so that it highlights yellow.
- Select Add to add a new content element.
- You can choose between a text panel, expandable panel, page tiles and photo gallery.
- To add text to your panel choose the Text element.
- Name the text item.
- Select Add
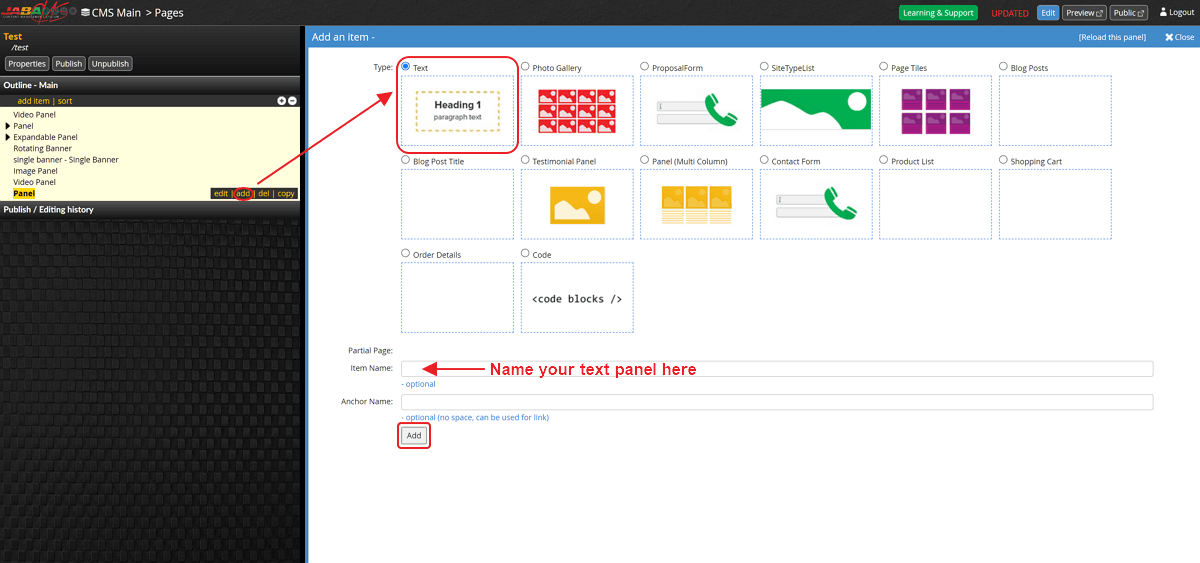
Add a Text Element Inside a Panel.
You can now use the text panel to add content to your page.
Adding / Editing Text
Choose the page from the CMS directory that you wish to edit text. To edit the text panel on the page you have selected, click on the text you wish to edit. A yellow dotted line will appear around the text box and a toolbar will appear directly above or below the text panel.
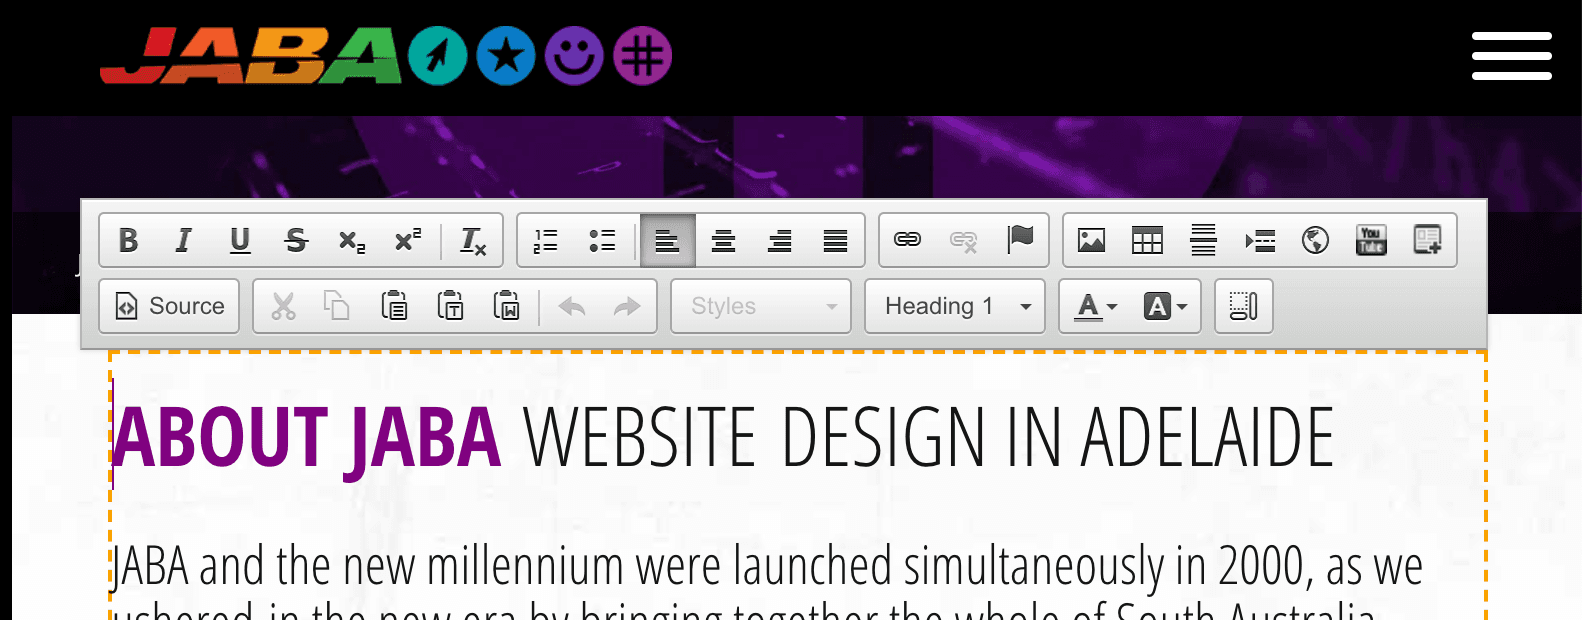
View of a Selected Text Panel and Toolbar.
The controls are similar to a word document. Begin typing the new text you wish to add or deleting the existing text you wish to remove.
- Once you have completed your changes, a button will appear in the top left saying "Save HTML"
- Press the "Save HTML" to finalise ALL changes. *Note: you must save or the changes will be lost!*
- You can also locate the text item in the panel on the left and manually save the text field individually.
- Publish your changes in the top left corner.
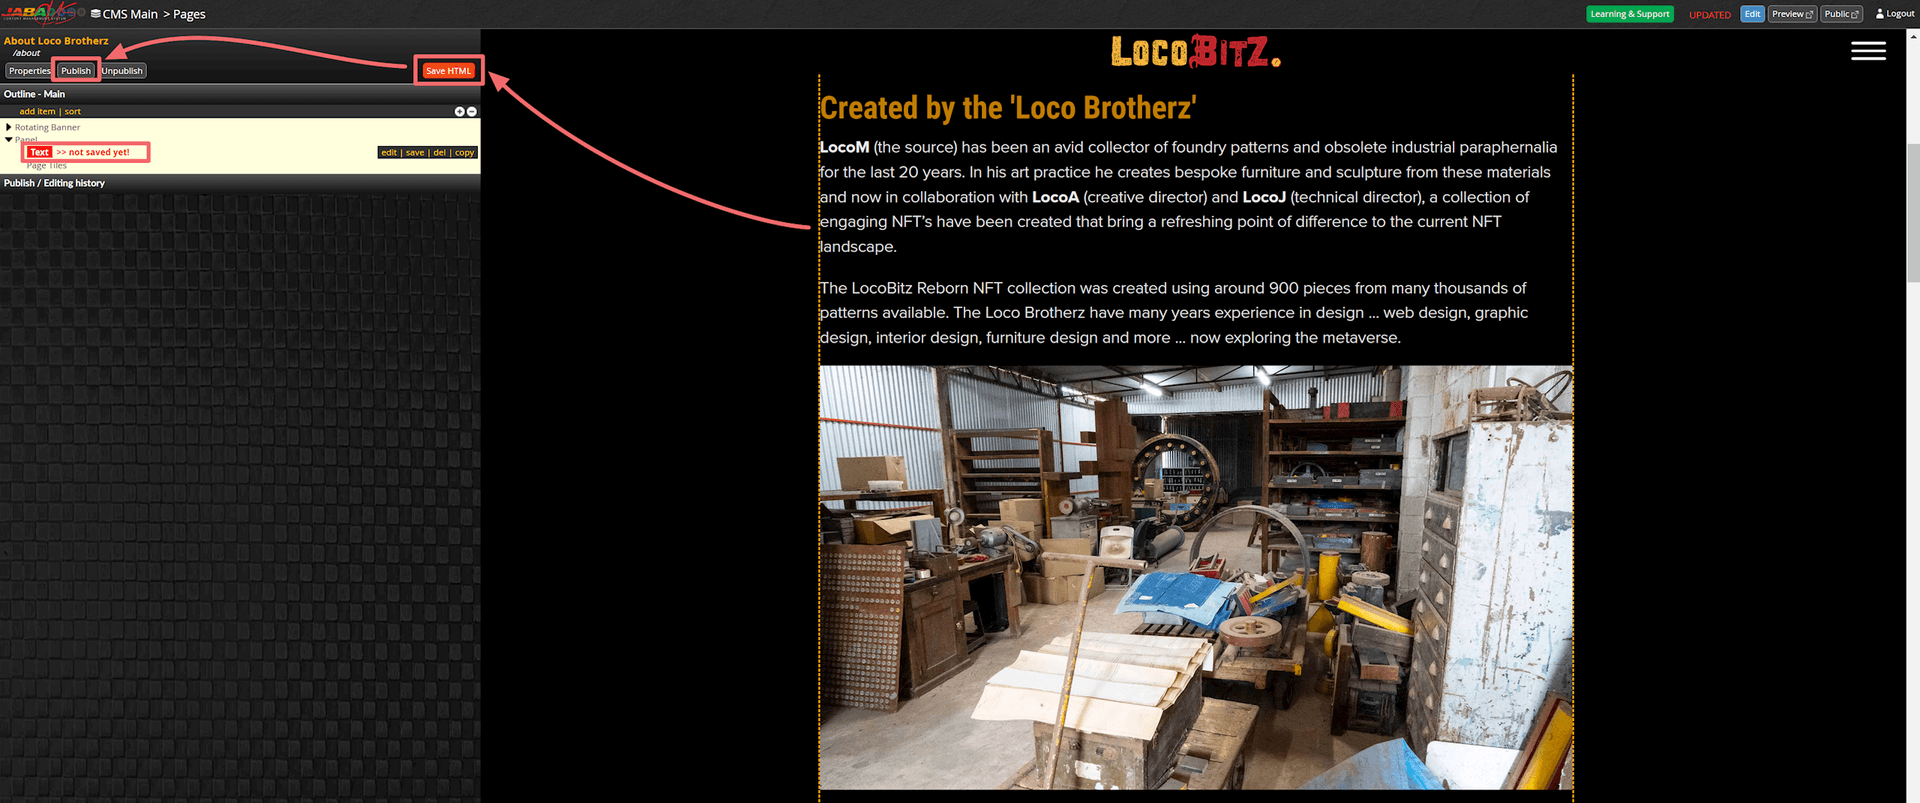
Save Your Edit Text Panel.
Website Content Formatting Toolbar
To format the text of your website, the editing toolbar can be utilised to make your website content easy to read for users and optiised for search engines.
Select any of the following functions from the tool bar to format your text content.
Headings and Paragraphs
- Format your text using the paragraph format settings for headings and body text.
*Please note only ONE heading 1 must be used at the top of every page.*
*You can use as many heading 2, 3, 4, 5 and 6 as you wish.* - Select your text that you want to be a heading and then choose the heading from the Format drop down menu.
- Save your text panel.
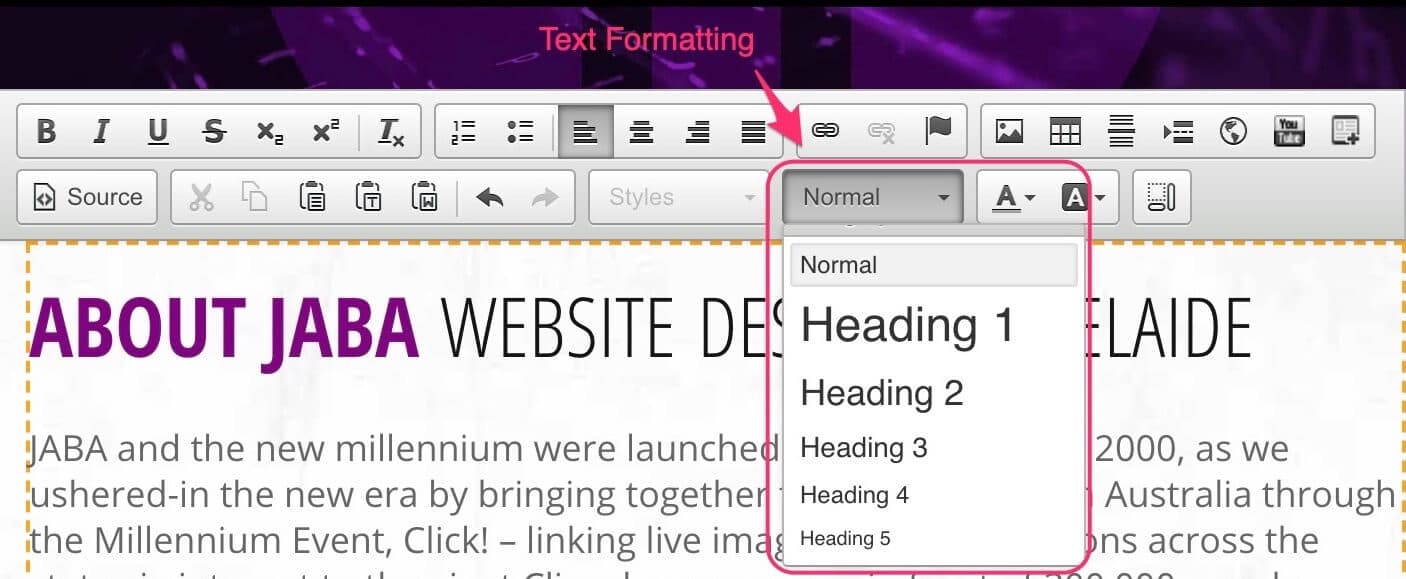
You can also use the toolbar to do the following:
-
Bolding

-
Italics

-
Underline

- Scorethrough

-
Subscript

-
Superscript

- Numbered list

-
Bullet points

- Alignment left, right, central and block (justify)




- Hyperlink

- Unlink

- Anchor

- Image

- Horizontal Line

- iframe

- YouTube Video Embed

- Embed

- Paste Text From Document

- Styles: Button
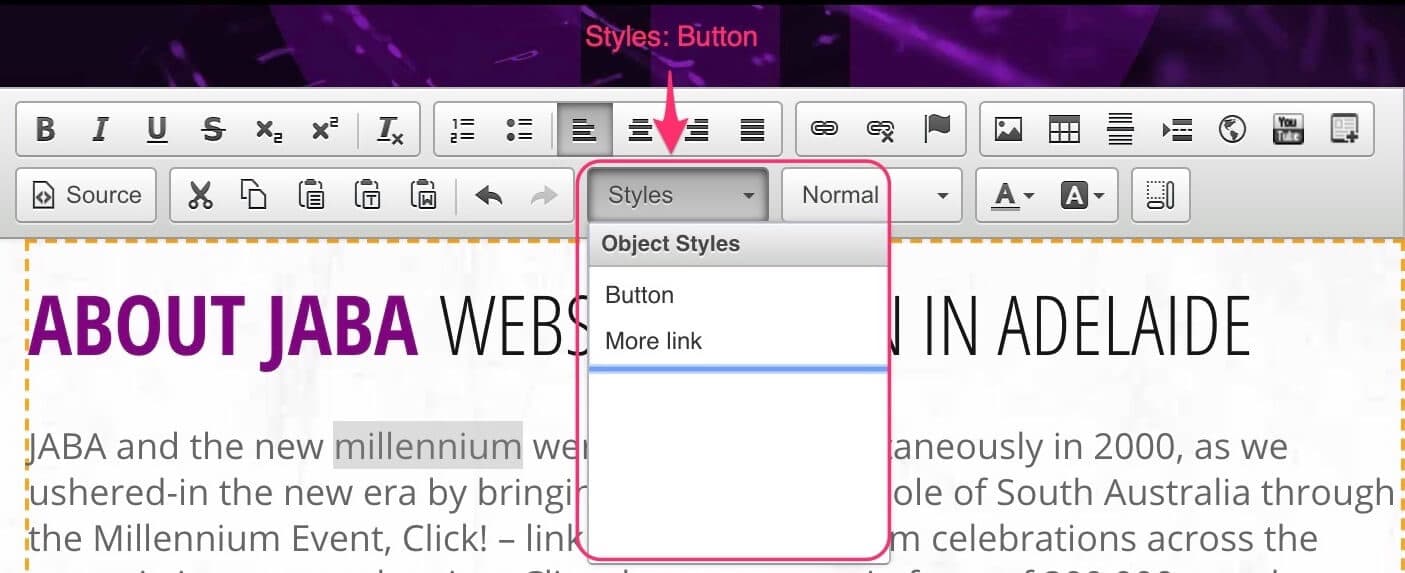
- Text Formatting
.jpeg&w=1920&q=75)
- Text Colour

- Text Background Colour

 Previewing and Publishing Pages
You can preview your page changes before making them live on your website. You will also need to publish a page for the public to be able to view the changes you have made. You can use the preview/publish tool to help with this.
Preview Changes
Once you have finished making changes to your website and saved these changes, you are able to preview how these changes will appear before the public can see them. The preview tool can be utilised to help guide your changes.
- Select the Preview button in the top right corner of the screen to preview the changes inside the CMS page you are editing.
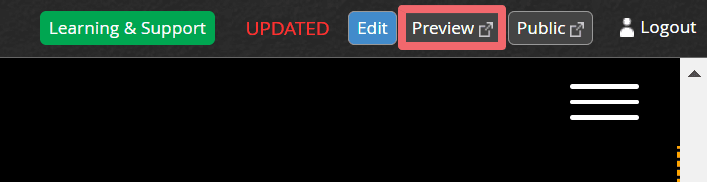
Select the Preview Button
- Select the Public tab once published to see the changes and current live site/page in a new tab in your browser.
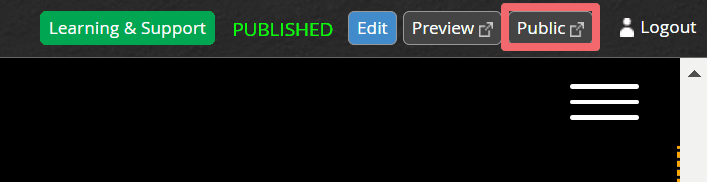
Select the Public Button
Publishing Pages
Once you are happy with your changes and you have previewed them to ensure they are correct and look good, you can publish the page in the top left corner of the screen.
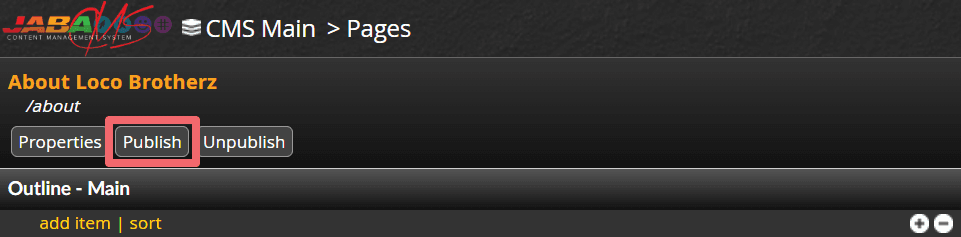
Publish a Page
- A pop up box will appear asking you to confirm the changes. Press OK.
To find out if the page is Published or not, you can verify in the top right corner. There are four potential options for a website page status:
- Published

- Unpublished

- Updated

- New/Updated

Previewing Published Pages
You can preview published changes by selecting the Public button in the top right corner of the screen to see the changes inside the CMS page you are editing.
Select the Public Button
Unpublish a Page
You can unpublish a page if you no longer want it to be published.
- To unpublish your webpage, select Unpublish button in the top left corner of the screen.
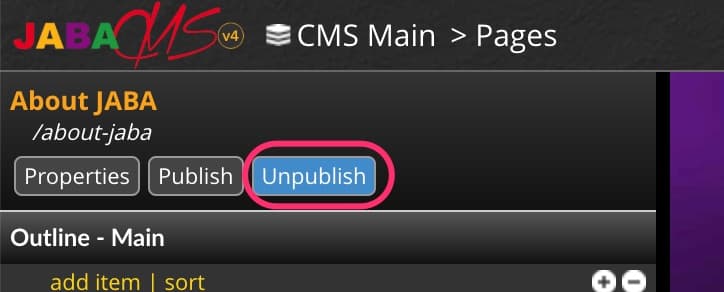
Unpublish a Page
- A pop up box will appear asking you to confirm the changes. Press OK.
- You can verify your page status by checking the top right corner. If it says "UNPUBLISHED" then the change has been applied.
 Image Galleries
Create an image gallery to visually demonstrate your library of images on the same webpage for users to scroll through.
Begin by uploading all your gallery images to your CMS Media Library. You can see the tutorial on Uploading Images to the Media Library if you need assistance.
We highly recommend you creating a new folder for your gallery so all your media is sorted into the right place and easy to find. You can see the tutorial on Creating a New Folder in the Media Library if you need assistance.
Once your images are uploaded, select the page from the CMS directory that you could like to put your gallery on.
- Select the Panel you would like to add the photo gallery to.
- On the selected panel that is highlighted yellow, select add.
- Select Photo Gallery.
- Give the photo gallery an item name.
- Select Add
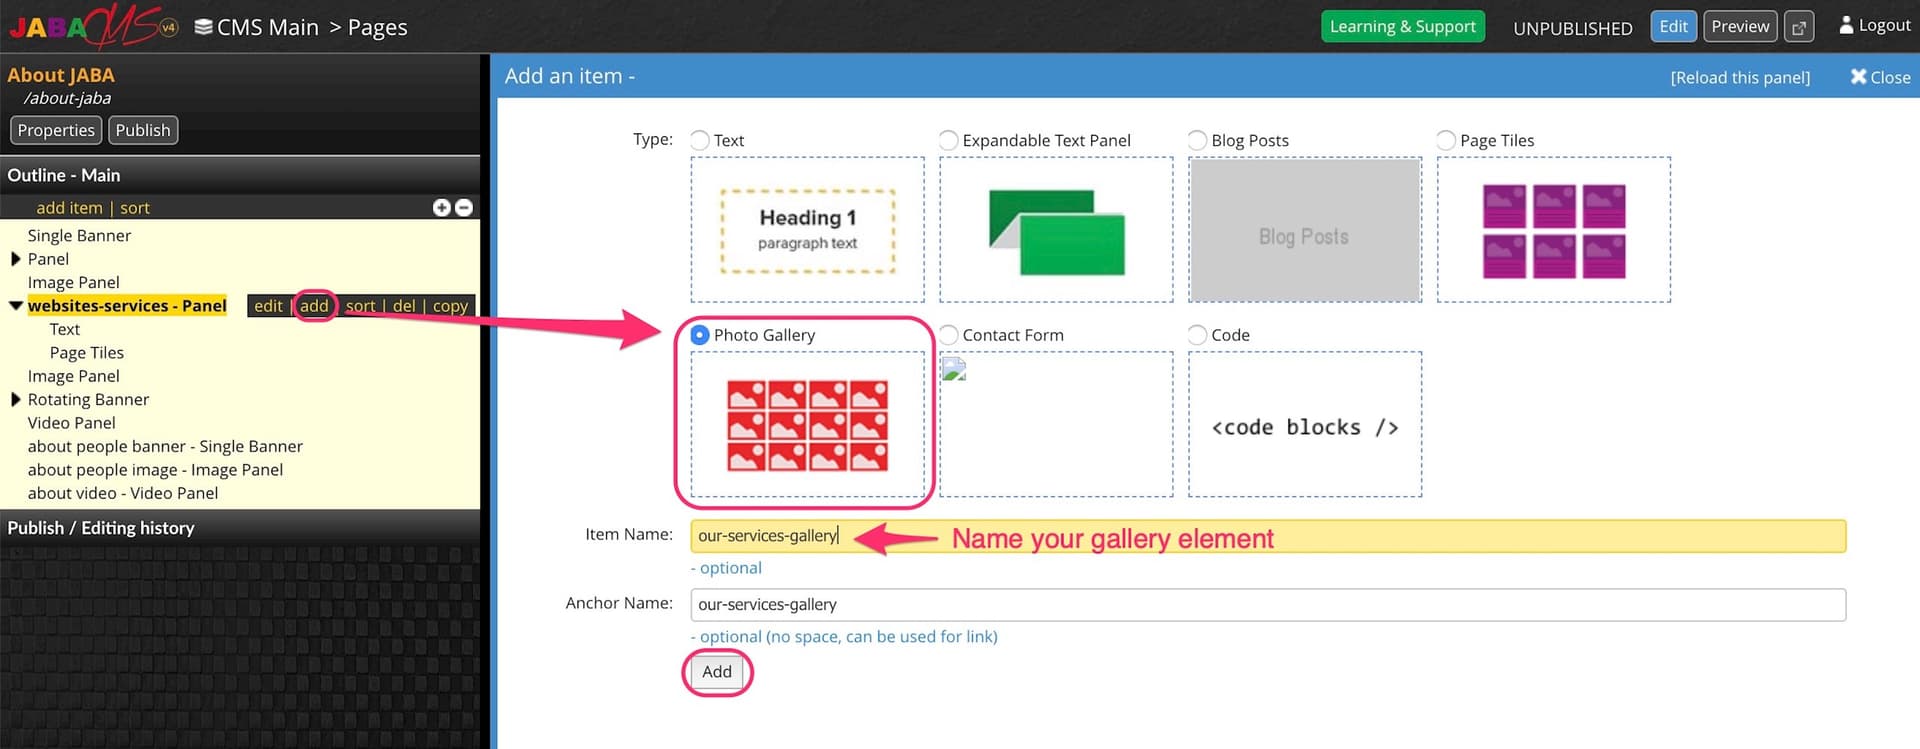
Add Photo Gallery Element
- Select the Open Media Library button.
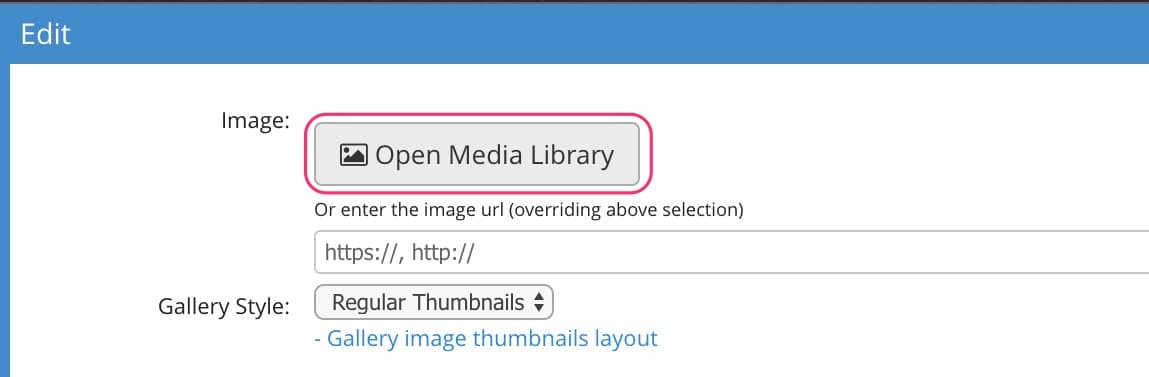
- Locate the folder where your image gallery images are uploaded.
- Select multiple photos you wish to add to the gallery. You can also use the Select All button if you wish to use the whole folder of images.
- Press Select
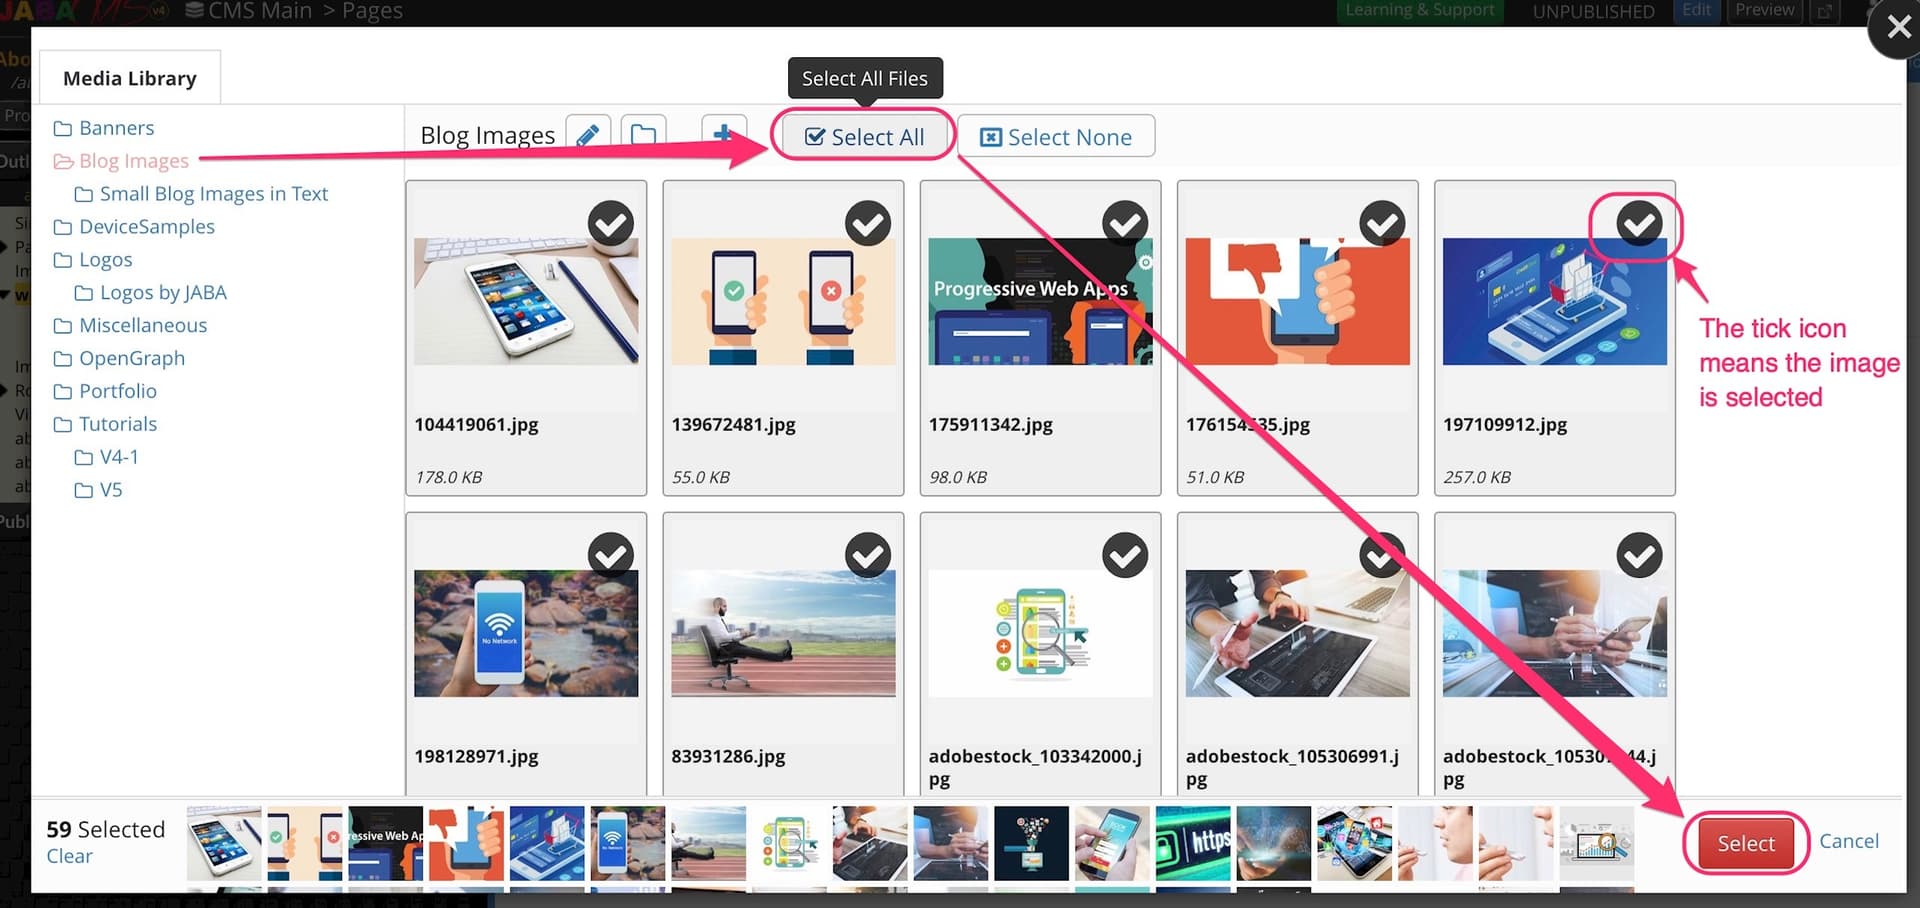
Select Photo Gallery Images
- You can name the gallery if you would like.
- If you want to re order images, remove an image by pressing the "X" and re add in order you would like.
- Select Save
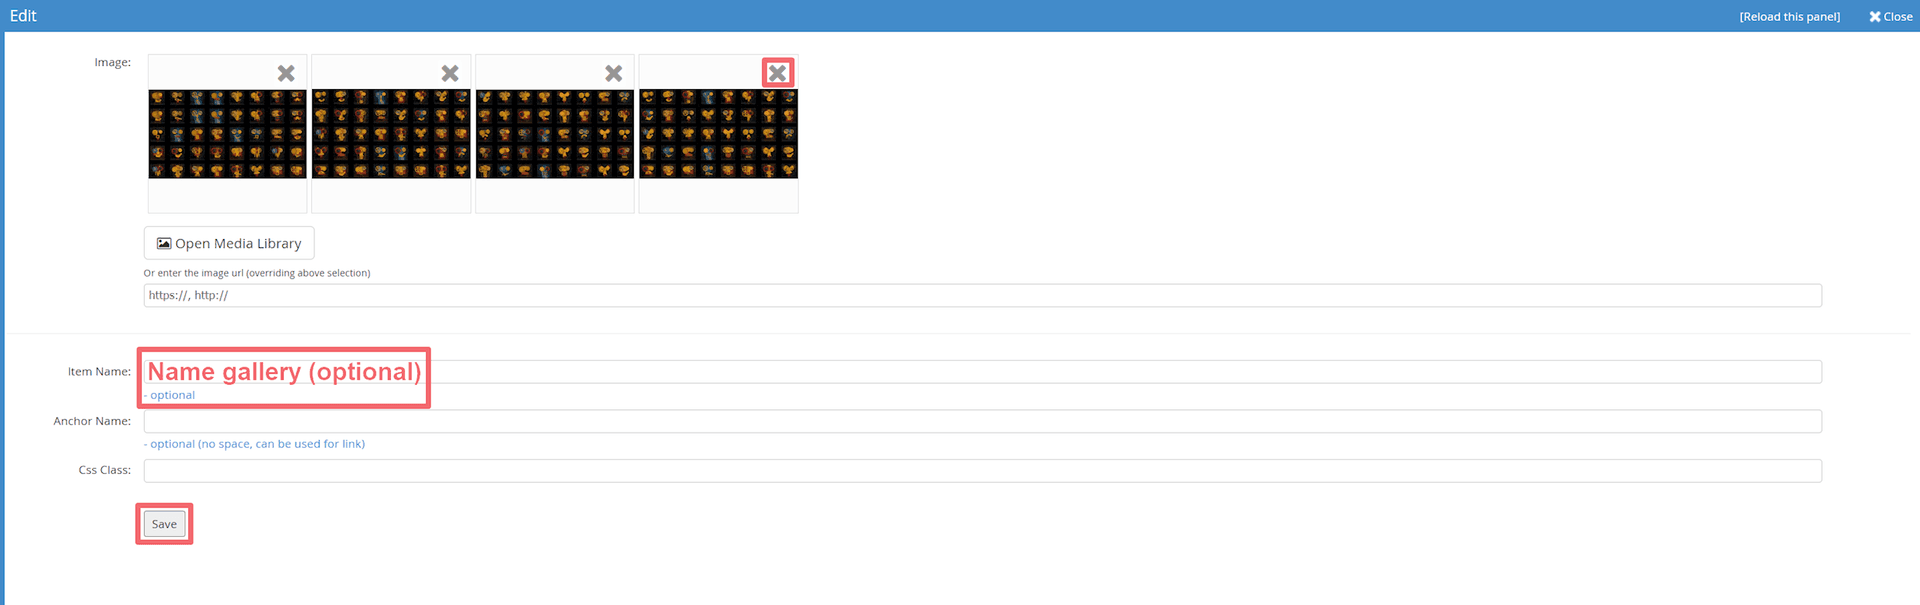
Choose Photo Gallery Options
- Publish your page to make the gallery available to the public.
 Changing Page Tiles and Removing Page Tiles
Learn how to remove or add page tiles on an existing page.
To learn how to edit the page tile images, titles or text see editing page tiles and meta data in the advanced functions section below.
Choose the page from the CMS directory that you want to change or add the tiles.
Adding a Tile Element
If you want to add a set of tiles to a page you can do so by selecting the panel you want to add the tiles to and selecting add item.
- Select Page Tiles.
- Name the tile panel in the Item Name field.
- Select Add.
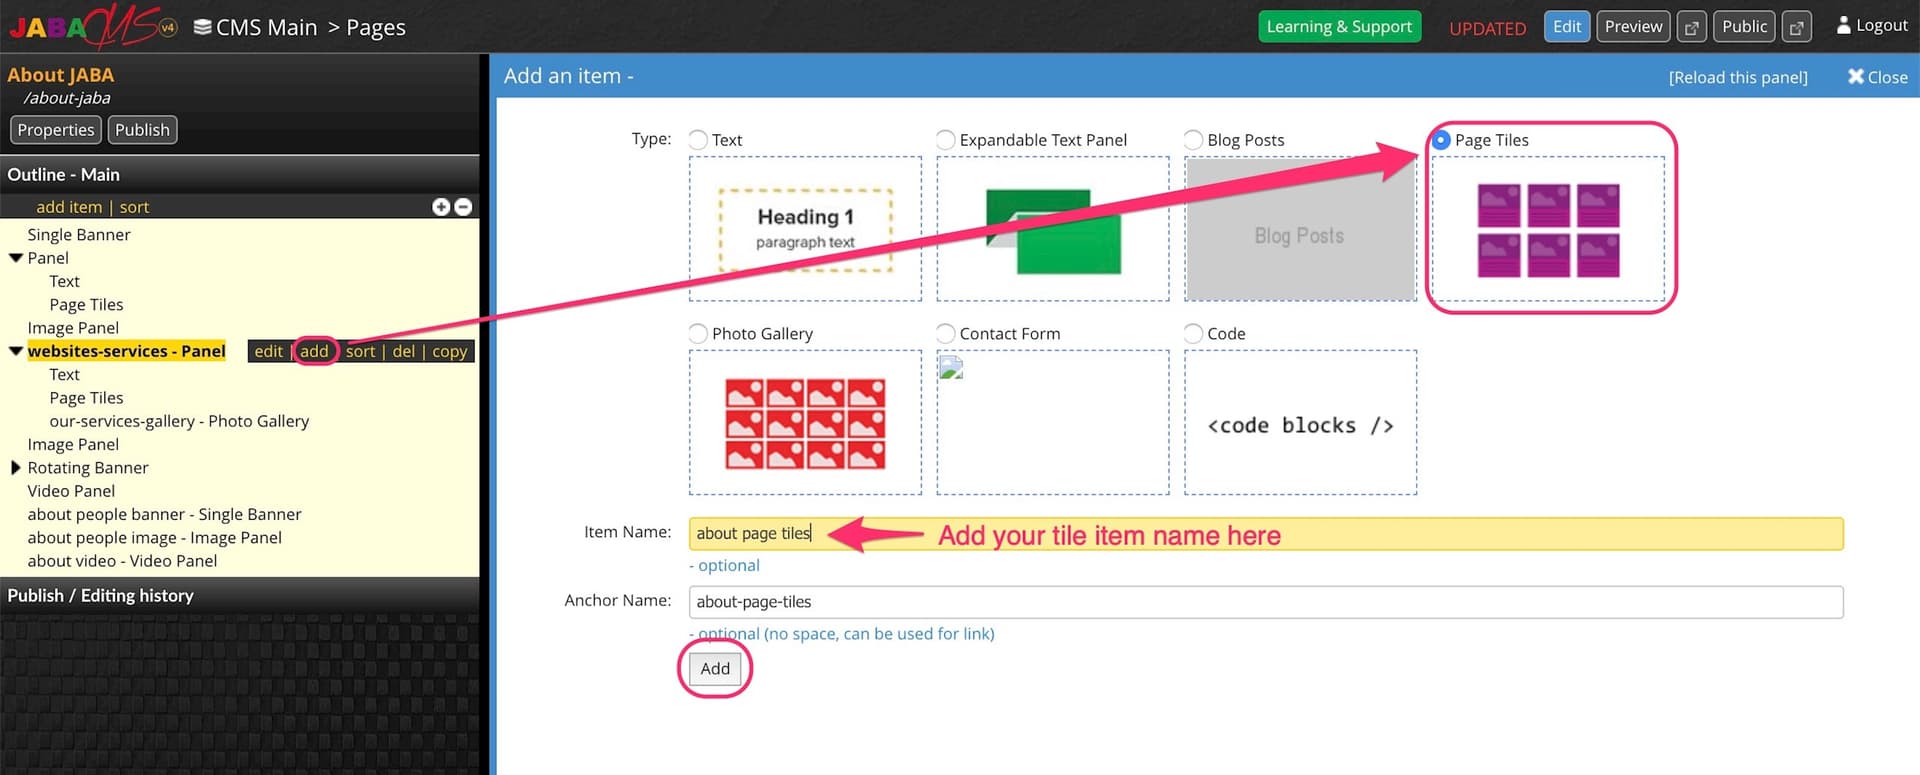
Add Page Tile Element
Adding Tiles
A panel will open up with two lists. The left side shows the currently selected tiles from first to last position on the webpage. The right side shows the directory of all your websites pages.
- To add a tile to the page, find your page on the right hand list.
Note: you can use the search box to find a page or previous and next buttons to see more. - Select the page you want to add.
- It will appear in the left side list.
- When you are done adding page tile select Save.
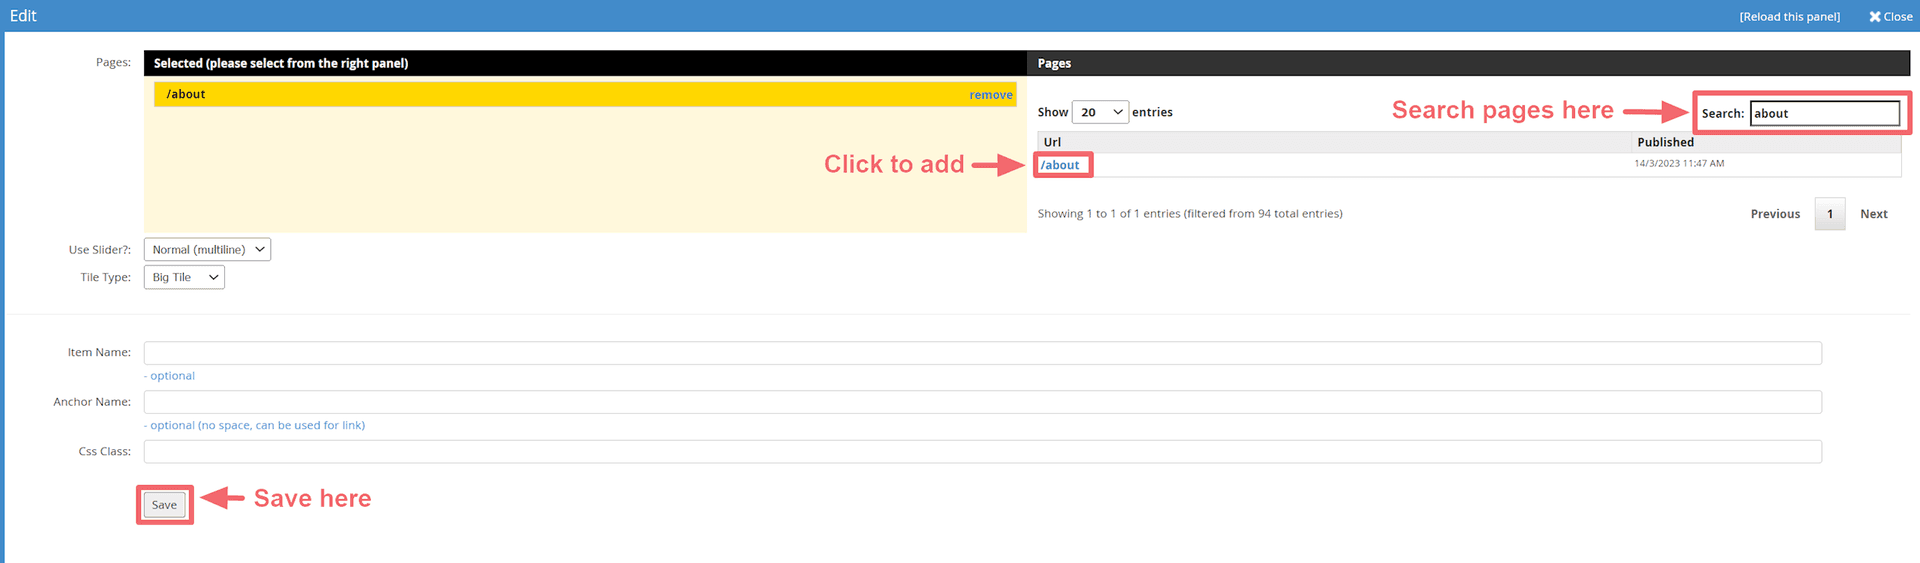
Add Page Tiles to a Page
Sorting Tiles
- To sort the tile position press, hold and drag the tile on the left side list to its correct position.
- When the tiles are in the correct position, press Save.
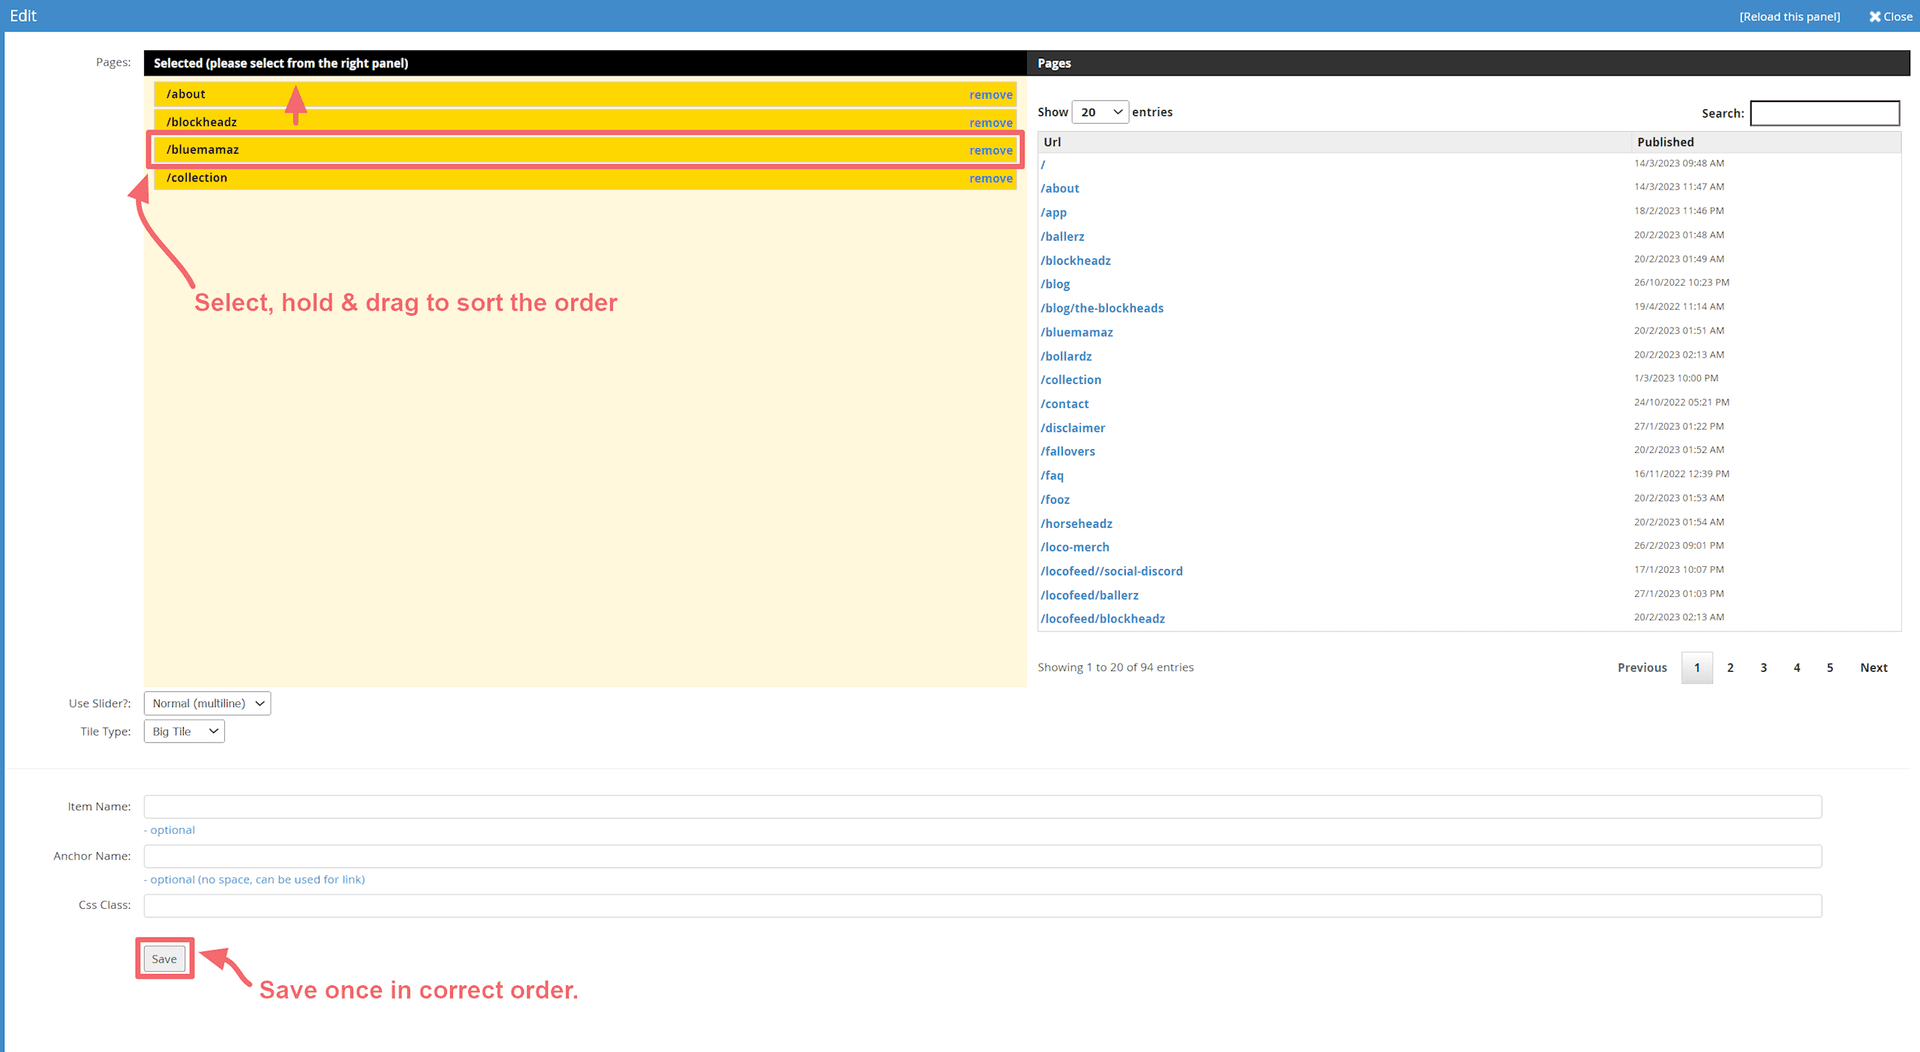
Sorting Page Tiles
Removing Tiles
- To remove a tile click the remove button next to the tile name in the left side column.
- When the tiles are correct, press Save.
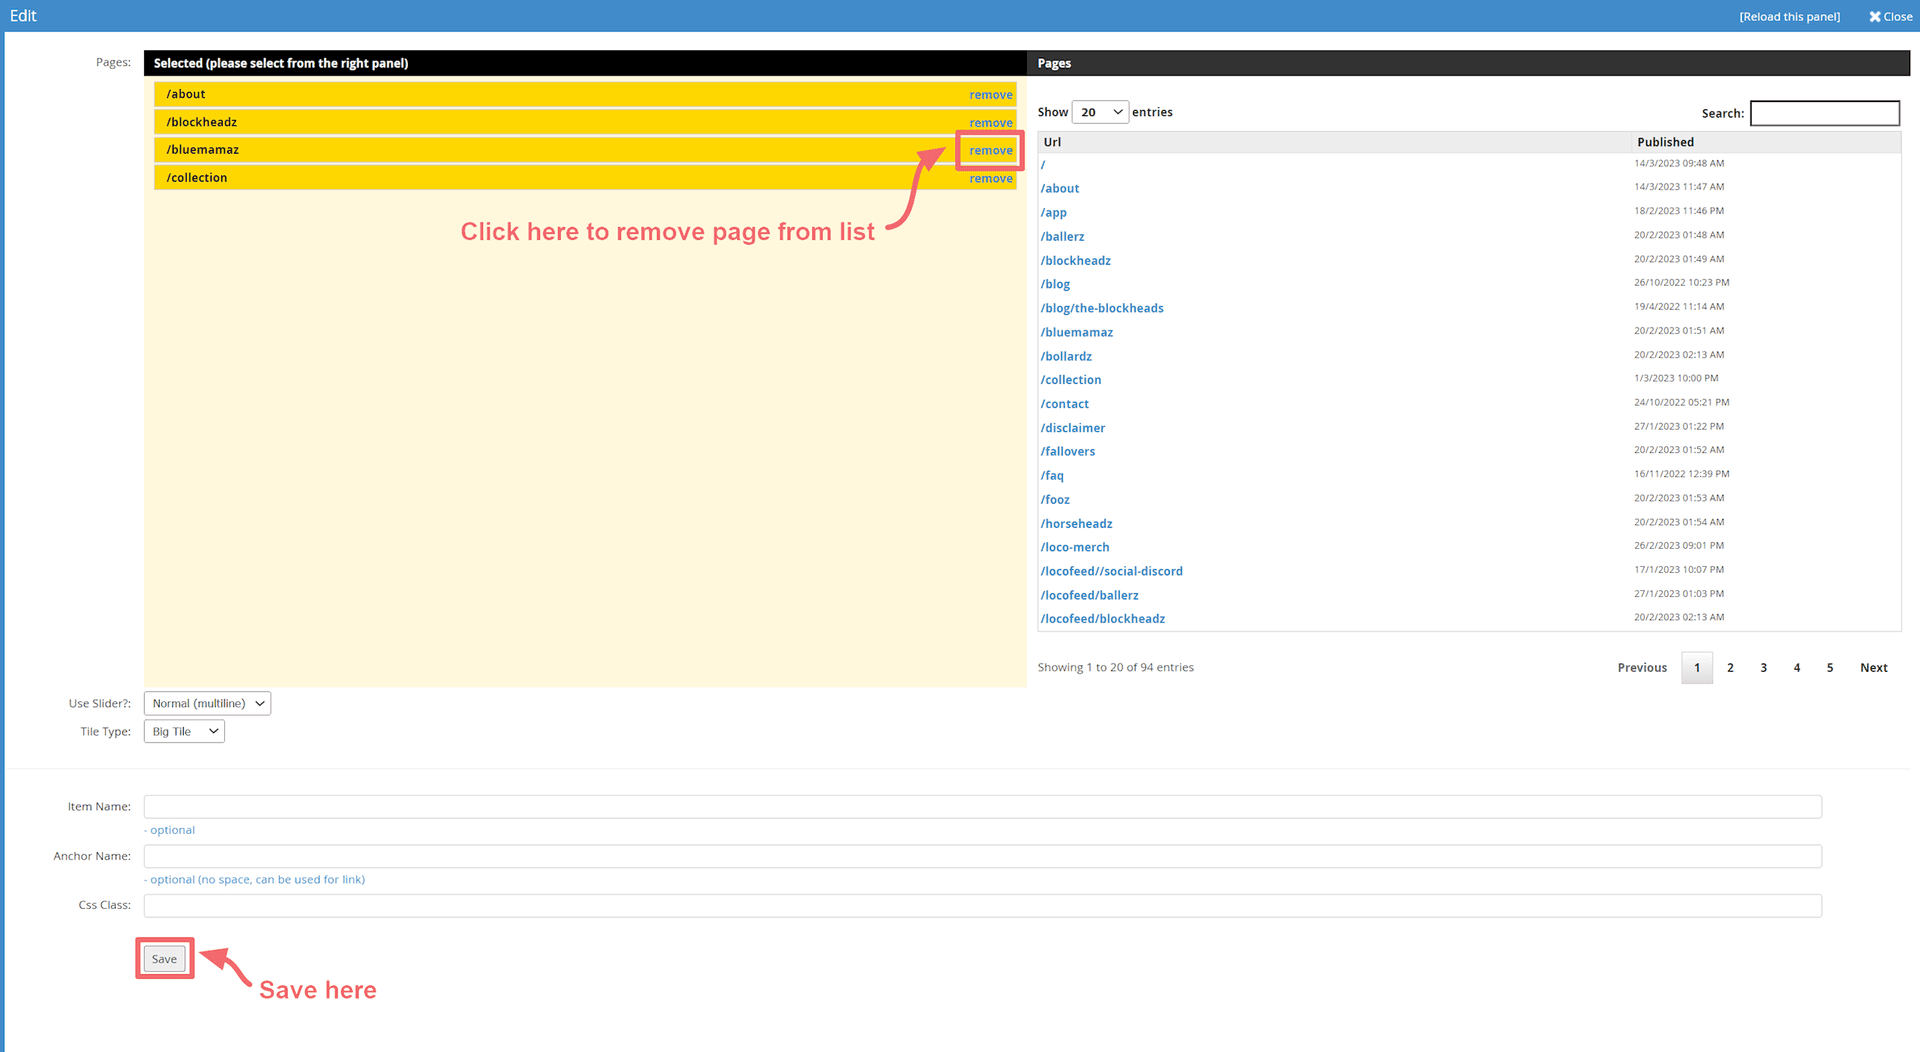
Removing Page Tiles
 Adding Multi Columns
Learn how to add a multi column panel to your website. You can also manage the number of panels within the multi column.
Choose the page from the CMS directory that you want add a multi column content panel to.
- Select add item in the top left corner.
- Select Panel (Multi Column).
- Enter an item name for your multi column panel.
- Select Add.
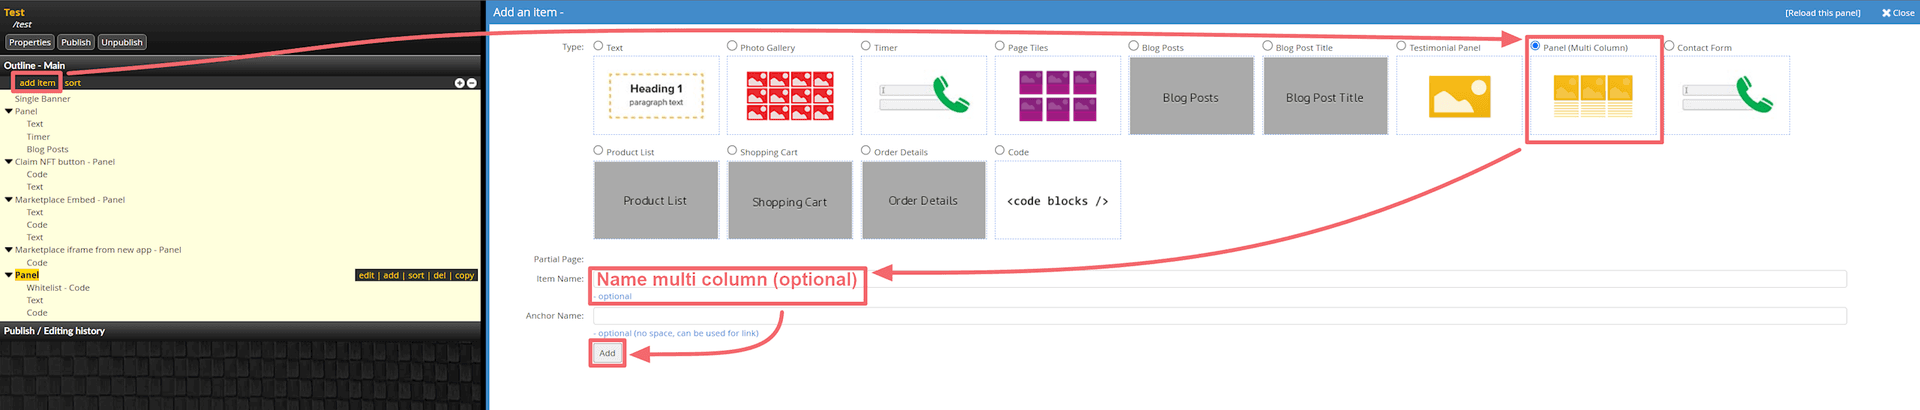
Add Multi Column Element
- You can add a background colour or texture to the multi column panel.
- Choose the ratio for your multi column.
E.g. 4:4:4 (Three columns) makes your panel display with 3 even text boxes across. When you go down to a smaller device they will stack. - Select Save.
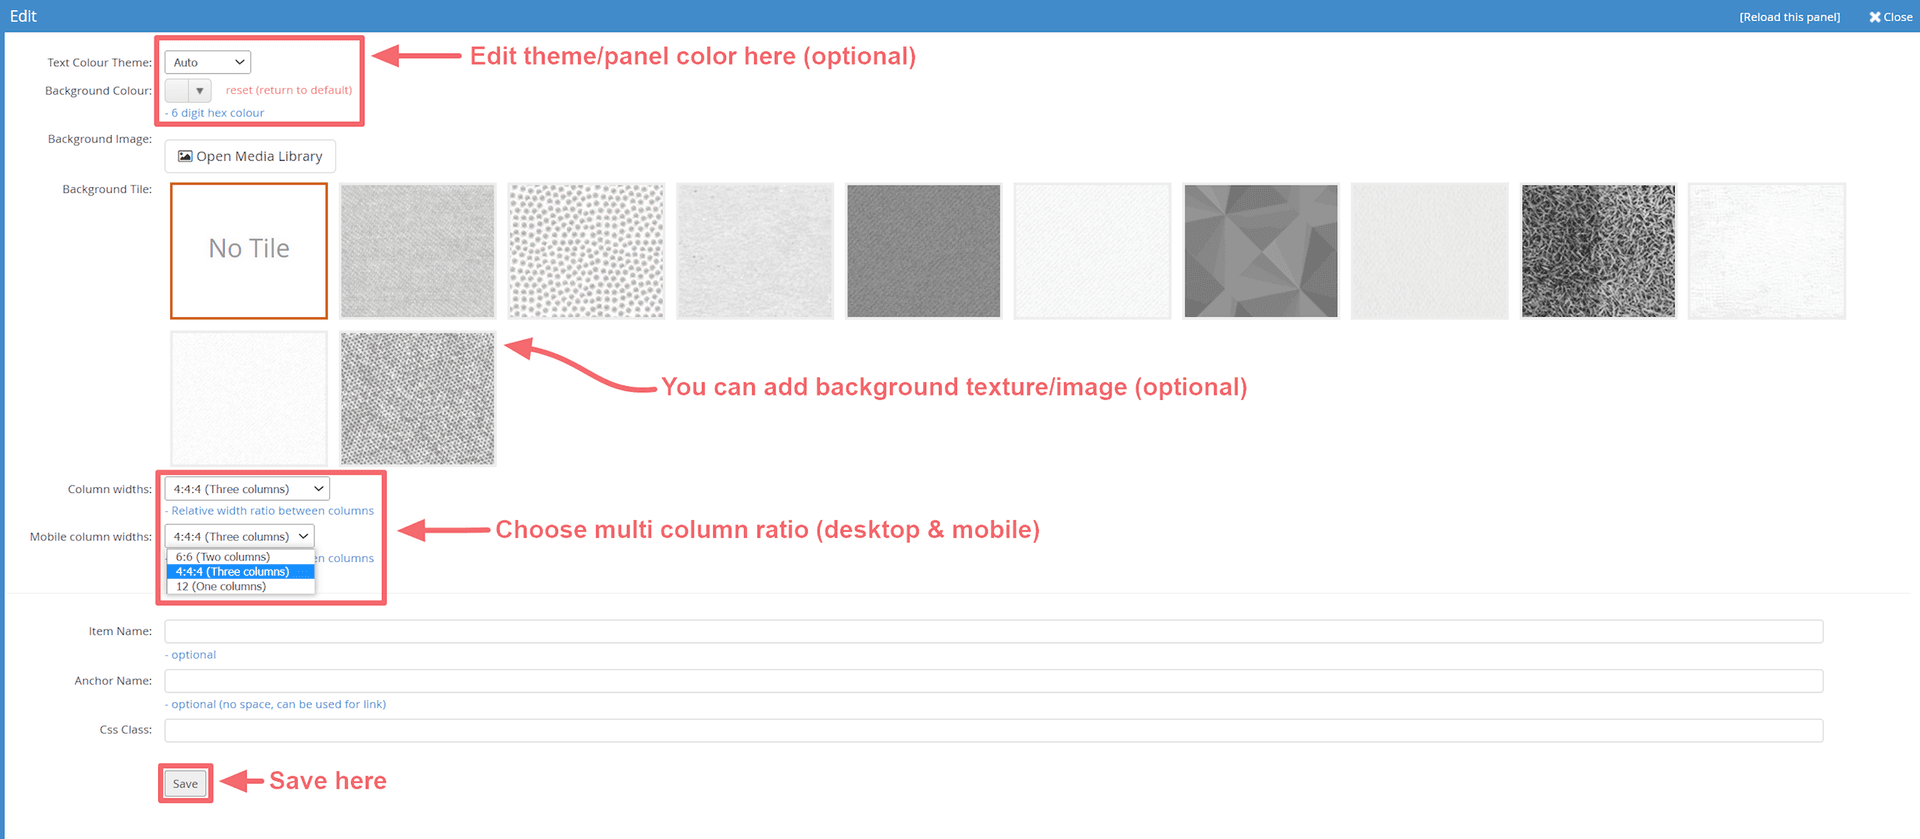
Set Up Your Multi Column Panel
You can edit your multi columm ratios at any time by selecting the multicolumn panel and selecting Edit.
The following ration options are available:
- 2:10, 3:9, 4:8, 5:7 and 6:6 provide different ratios for Two Columns.
- 3:6:3 and 4:4:4 provide different ratios for Three Columns
- 3:3:3:3 provides the ratio for Four Columns
- 2:2:2:2:2 provides the ratio for Six Columns
Once you have chosen your desired ratio size, select Save.
Add Text Elements to Your Multi Column to Add Content
Once you have created your multi column panel you will need to add the text elements to build the multi column.
- Click on the multi column panel you just added in the left side panel so that it highlights yellow.
- Select Add on the highlighted panel element.
- Select Text, name your item and select Add.
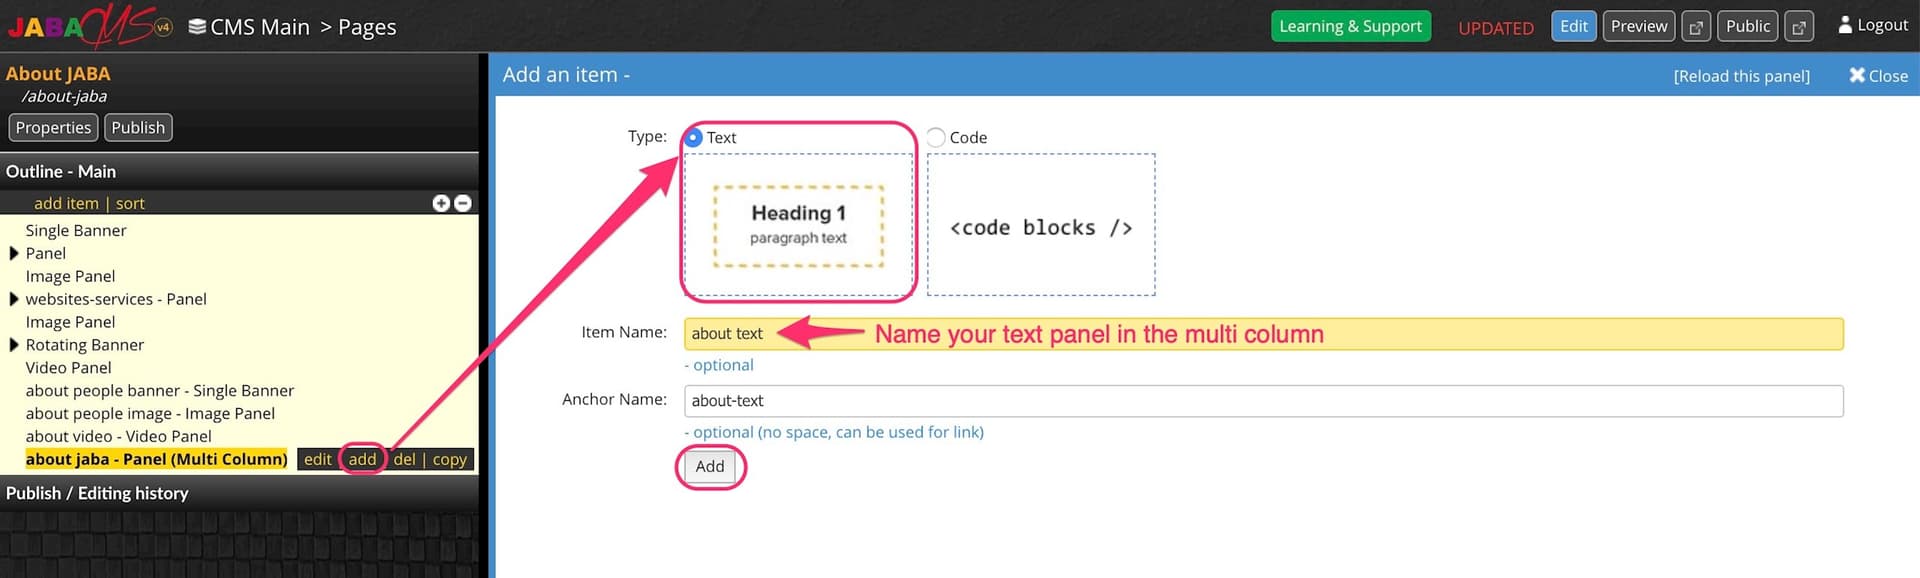
Add Text Element to Multi Column
- Repeat these steps for as many text panels as you want in your multi column panel.
- Enter the text, images and other content you wish to display in these panels.
Note: Remember to save each text panel as you add content, otherwise the changes will be lost.

Content Management System Tutorials
Advanced Functions for JABA CMS Version 7
Learn how to add links, update meta data, update the menu, update the contact form and much more by following the below tutorials. You can learn the basic functions above. If you need any further assistance, you can call the friendly team at JABA on 08 8232 2655 from Monday to Friday, 9am to 5pm (ACST time) and we will walk you through any changes you need to make to your website via the CMS.
 Editing your Website Menu
Edit your website menu to help users find what they're looking for on your website.
Select Menu from the left panel in the CMS main directory.
Edit an Existing Menu Item
- Select the menu item on the right that you want to edit. It will highlight yellow.
- You can edit the title of your menu item on the far right.
- You can choose Select Page on the far right under URL to open a list of all web pages in your CMS.
- Select the page you would like the menu item to link to.
- Once you have made all your desired changes to the menu select Save.
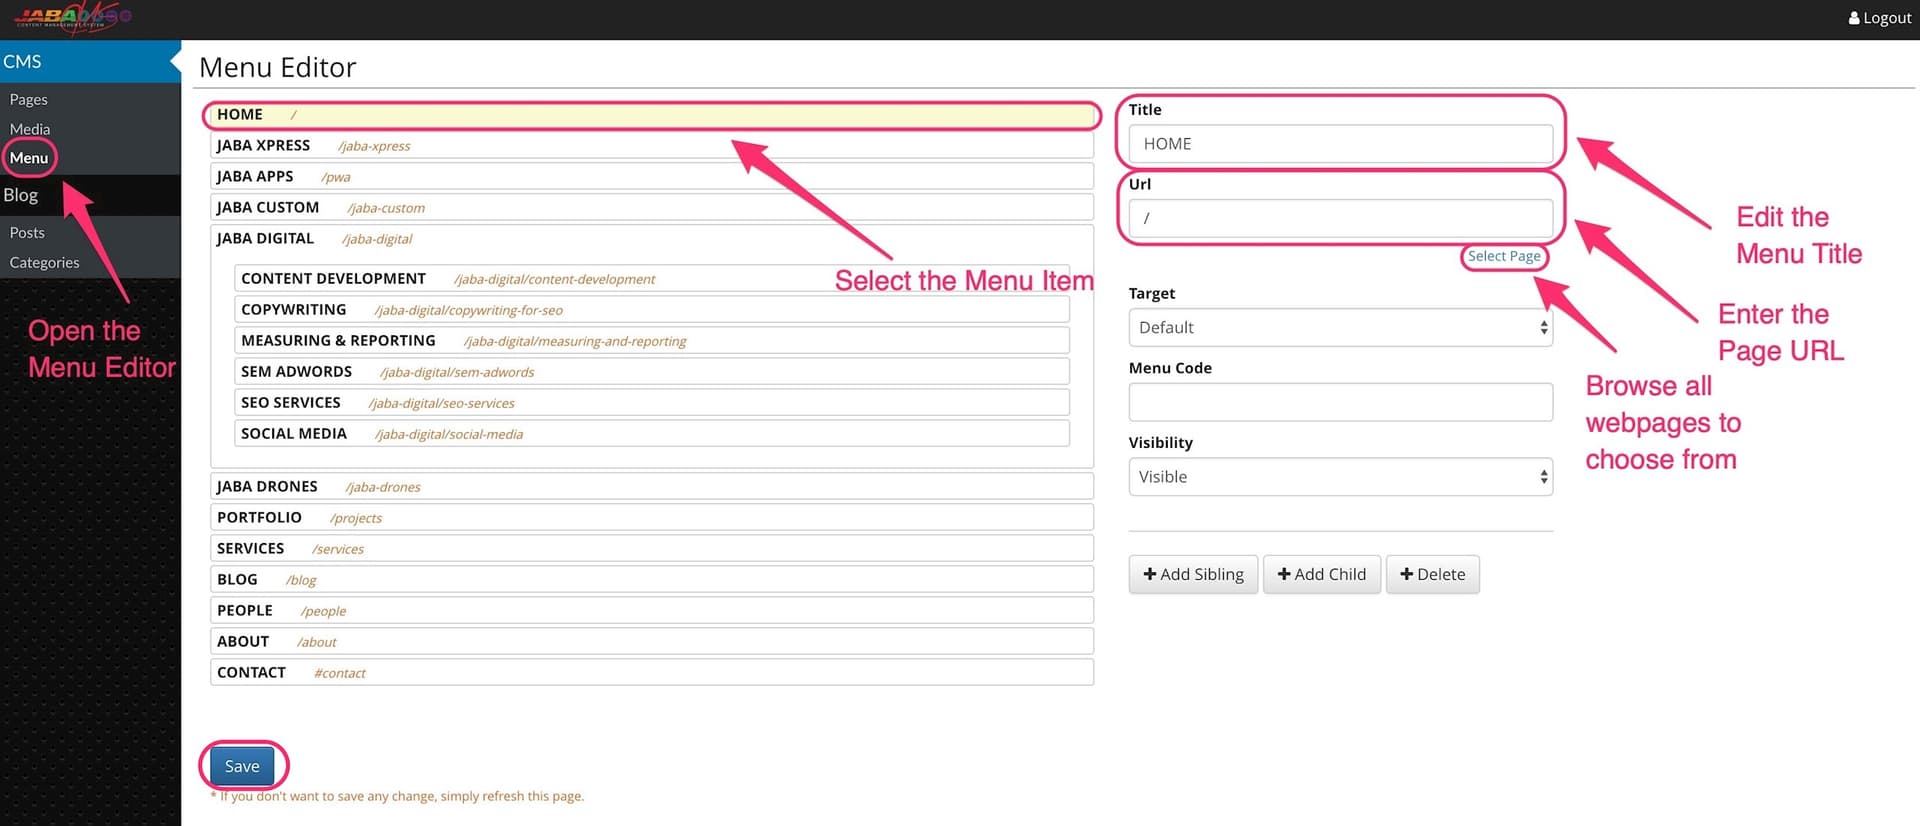
Edit Your Website Menu
Adding a New Menu Item
- To add a new menu item, select an existing menu item.
- Select + Add Sibling to add a menu item under the existing menu structure.
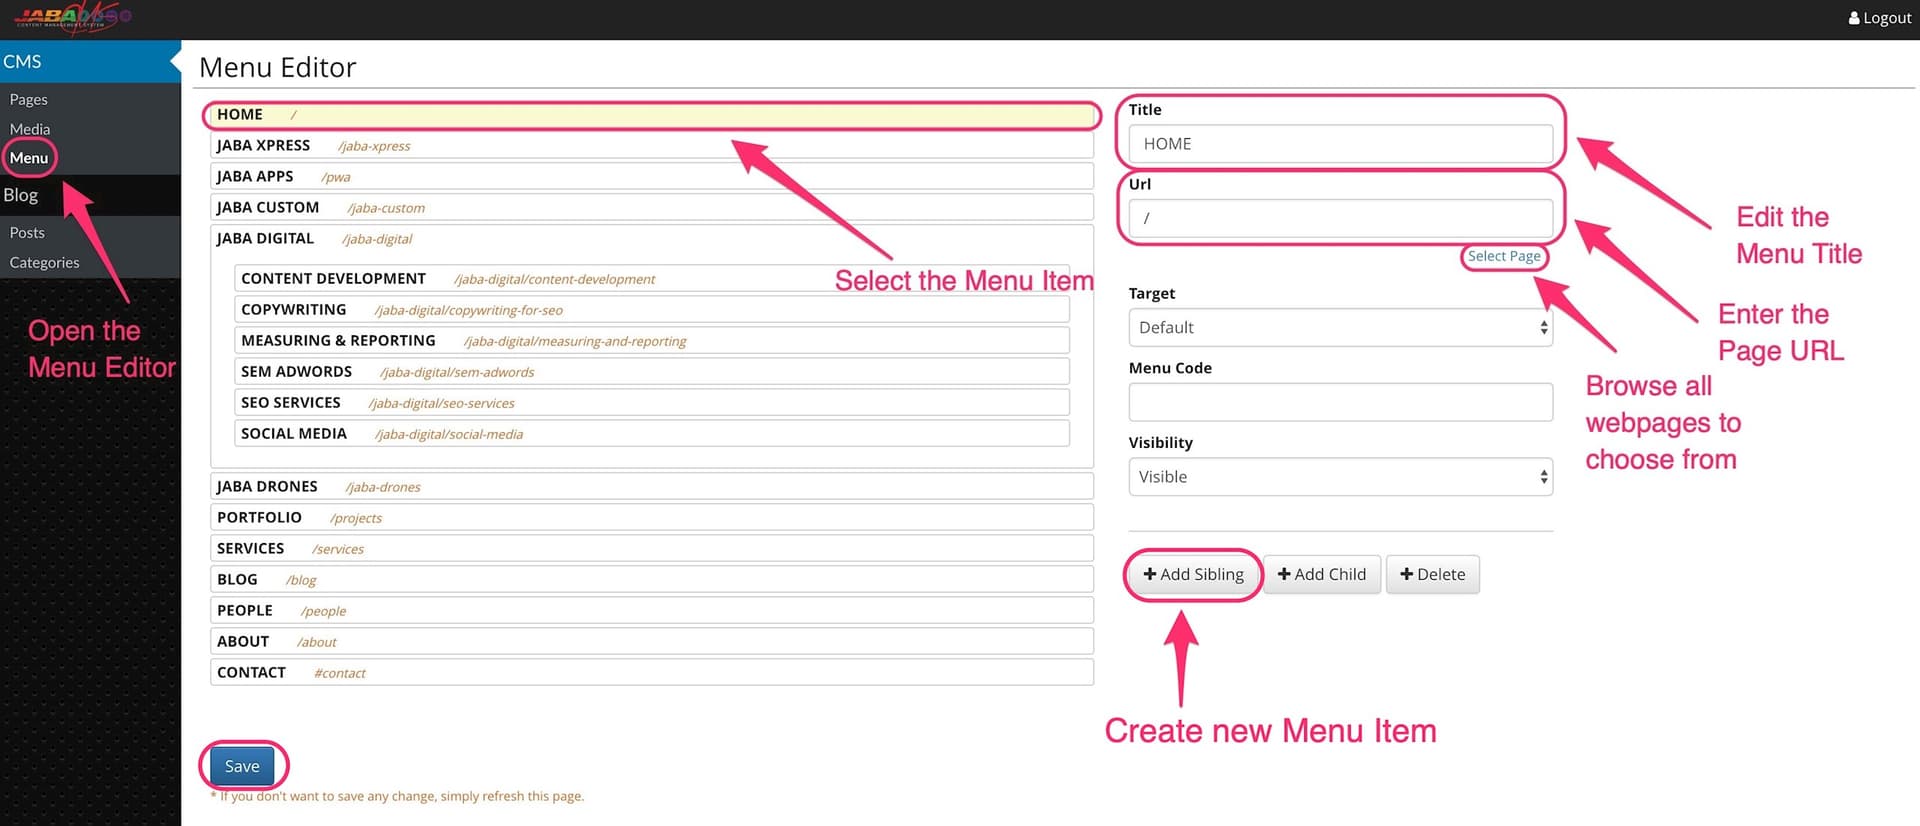
Add an Item to Your Website Menu
- Select + Add Child to add a menu item within the existing menu structure.
- A new item will appear indented under the selected option.
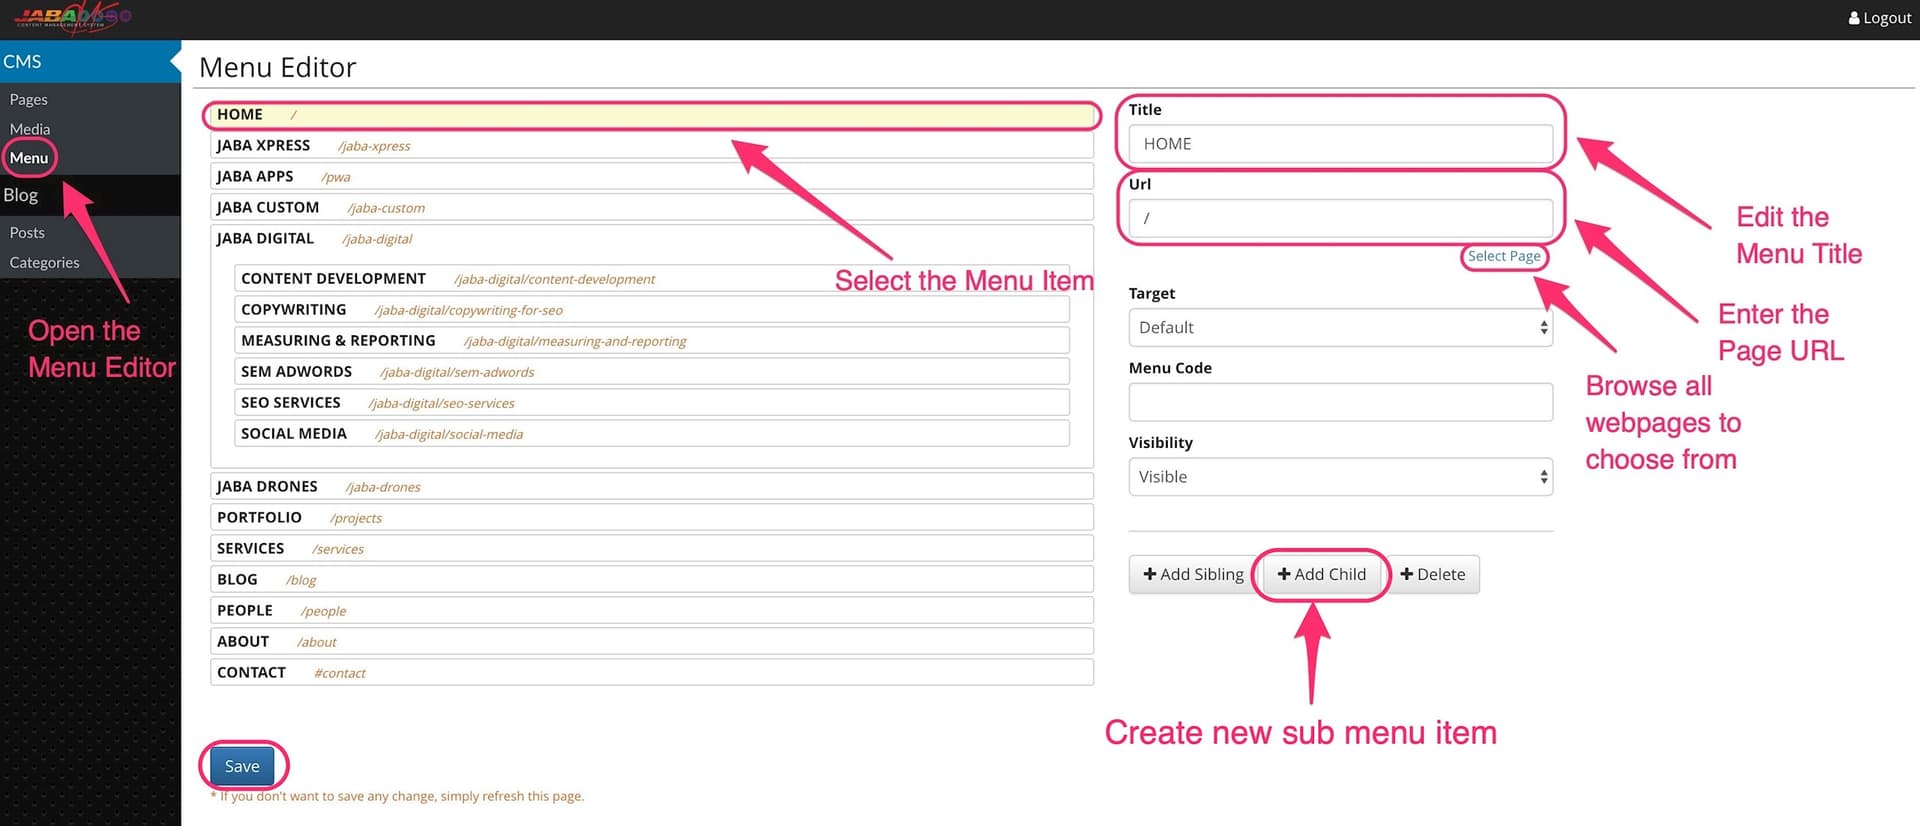
Add a Sub Item to Your Website Menu
- Enter the new menu title and page URL in the fields on the far right.
- You can choose Select Page to open a list of all web pages in your CMS.
- Select the page you would like the menu item to link to.
- Press Save to finalise these changes
Deleting a New Menu Item
- To delete an existing menu item, select the menu item.
- Select + Delete
- Press Save to finalise these changes
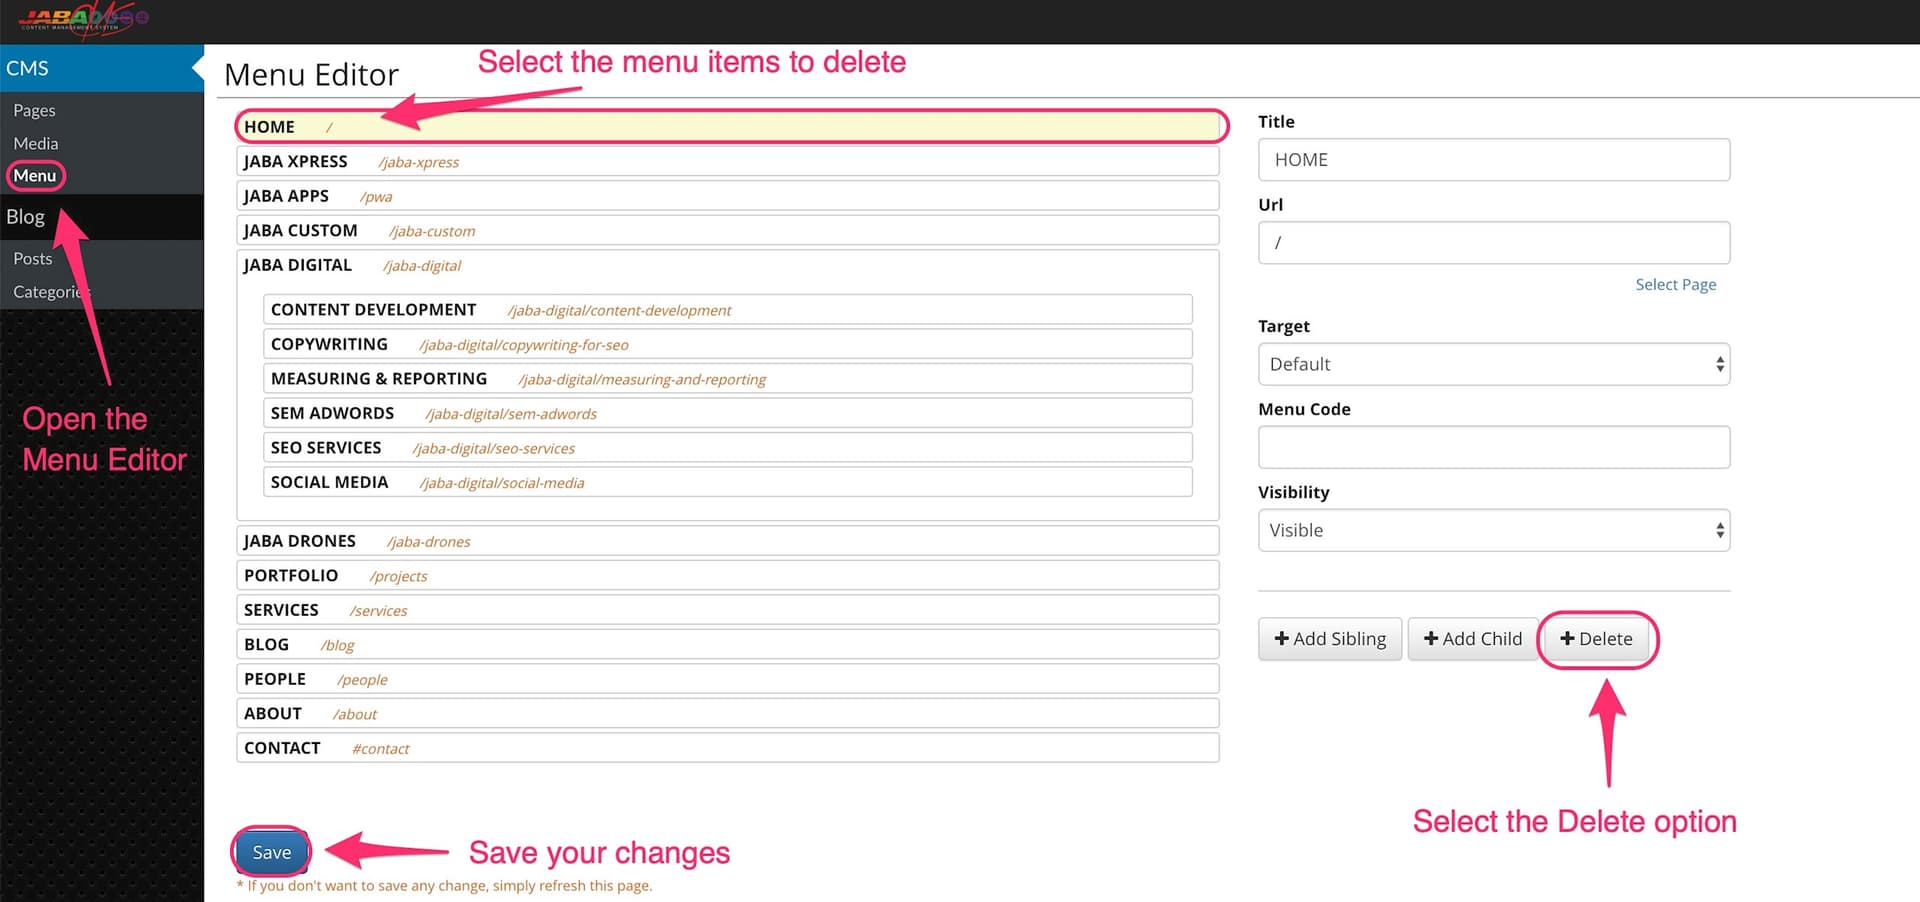
Delete a Menu Item on Your Website
You can delete a menu item by selecting the menu item and selecting delete on the far right.
 Editing Meta Data for Tiles and Search Engines
Learn to change the text and images on your website tiles as well as the meta data on each of your web pages. Meta data and meta images help search engines rank you for your set organic keyword search terms.
To edit a tile image, title and text you will need to select the correlated page from the CMS directory. Editing a tile image, title and text will also edit the meta data for that page, which is used by search engines to help rank your website.
- Choose the page from the CMS directory that you wish to edit tile image, title and text.
- Select Properties in the top left corner.
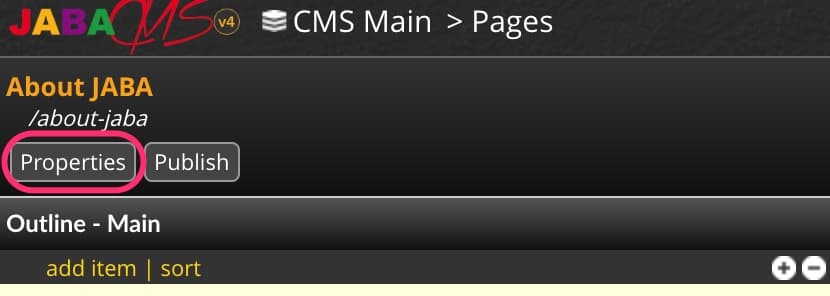
Select Properties
Editing the Page Tile Image
- Select Open Media Library.
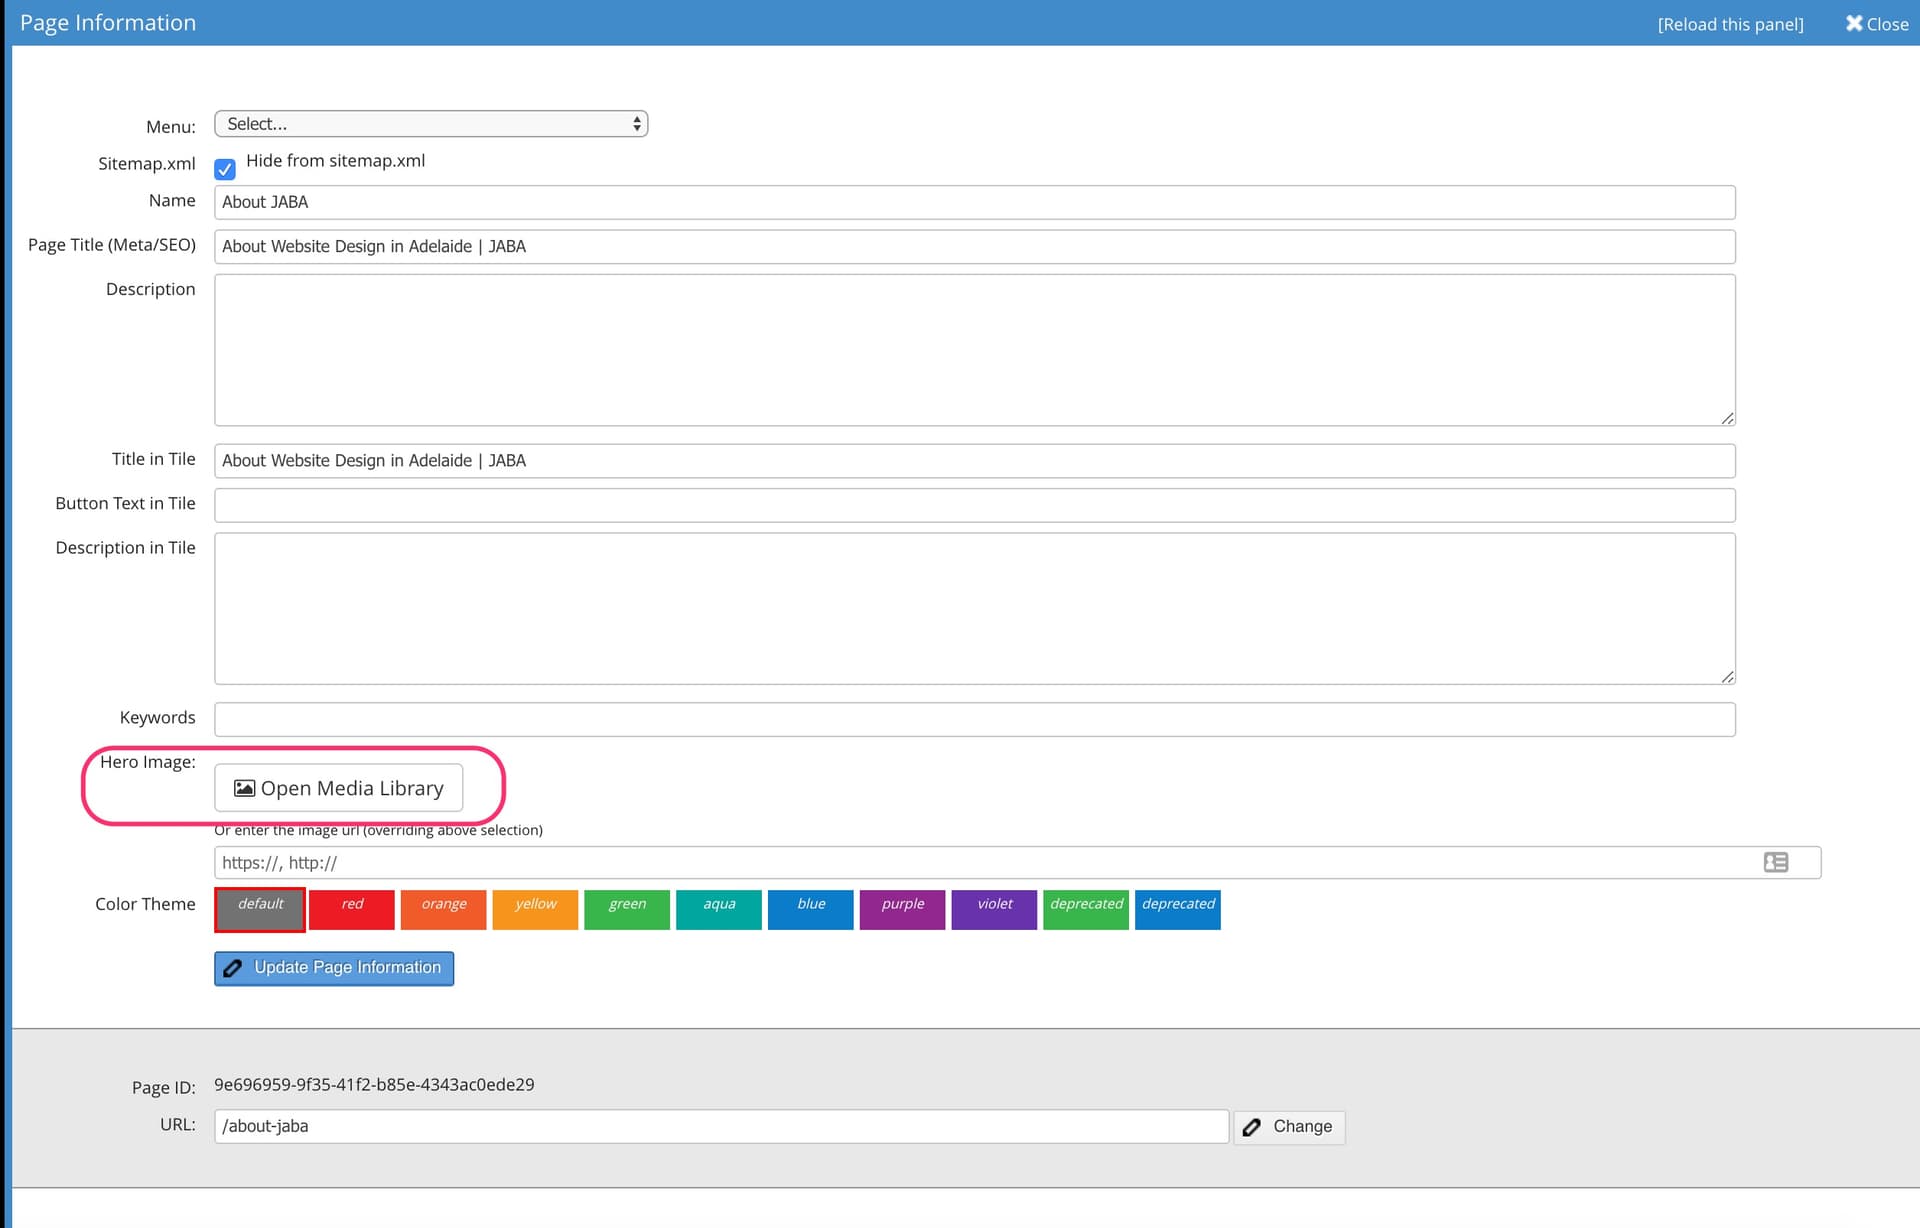
Open Media Library
- Navigate to the folder and image you want to use.
- Select the image and press Select.
Select an Image from Your Media Library
- Select Update Page Information.
- Publish the page.
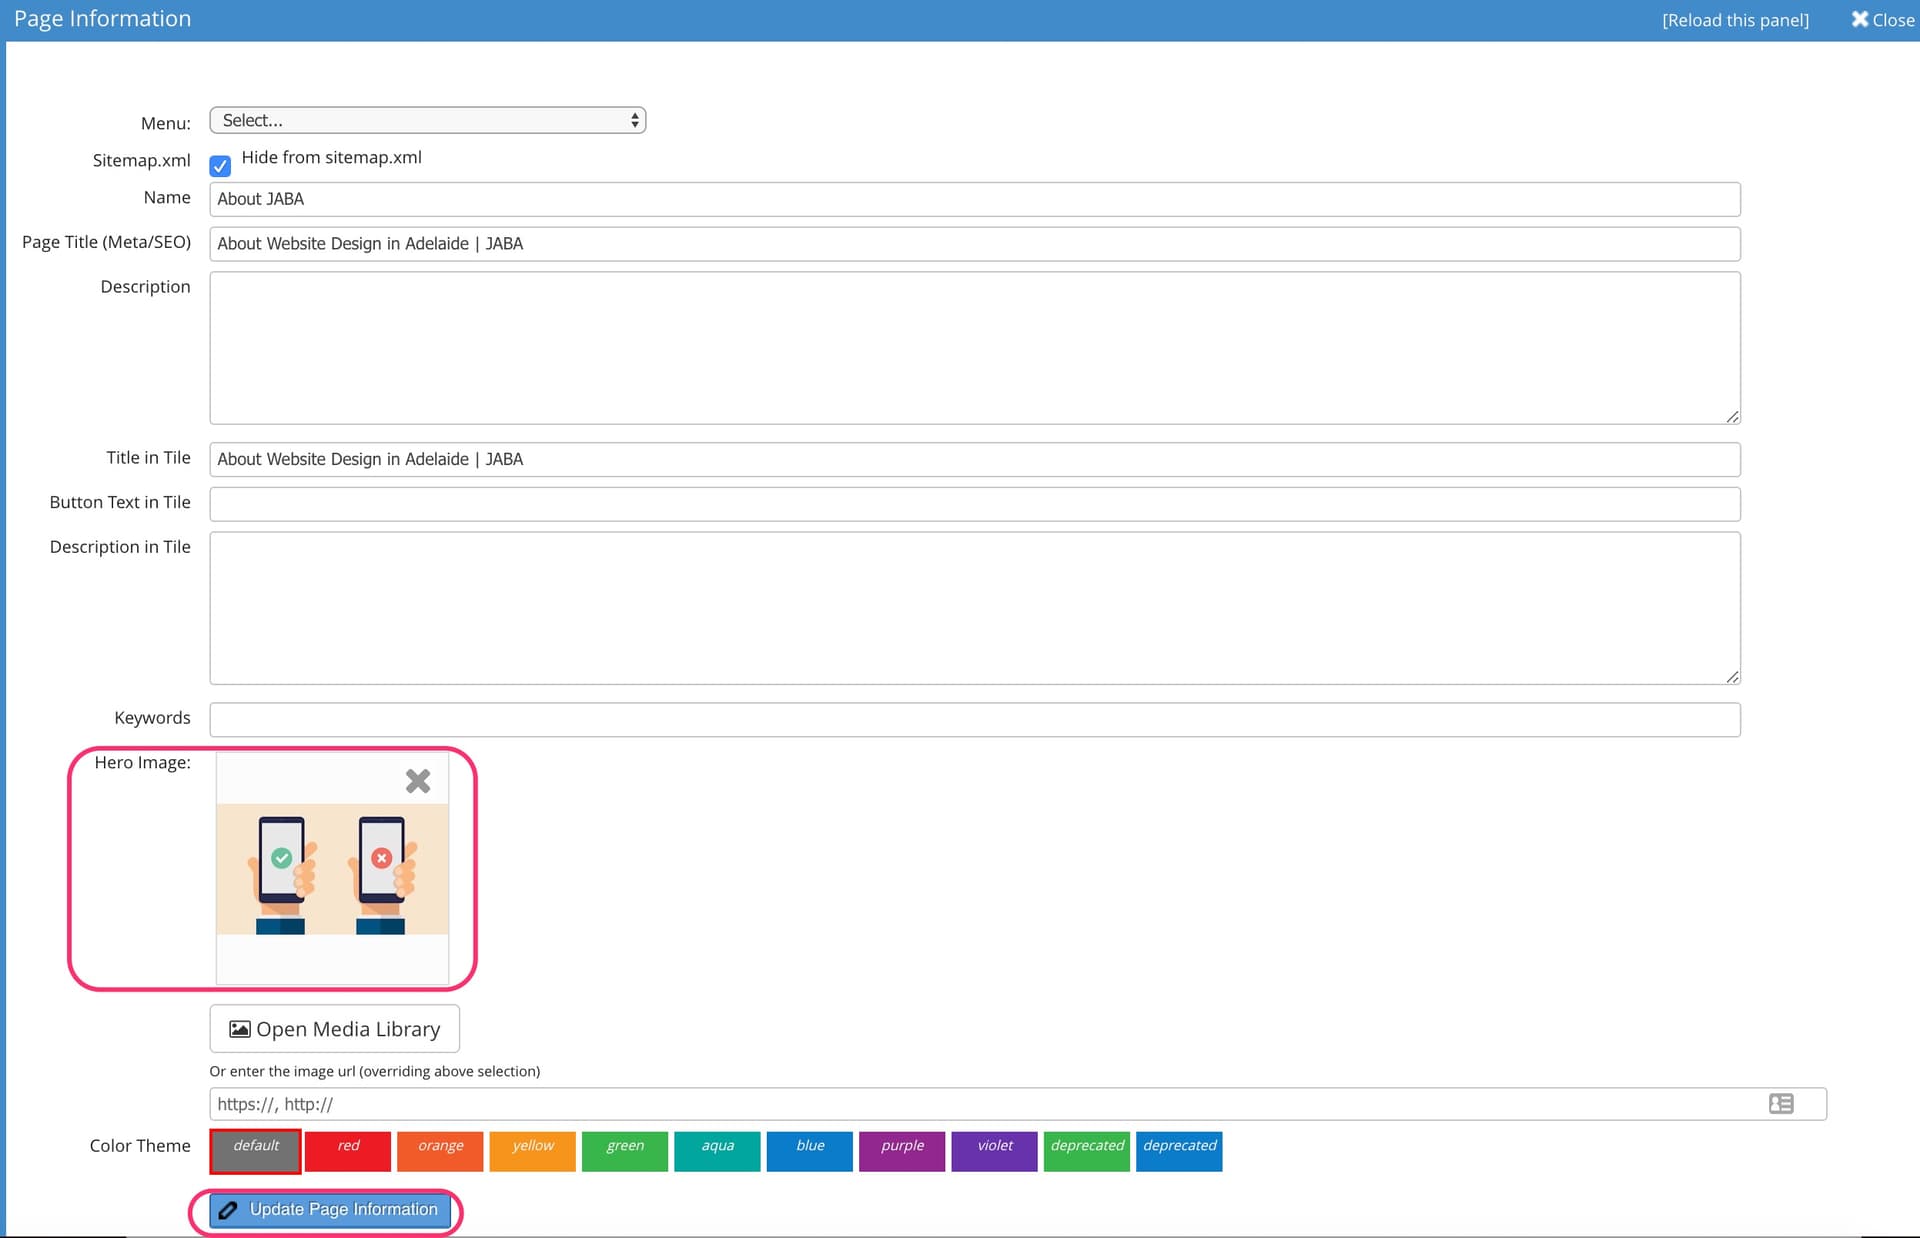
Add a tile/meta Image
The image will display as the tile image but will also be used as your open graph image which will show on social media and other places.
Editing the Page Tile Heading
- Enter your page tile heading in the Title in Tile field in the properties.
- Select Update Page Information.
- Publish the page.
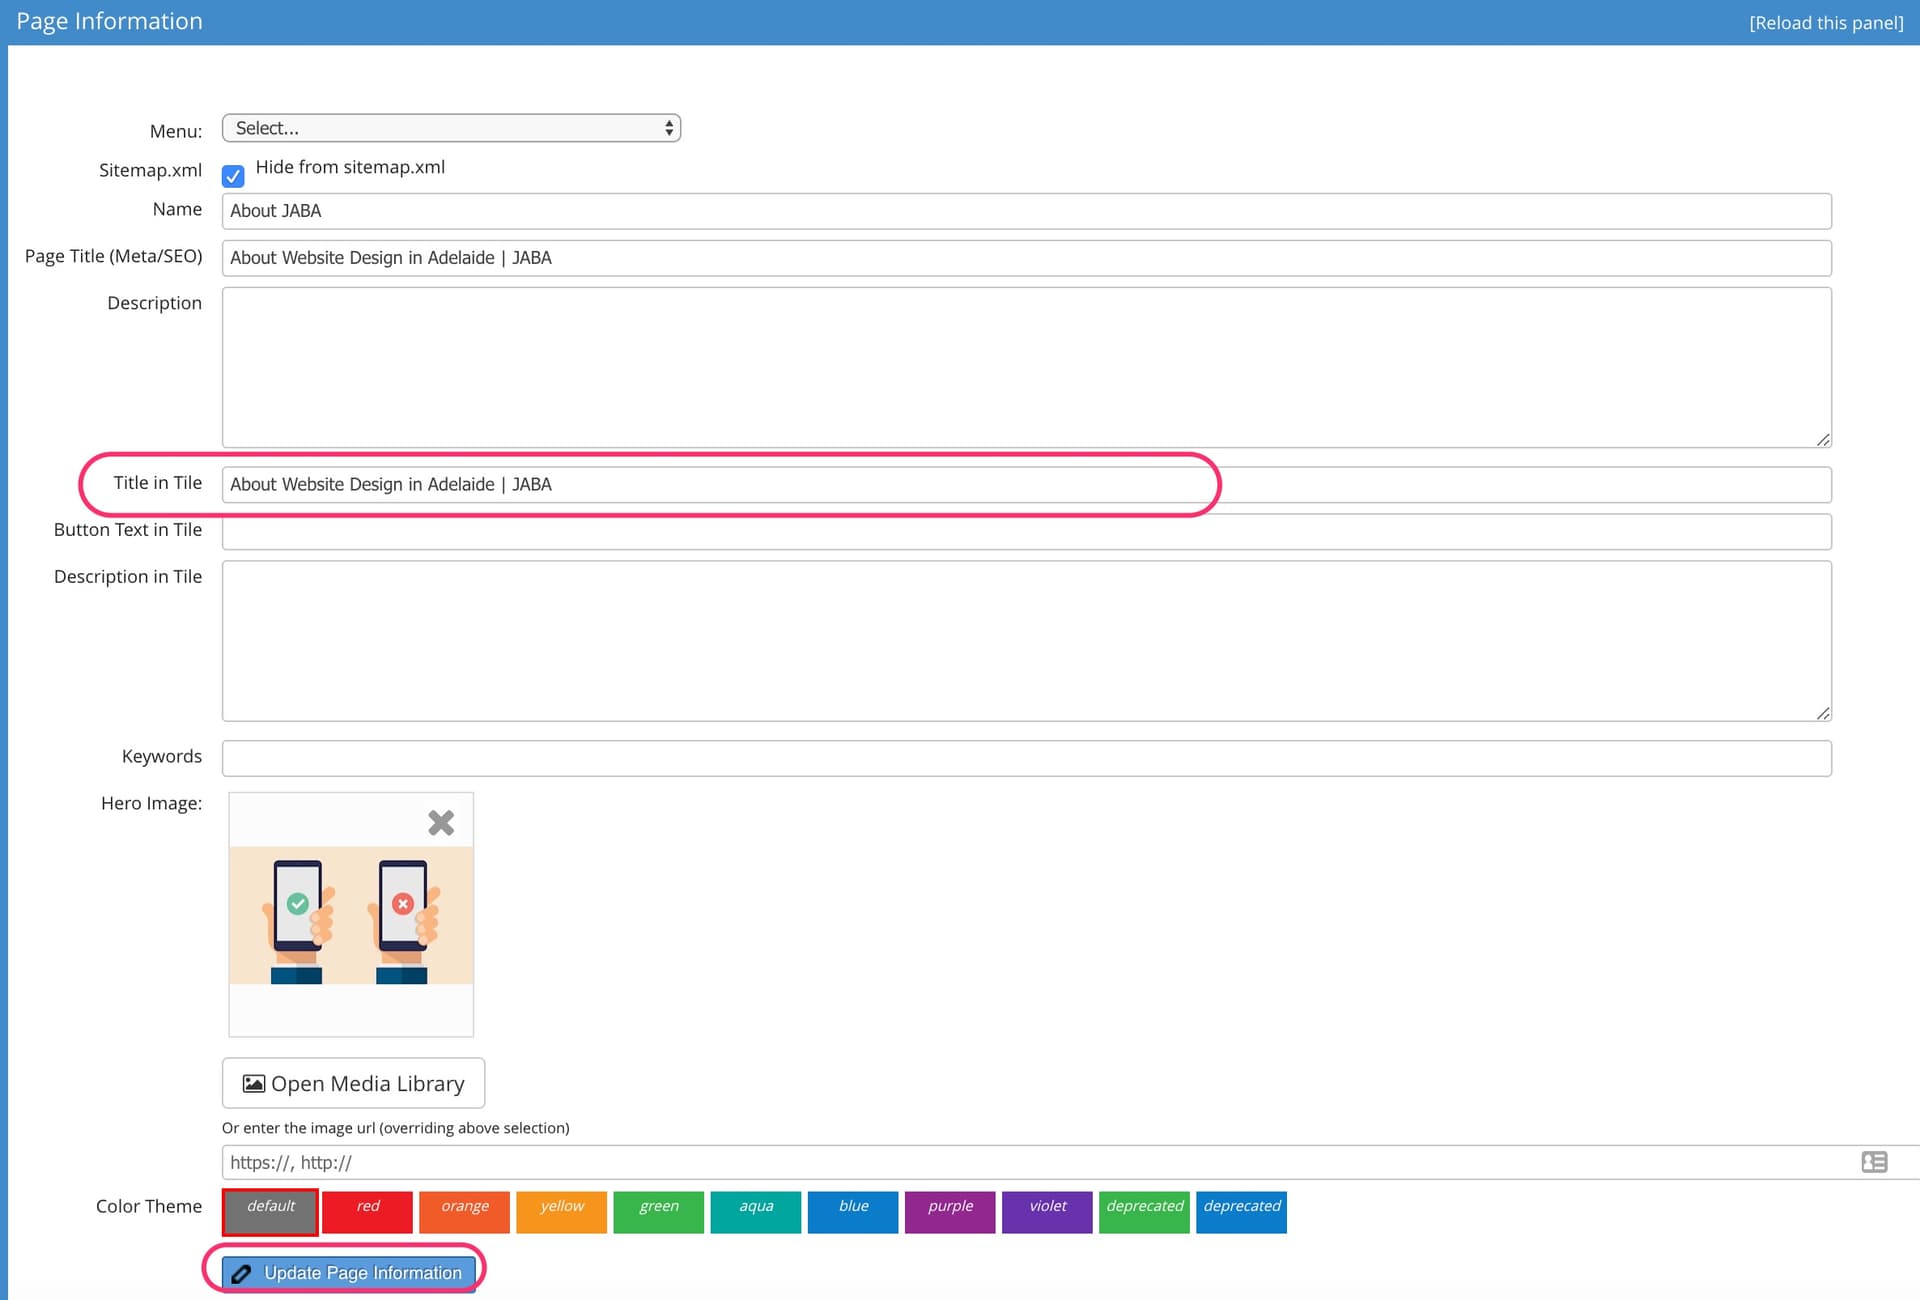
Add a Tile Title
The Title in Tile field will apply for the page tiles on your website only and will not effect meta data.
Editing the Page Tile Description
- Enter your page tile description in the Description in Tile field in the properties.
- Select Update Page Information.
- Publish the page.
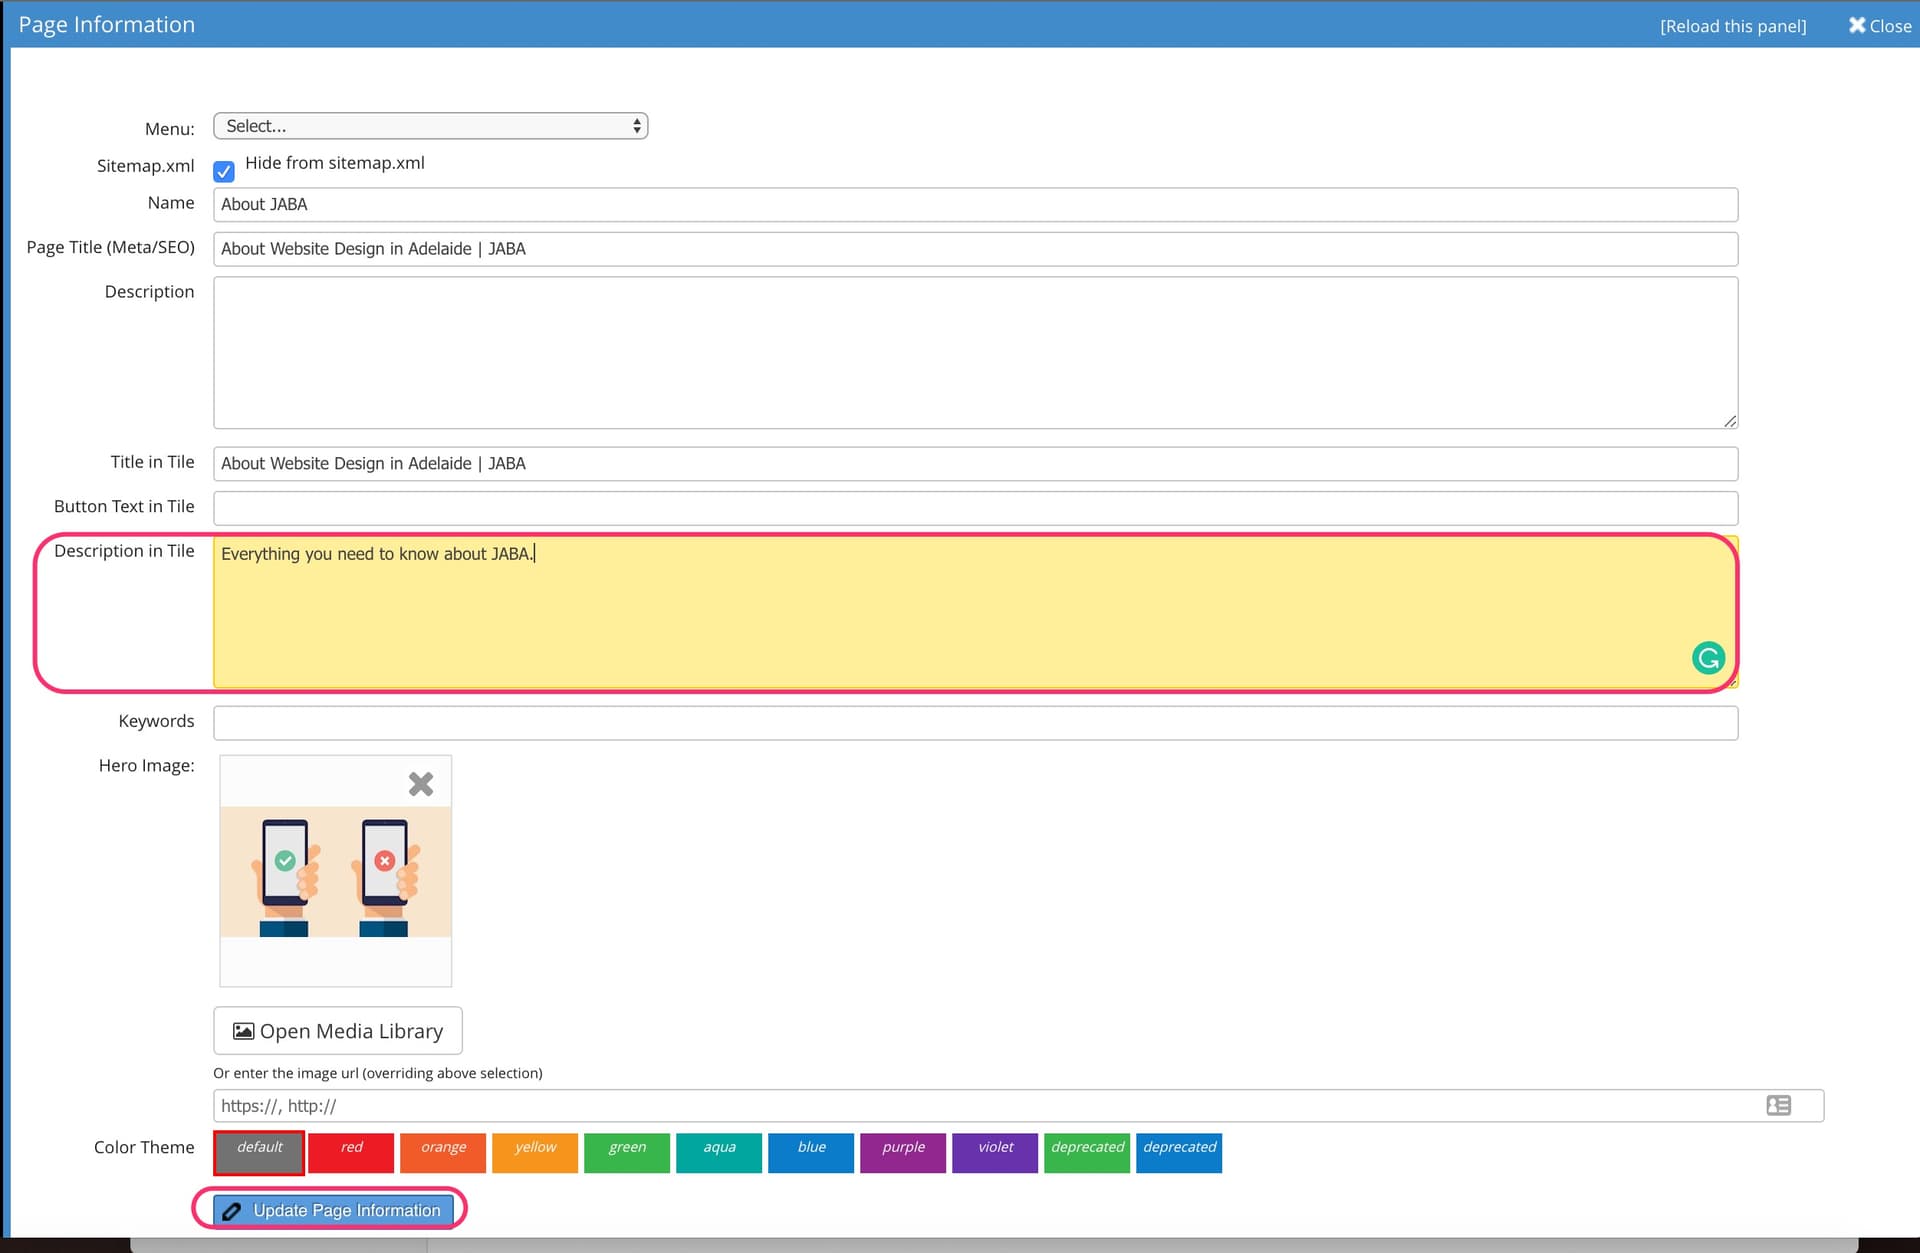
Add a Tile Description
The Description in Tile field will apply for the page tiles on your website only and will not effect meta data.
Editing the Page's Meta Data Title
- Enter your page's meta title in the Page Title (Meta/SEO) field in the properties.
- Select Update Page Information.
- Publish the page.
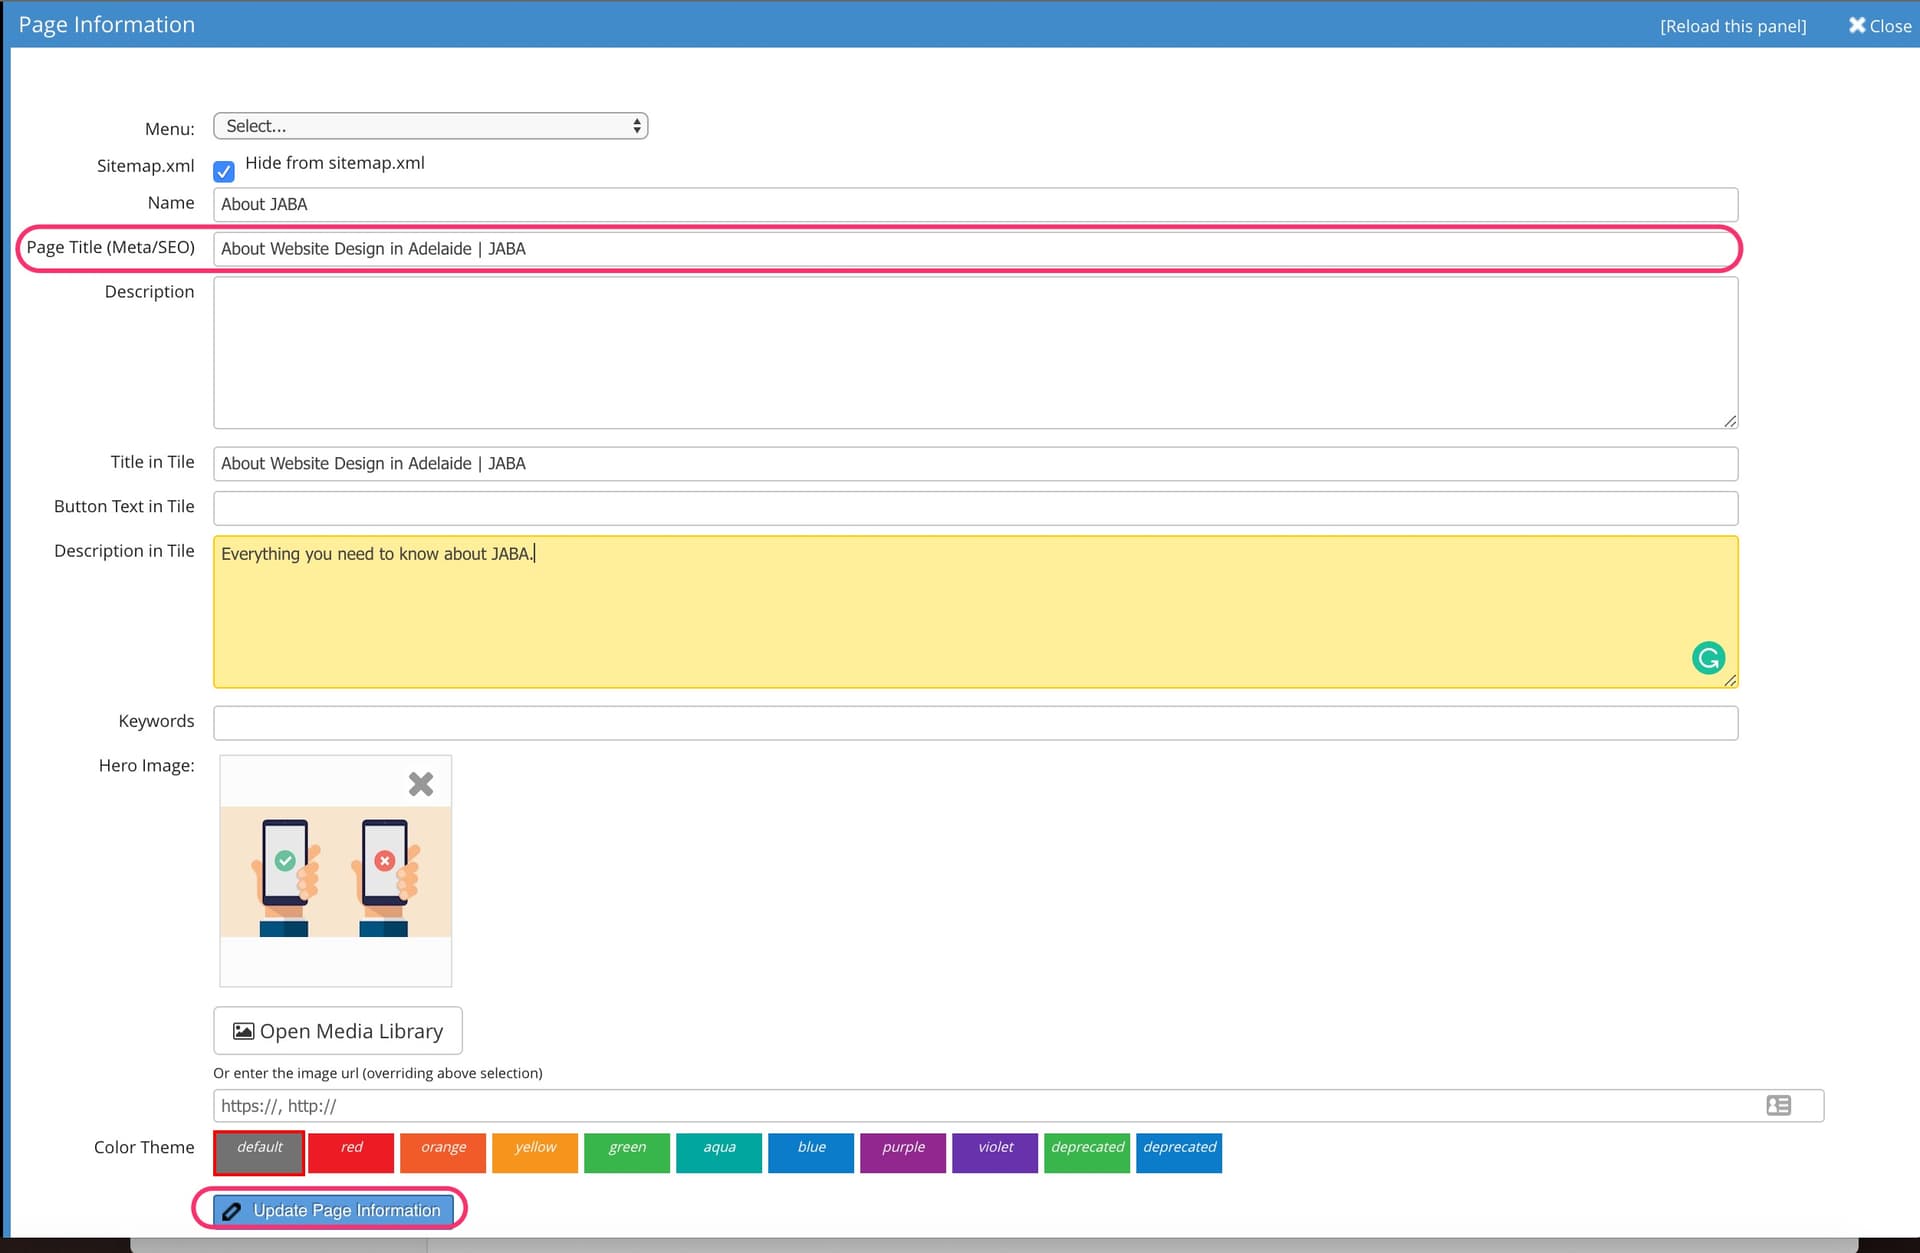
Add a Meta Title
The Page Title (Meta/SEO) field will apply for your webpages meta data used to index your page on search engines. The page tile title will not be effected.
Editing the Page's Meta Data Description
- Enter your page's meta description in the Description field in the properties.
- Select Update Page Information.
- Publish the page.
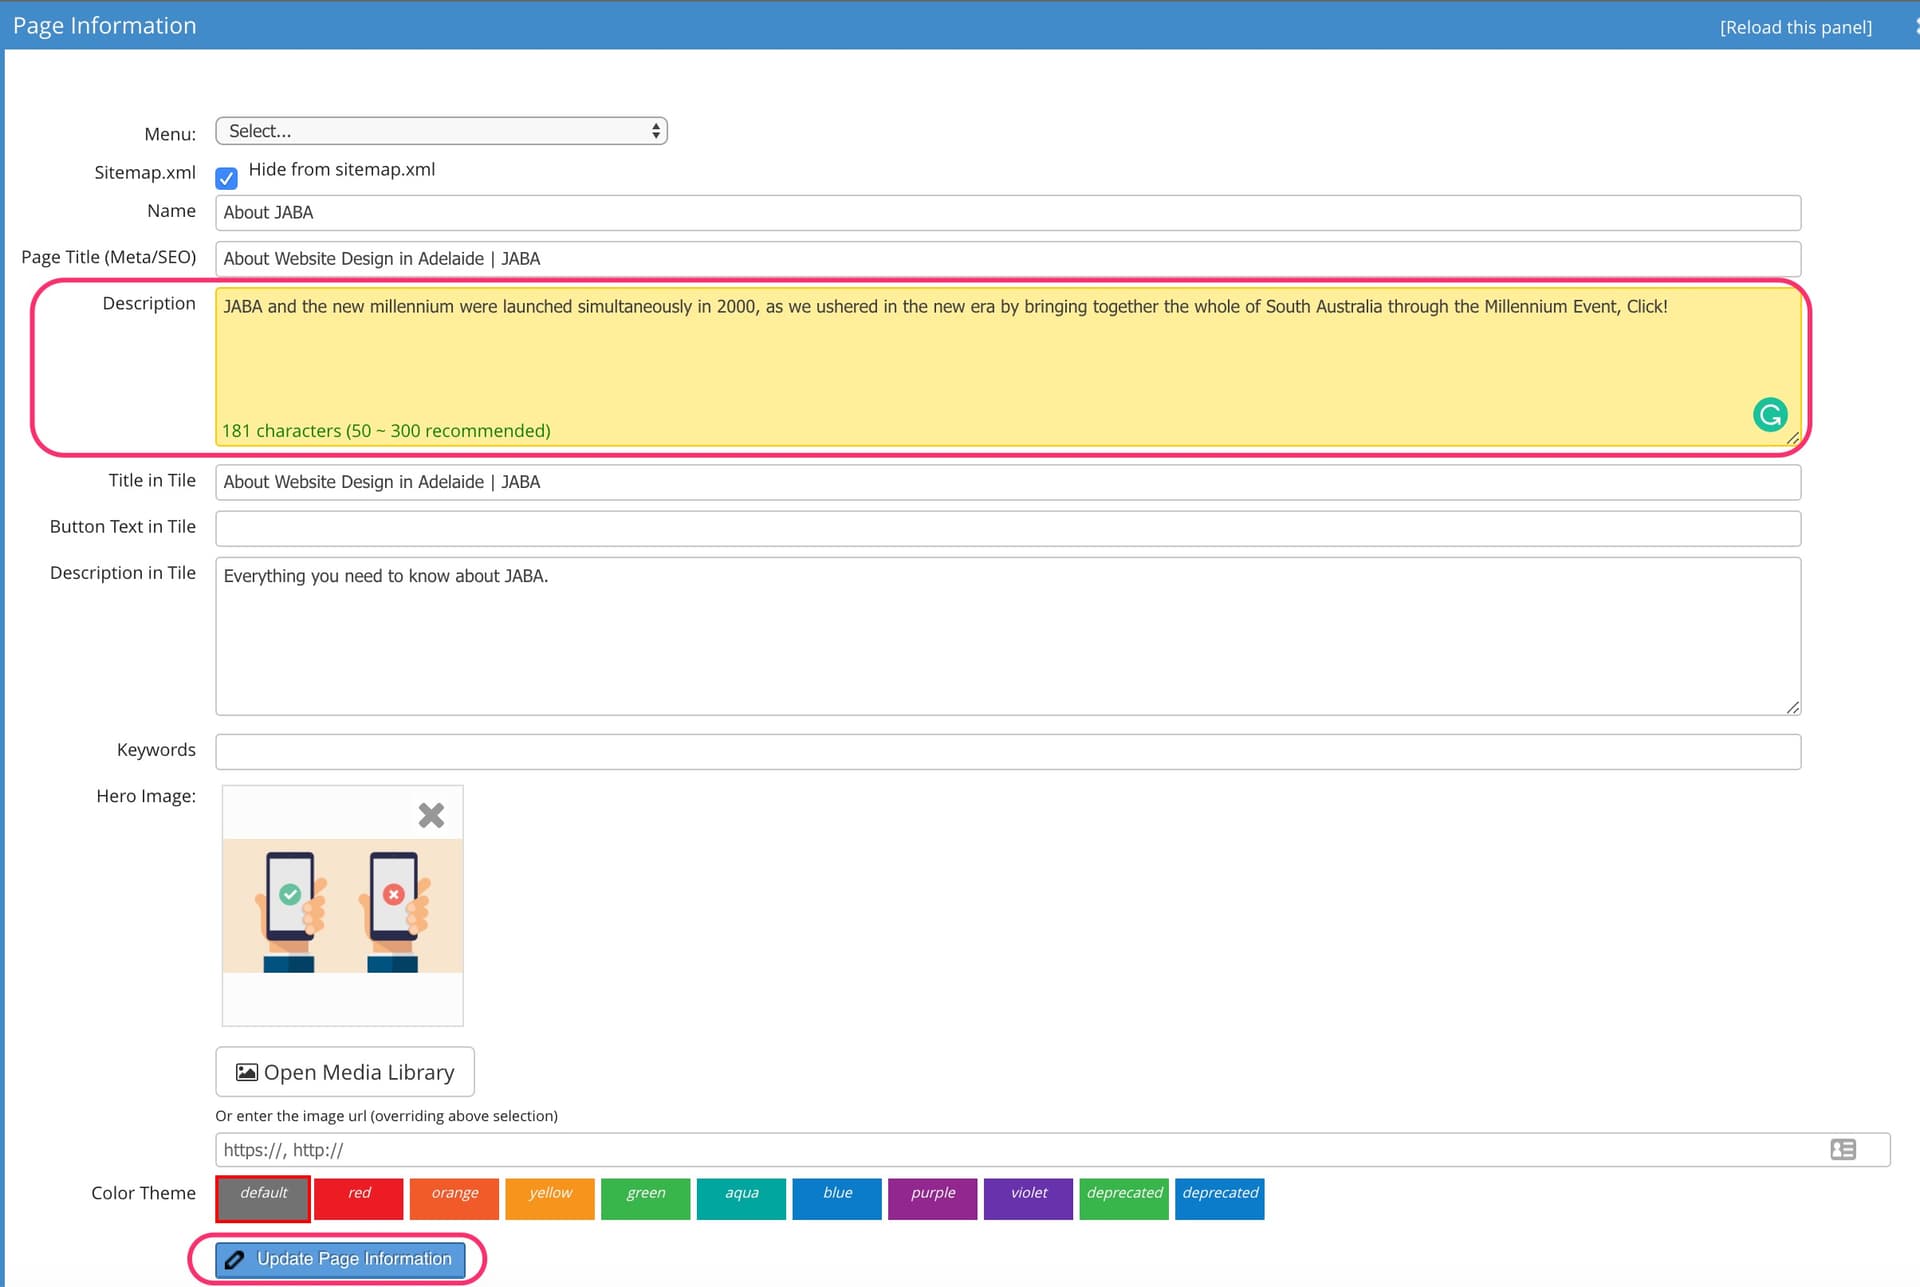
Add a Meta Description
The Description field will apply for your webpages meta data used to index your page on search engines. The page tile title will not be effected.
Meta Data Keywords
- You should choose at least one keyword / longtail keyword (e.g. Crash Repairer in Adelaide) to target for each webpage on your website.
- Each page should have a different keyword that is rellavent to the pages information and you should add the keyword to the Keywords field in the properties as well as once in the meta title, meta description and heading 1.
- It is also great if you can use the keyword naturally in a paragraph sentance and/or heading 2 at least once.
 Advanced Text Formatting
Structure your website content formatting to optimise your website user's experience and help you rank well on search engines.
Structuring Your Text
When you receive your website, it will be custom built to have pre-set Headings, fine print and standard paragraph sized font. These are pre-set by our design and technical team. This includes the fonts chosen and the sizing of the text for each individual option on each website to suit the design.
Headings are useful to distinguish between sections of your website pages content. It makes the site easier to read for users and simpler to find what they're looking for.
To change the format of your website headings see Basic Content Formatting.
The following options formatting options are available for your text.
- Heading 1
For the opening sentence of your webpage ONLY. 70 characters maximum.
You should try to use your pages main keyword in this heading (e.g. About Skin Care Products in Adelaide).
- Heading 2
To distinguish key sections within a webpage. 70 characters maximum.
- Heading 3
A primary category or topic within a page
- Heading 4
A sub headline that helps clarify the paragraph content below
- Heading 5
Fine print for image acreditation, business credentials or notes.
- Heading 6
Fine print for legal purposes. Rarely needed and to be used sparingly.
- Normal
Standard paragraph text. This is the most commonly found text on every websites body copy.
You can find out about other text formatting features in the website tool bar in Basic Content Formatting.
Copying text from a Word or PDF Document into a Text Panel
If you are transferring (copying) text from a Microsoft Word or PDF document, please follow the below steps to ensure the content is correctly formatted.
- Copy the text from the document.
- Open the Text Panel in the CMS page you wish to add the content to and select it so your cursor is inside the text panel.
- Select the Paste as plain text icon from the toolbar.
Use Paste as Plain Text Toolbar Button
- Paste the text inside the box and select ok.
Note: Don't forget to save the text panel when you are done.
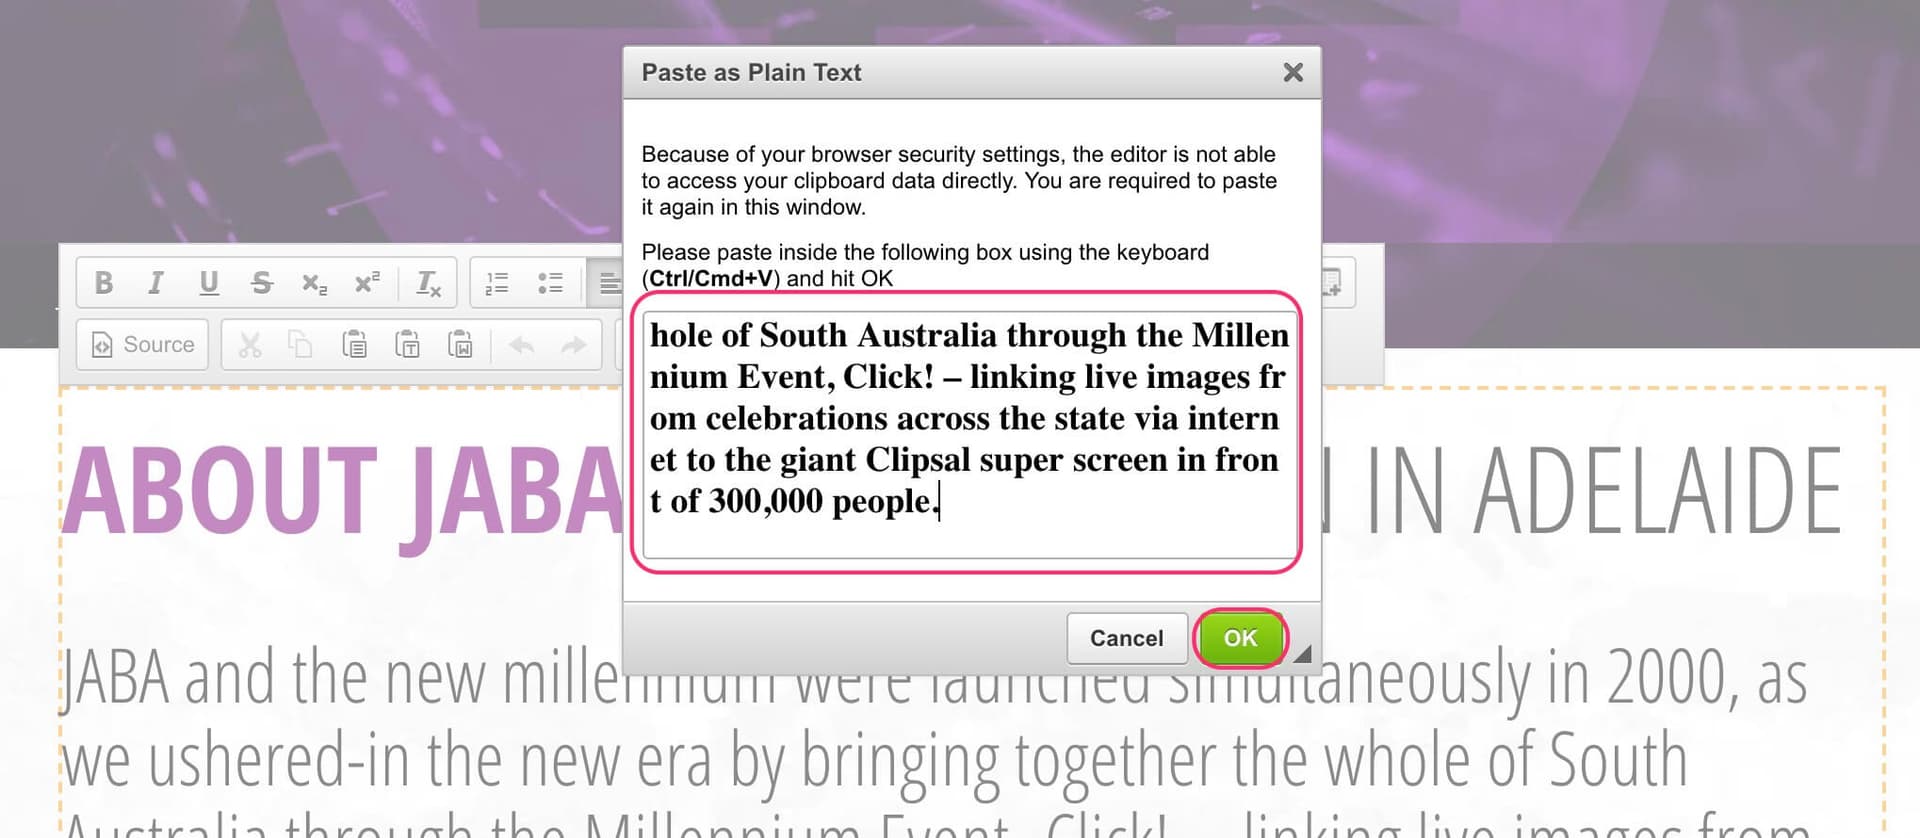
Paste as Plain Text into the CMS
Sorting Panels
If you want to sort the order of your panels or elements inside a panel you can do so on the left side panel.
- Select sort at the top of the main left panel on the selected page to sort the order of the elements.
- Select, hold and drag the item you want to move.
- Once it is in the right place, select Save.
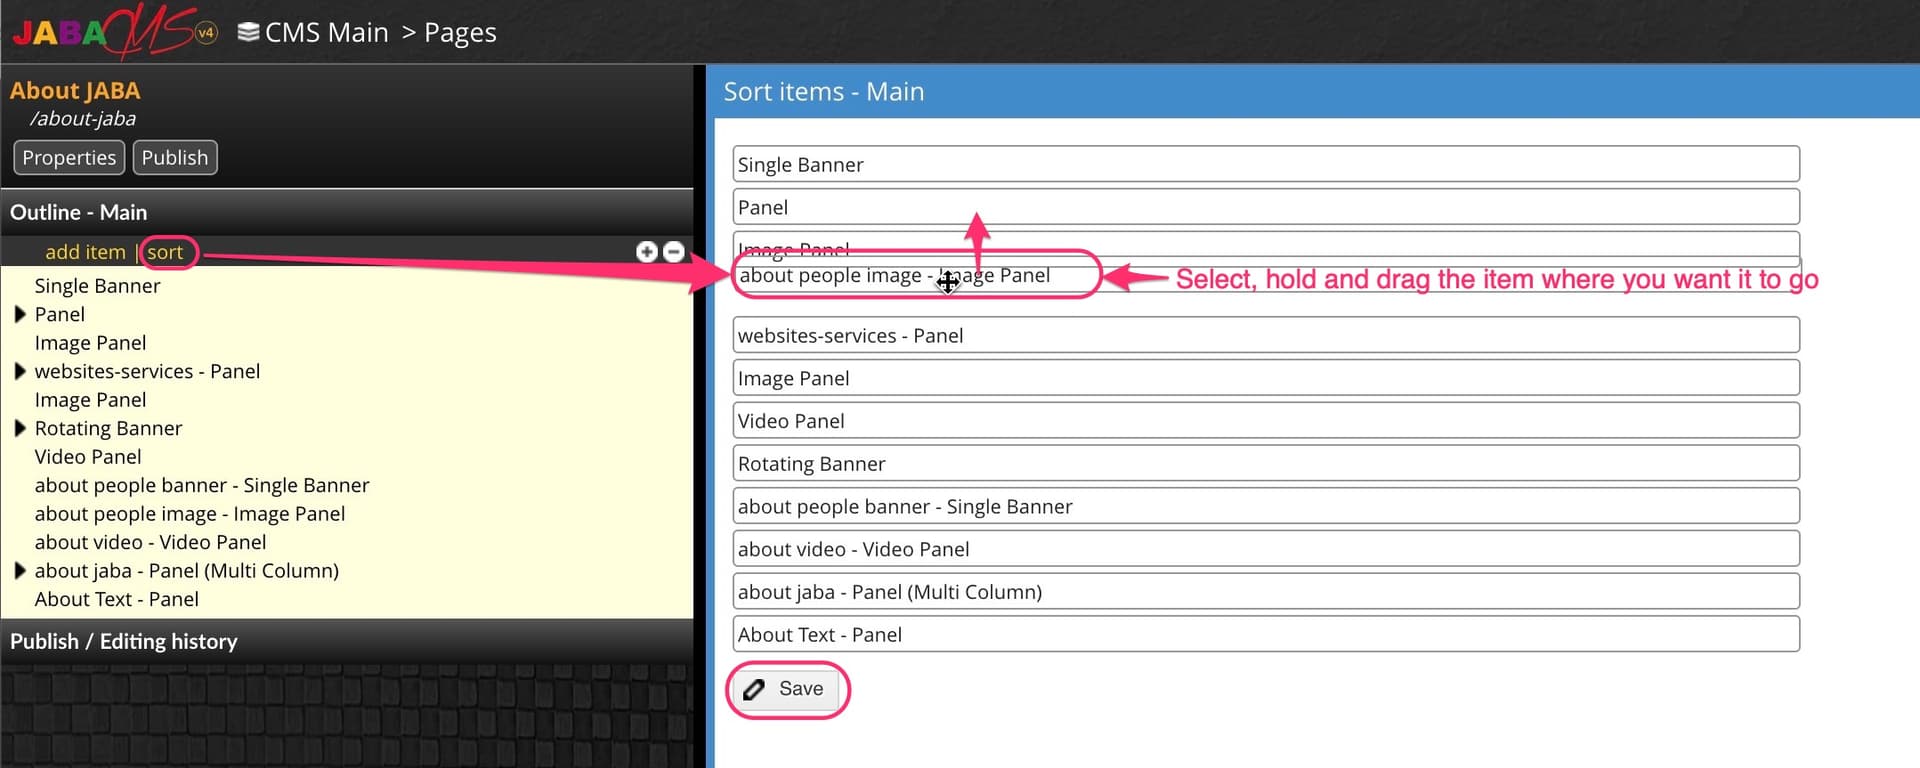
Sort Elements on a Page
To sort the order of elements within a panel:
- Select the main panel you want the sort so that it highlights yellow.
- Select sort.
- Select, hold and drag the item you want to move.
- Once it is in the right place, select Save.
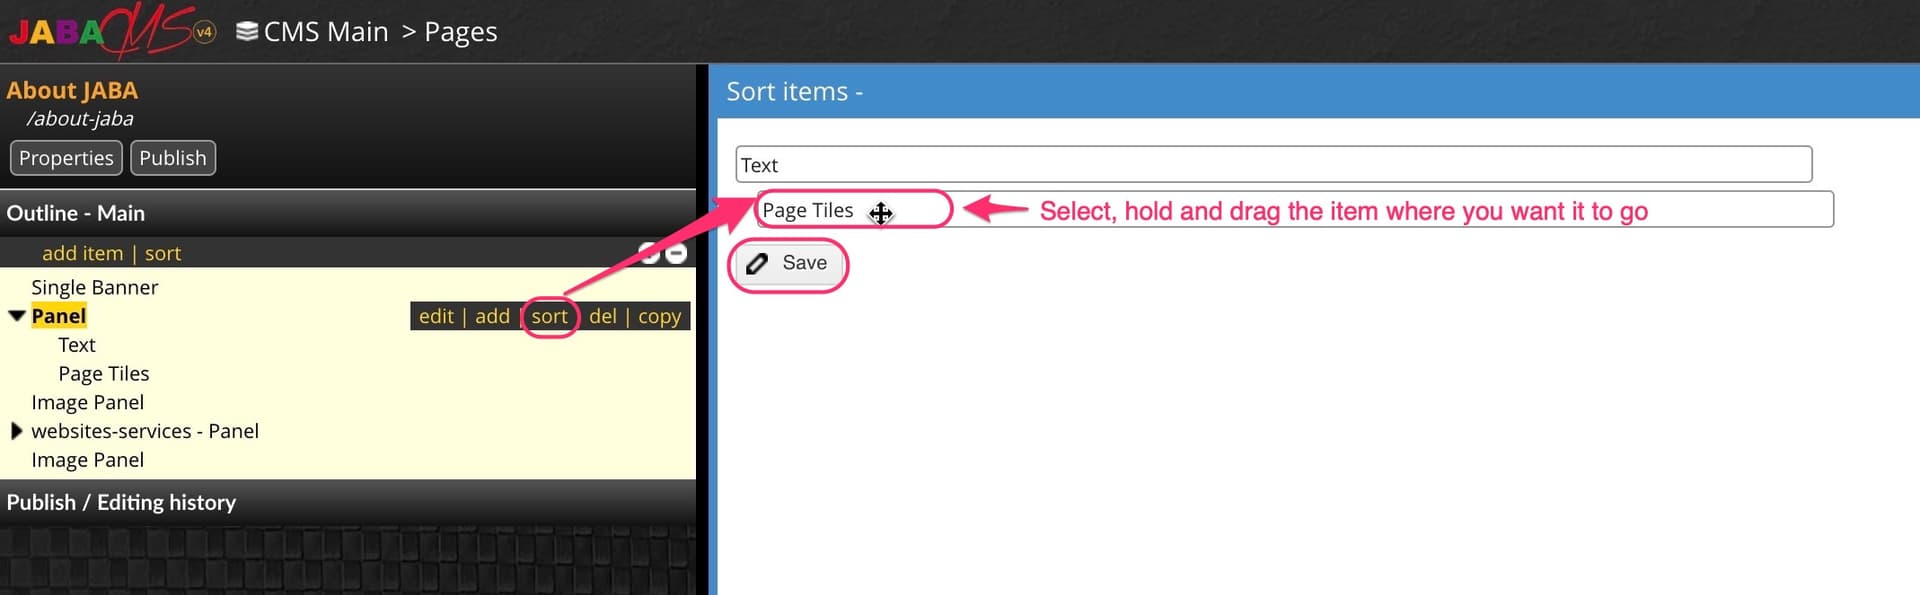
Sort Items Inside a Panel
Adding an Image inside the Text Panel
Select the text panel you wish to add your image to. A yellow dotted line will appear around the text box and a toolbar will appear directly above or below the text panel.
- In the toolbar, select the Image icon
Select the Image icon
- A pop up box will appear.
- Choose Browse Server.
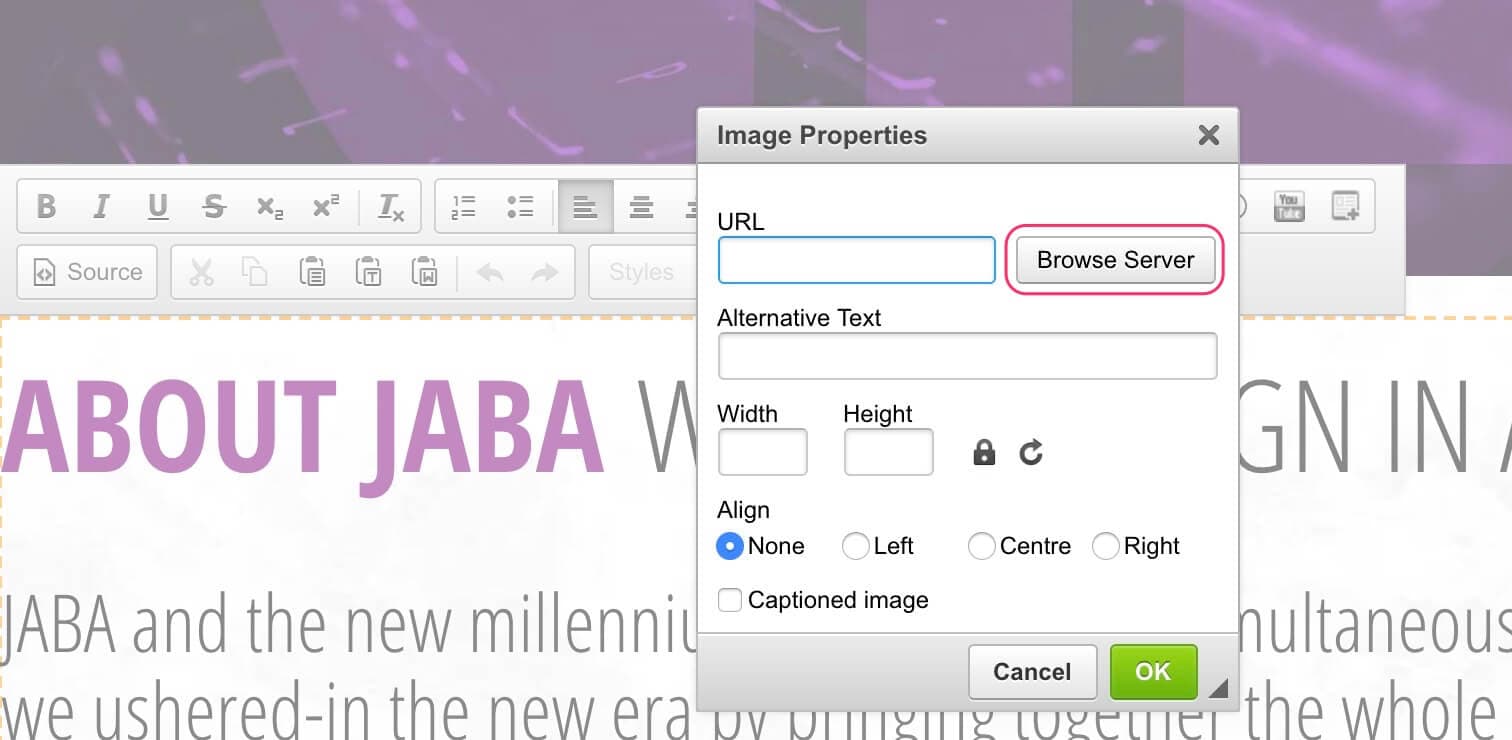
Press Browse Server
- Select your image from the media library that you want to place in the text block.
- Press Select
.jpg&w=1920&q=75)
Select Your Image(s)
- Enter the alt text for your image into the Alternative Text field.
- Press OK.
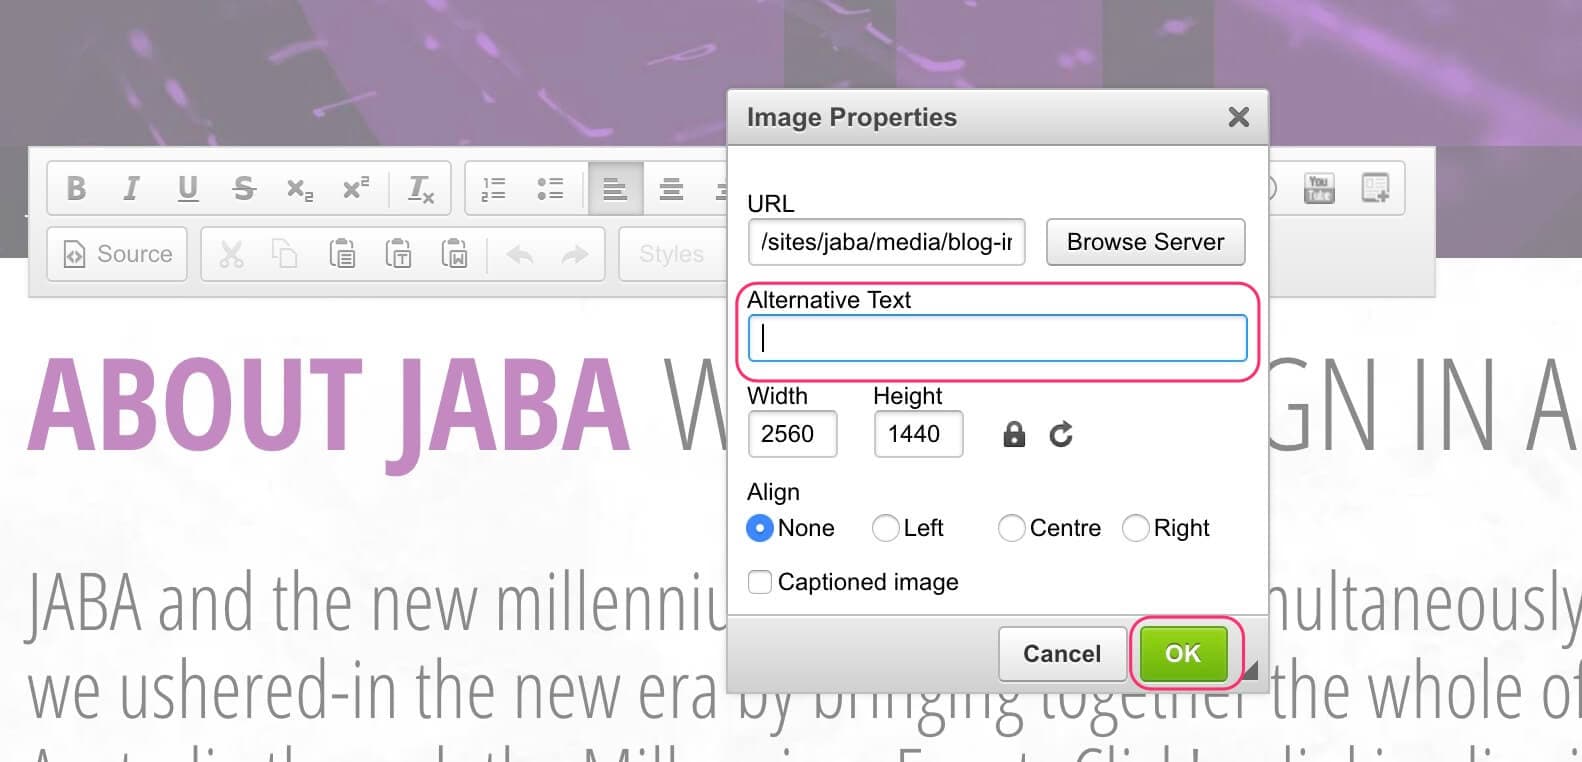
Add an Alt Tag
 Linking and Buttons
You can create links within the text on your website. These links can send users to useful resources such as PDF documents, other web pages within your site, other external websites and create call to action buttons, such as CALL NOW or READ MORE >.
Link to an Internal Link
You can link text or images on your website to another page within your site. Choose the page from the CMS directory that you wish to add a link to.
- Select the text panel with the text you wish to link.
- Highlight the desired word or words.
- Select the chain link icon in the toolbar.
Press the Hyperlink icon
- Select Link Type as URL.
- Select HTTPS from the drop down.
- Enter the URL of the webpage you wish to link to within your website.
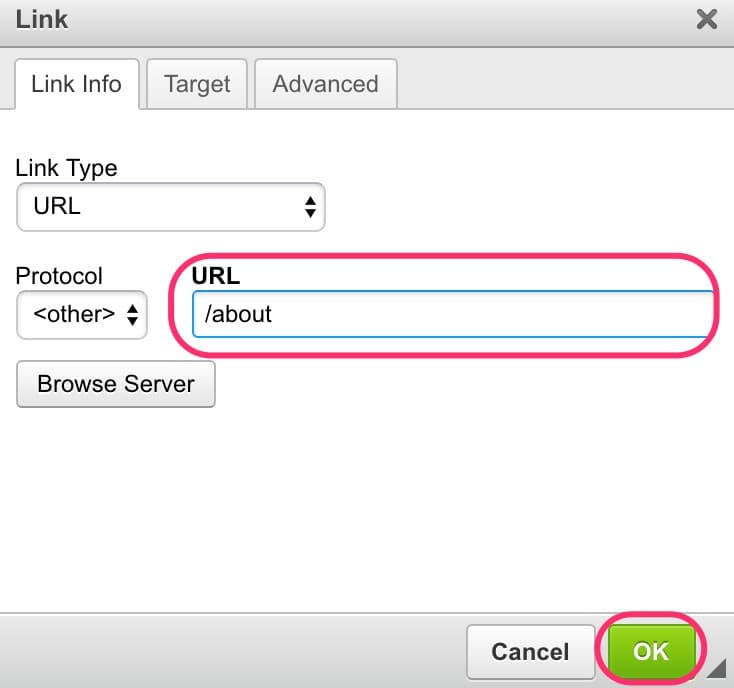
Enter the URL
- Alternatively, you can select Browse Server and navigate the directory of page to select the page you wish to link.
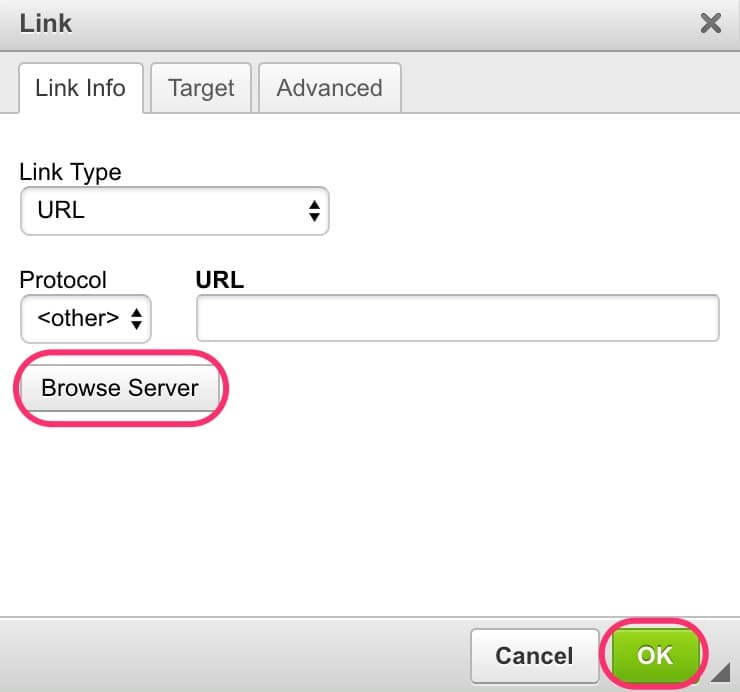
Browse the Media Library
- Select OK.
- Save your text panel using save on the left side panel.
- Publish your page.
Link to PDF/Image on Your Website
You can link text or images on your website to PDF or image within your site. It is best that PDF or image links open in a new tab so that when users close the item they will still have your webpage open. Choose the page from the CMS directory that you wish to add a link to.
- Select the text panel with the text you wish to link.
- Highlight the desired word or words.
- Select the chain link icon in the toolbar.
.jpeg&w=1920&q=75)
Press the Hyperlink icon
- Select Link Type as URL.
- Select HTTPS from the drop down.
- Select Browse Server and navigate the media library where your desired PDF or image is.
.jpeg&w=1920&q=75)
Browse the Media Library
Select your file and press Select.
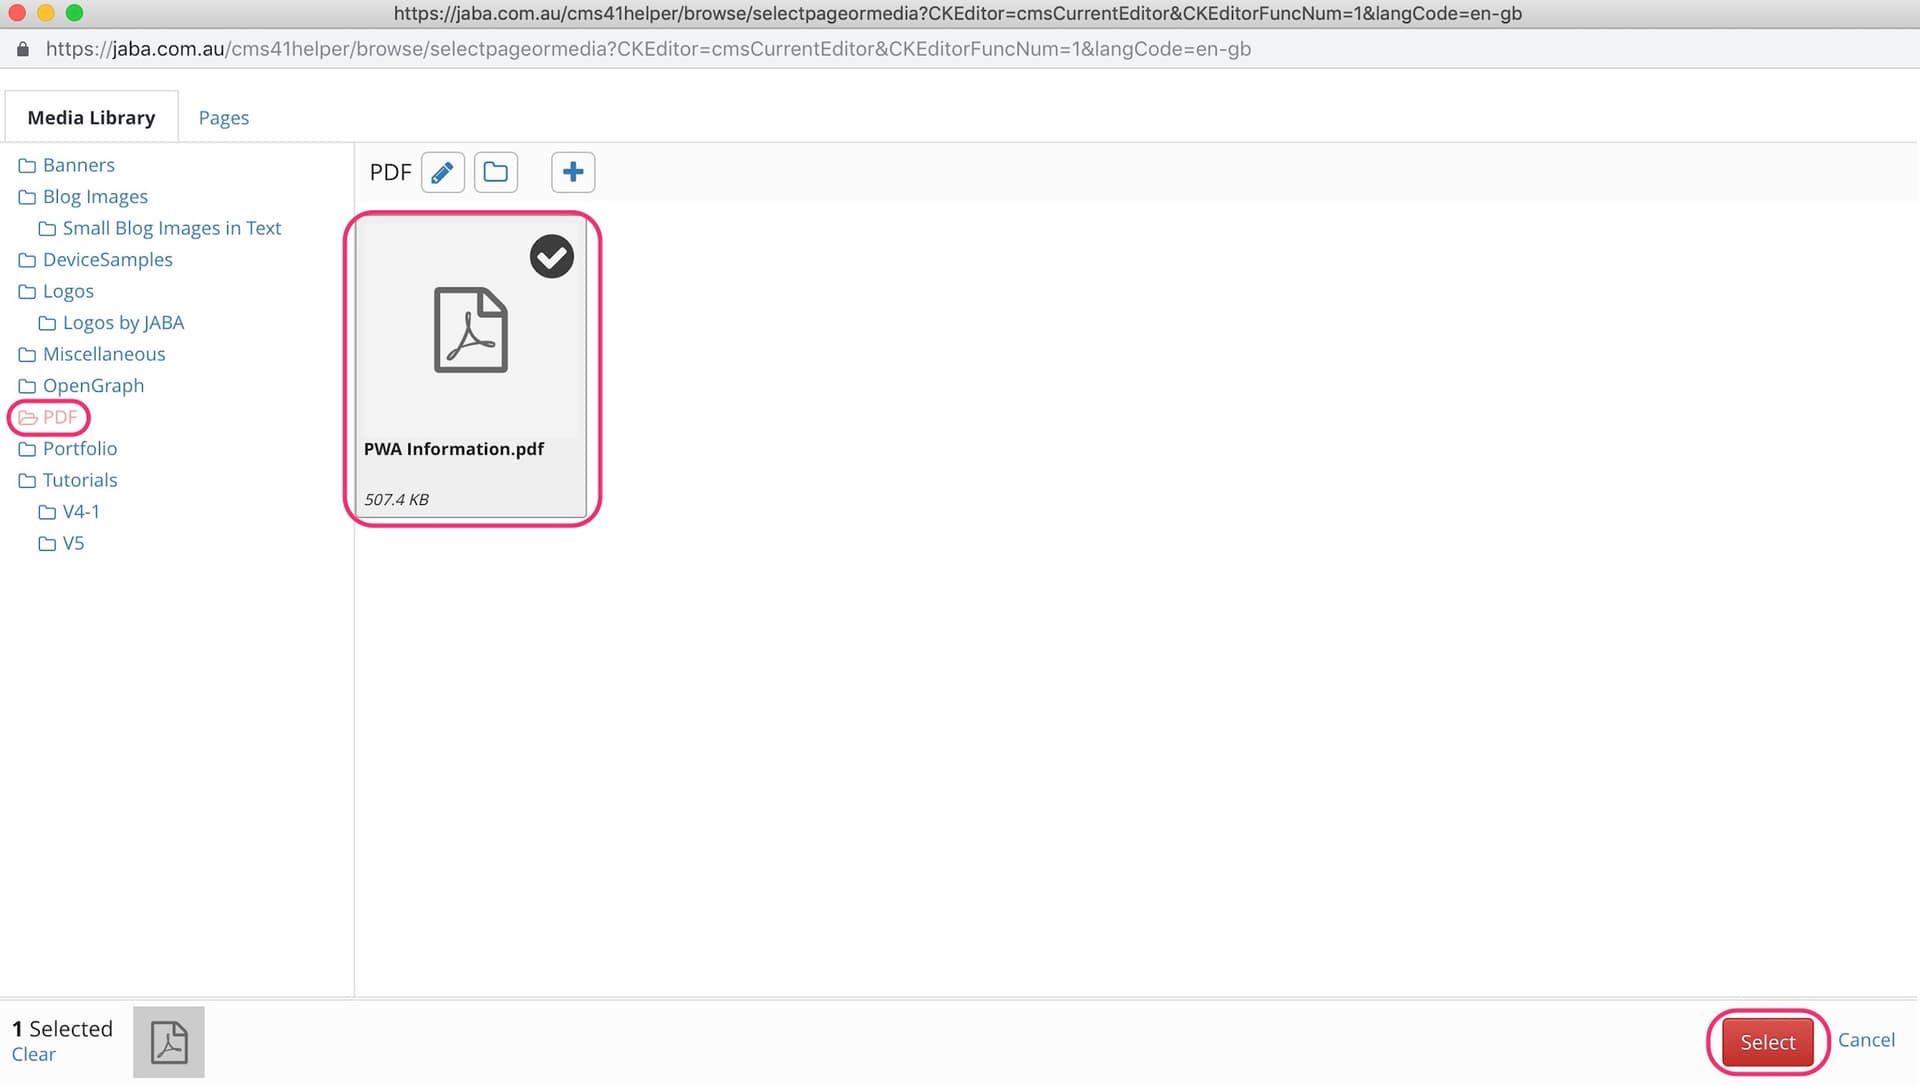
Select your PDF file
- Select the Target tab.
- Select New Window (_Blank) (This ensures the file will open in a new tab when clicked by a user).
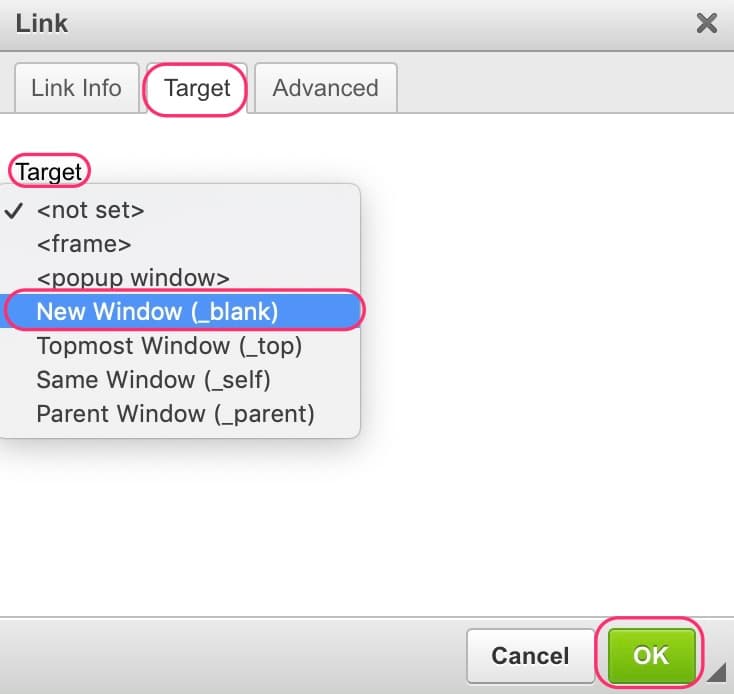
Open in New Window
- Select the Advanced tab.
- Enter noopener noreferrer in the Relationship field (this ensures that search engines read the link as safe).
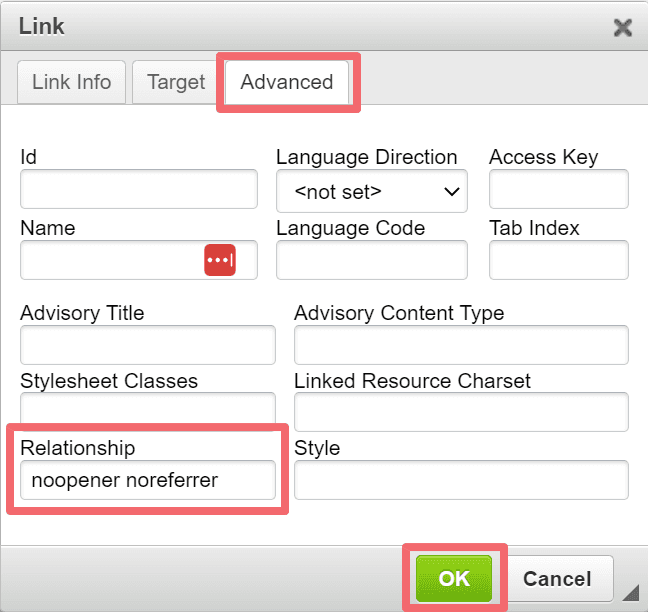
Enter the Relationship
- Select OK.
- Save your text panel using save on the left side panel.
- Publish your page.
Link to an External Website Link
You can link text or images on your website to an external website. It is best that link opens in a new tab so that when users close the linked page they will still have your website open. Choose the page from the CMS directory that you wish to add a link to.
- Select the text panel with the text you wish to link.
- Highlight the desired word or words.
- Select the chain link icon in the toolbar.
.jpeg&w=1920&q=75)
Press the Hyperlink icon
- Select Link Type as URL.
- Select HTTPS from the drop down.
- Enter the external website link into the URL field.
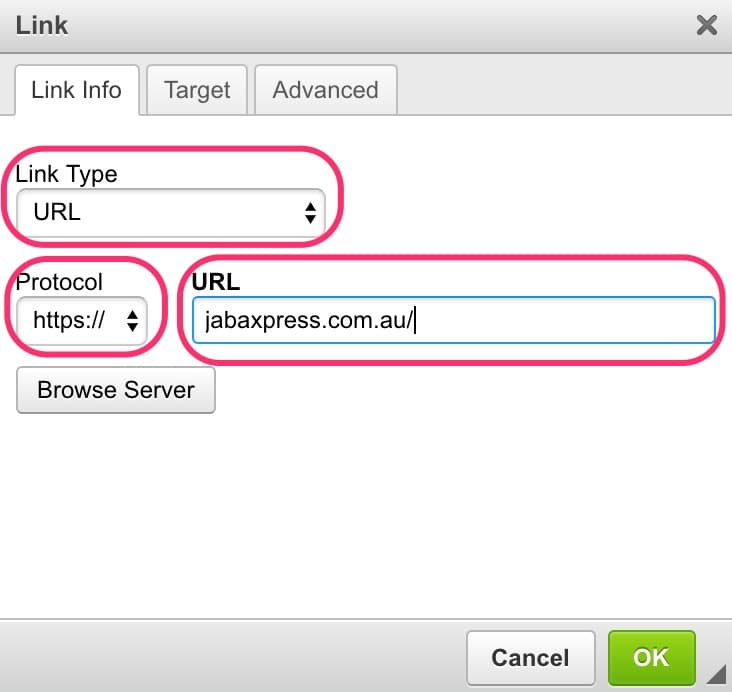
Link to external website
- Select the Target tab.
- Select New Window (_Blank) (This ensures the file will open in a new tab when clicked by a user).
.jpeg&w=1920&q=75)
Open in New Window
- Select the Advanced tab.
- Enter noopener noreferrer in the Relationship field (this ensures that search engines read the link as safe).
Enter the Relationship
- Select OK.
- Save your text panel using save on the left side panel.
- Publish your page.
Linking Text to an Internal Anchor
To link the text on your website to an anchor flag in a text panel you will need to first set up your anchor flag. To set up an anchor for an expanding panel of content see Expanding Panels.
- Select the text panel where you wish to add an anchor flag.
- Select the flag icon in the toolbar.
Press the Anchor icon
- Enter your Anchor Name.
- Select OK.
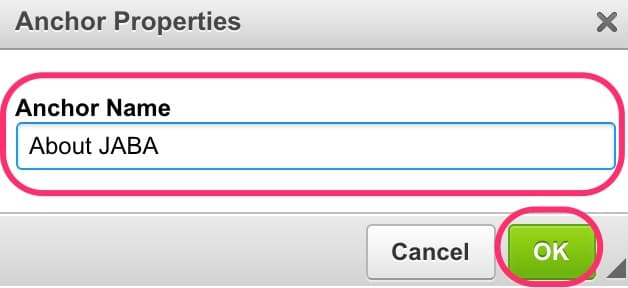
Give the Anchor a Name
- Select the text panel you wish to link to the anchor.
- Highlight the desired word or words.
- Select the chain link icon in the toolbar.
- Under Link Type select Link to anchor in text.
- Select the matching link name from the list.
- Select OK.
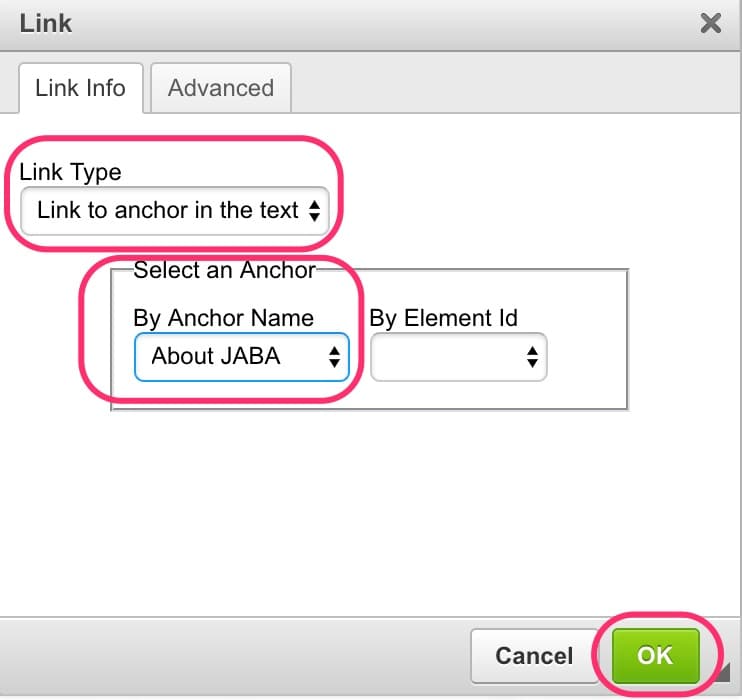
Anchor the item
- Save your text panel using save on the left side panel.
- Publish your page.
To link the text on your website to anchor to a panel you will need to first set up your panel anchor name. To set up an anchor for an expanding panel of content see Expanding Panels.
- Select the panel you want to anchor to in the left side panel.
- Select edit.
- Enter your unique anchor link name in the Anchor Name: field.
- Select Save.
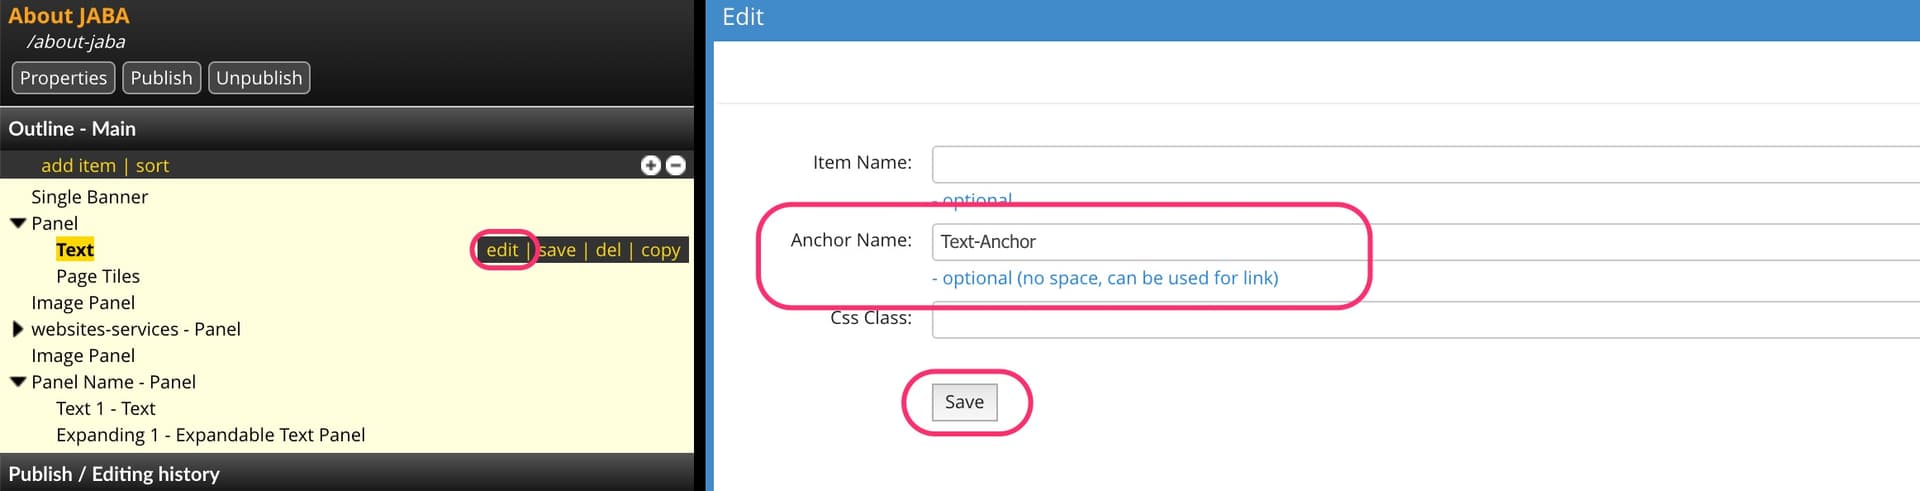
Create a unique anchor name
- Select the text panel you wish to link to the anchor.
- Highlight the desired word or words.
- Select the chain link icon in the toolbar.
- Under Link Type select Link to anchor in text.
- Select the matching link name from the list.
- Select OK.
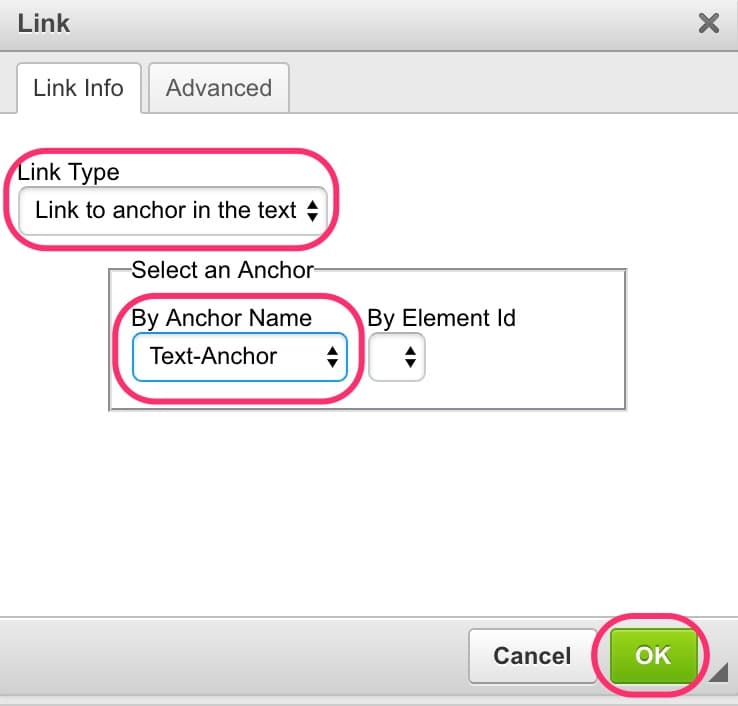
Anchor the text to the unique anchor name
- Save your text panel using save on the left side panel.
- Publish your page.
Creating a Button
To create a button on your website as a call to action you will need to create your text link. See the above information for assistance.
- Once you text has been linked, Put your cursor on the linked text and select the Styles drop down menu on the toolbar.
- Select Button from the drop down list.
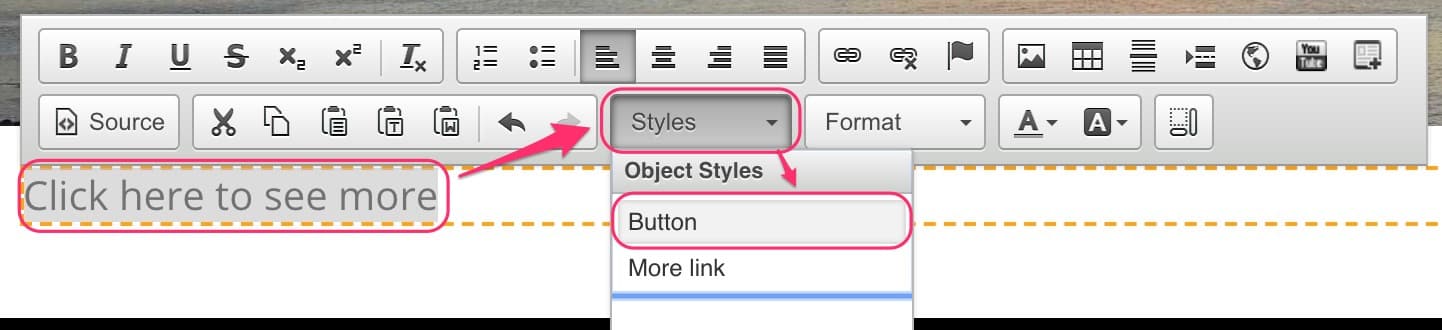
Select the Button option
- Your text will now display as a button in your preset website style.
- Save your text panel using save on the left side panel.
- Publish your page.
 Expanding Panels
Expandable Text Panels are useful for hiding text and images that users may want to read more about that would otherwise clutter your webpage and make it hard for users to read at a glance.
Creating the Expandable Panel
Open the page in the CMS you wish to add the Expandable Text Panel to.
First you are going to to add a panel.
- Select add item.
- Select Panel and enter your item name.
- Select Add.
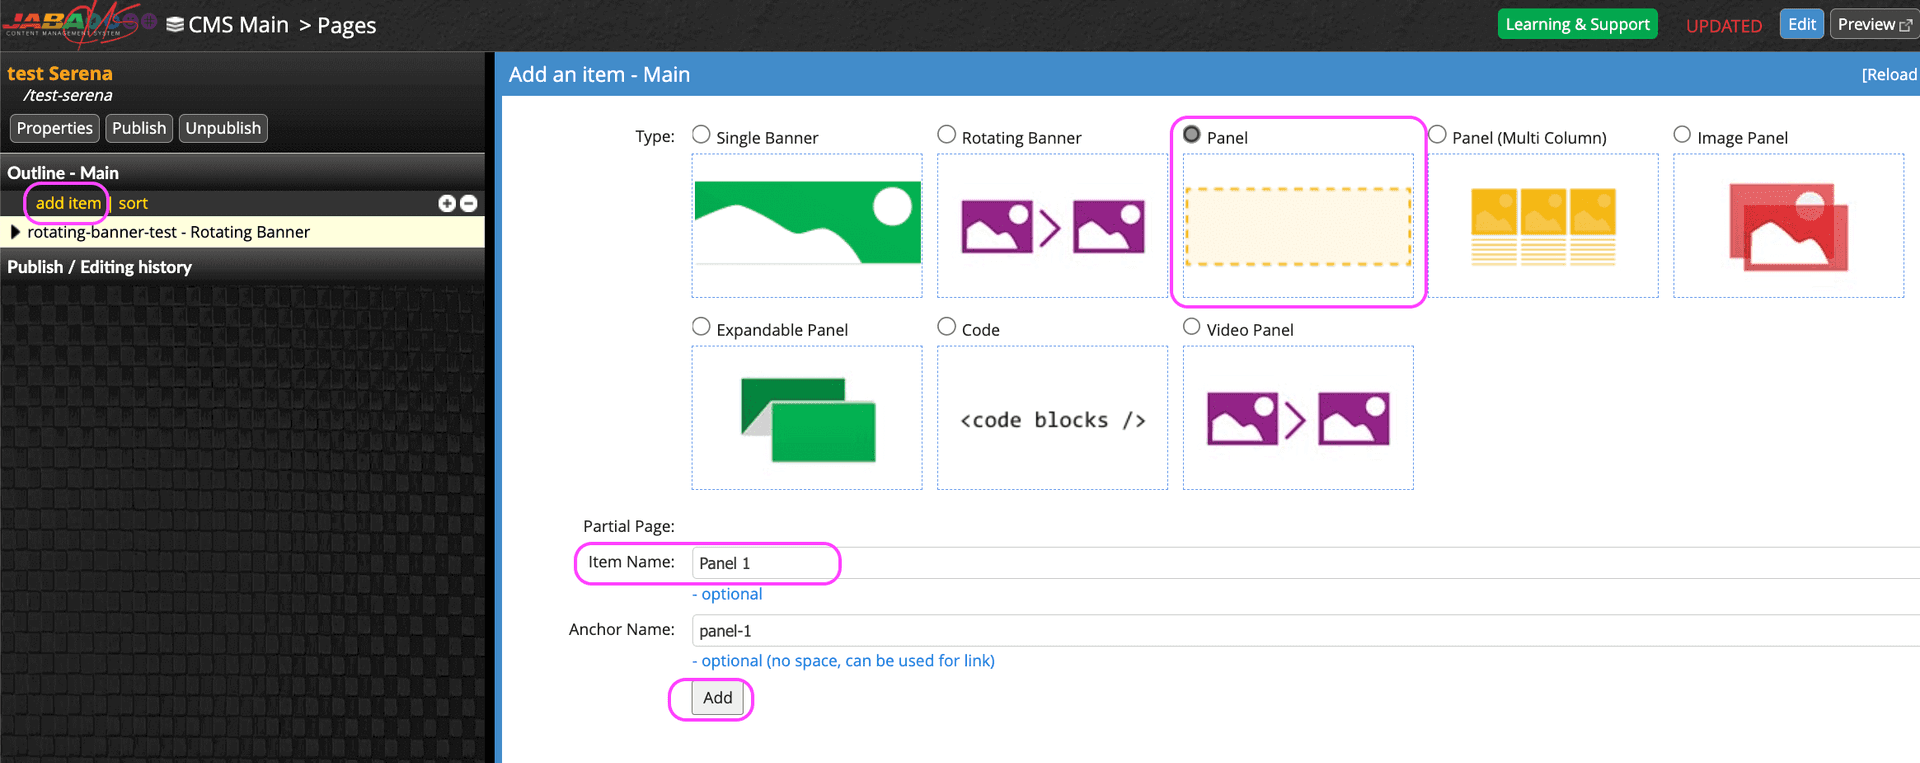
Create a Panel
Next you are going to add a text box to your panel.
- Select the newly created Panel (very last item in the list by default).
- Select add.
- Select Text.
- Enter your item name.
- Select Add.
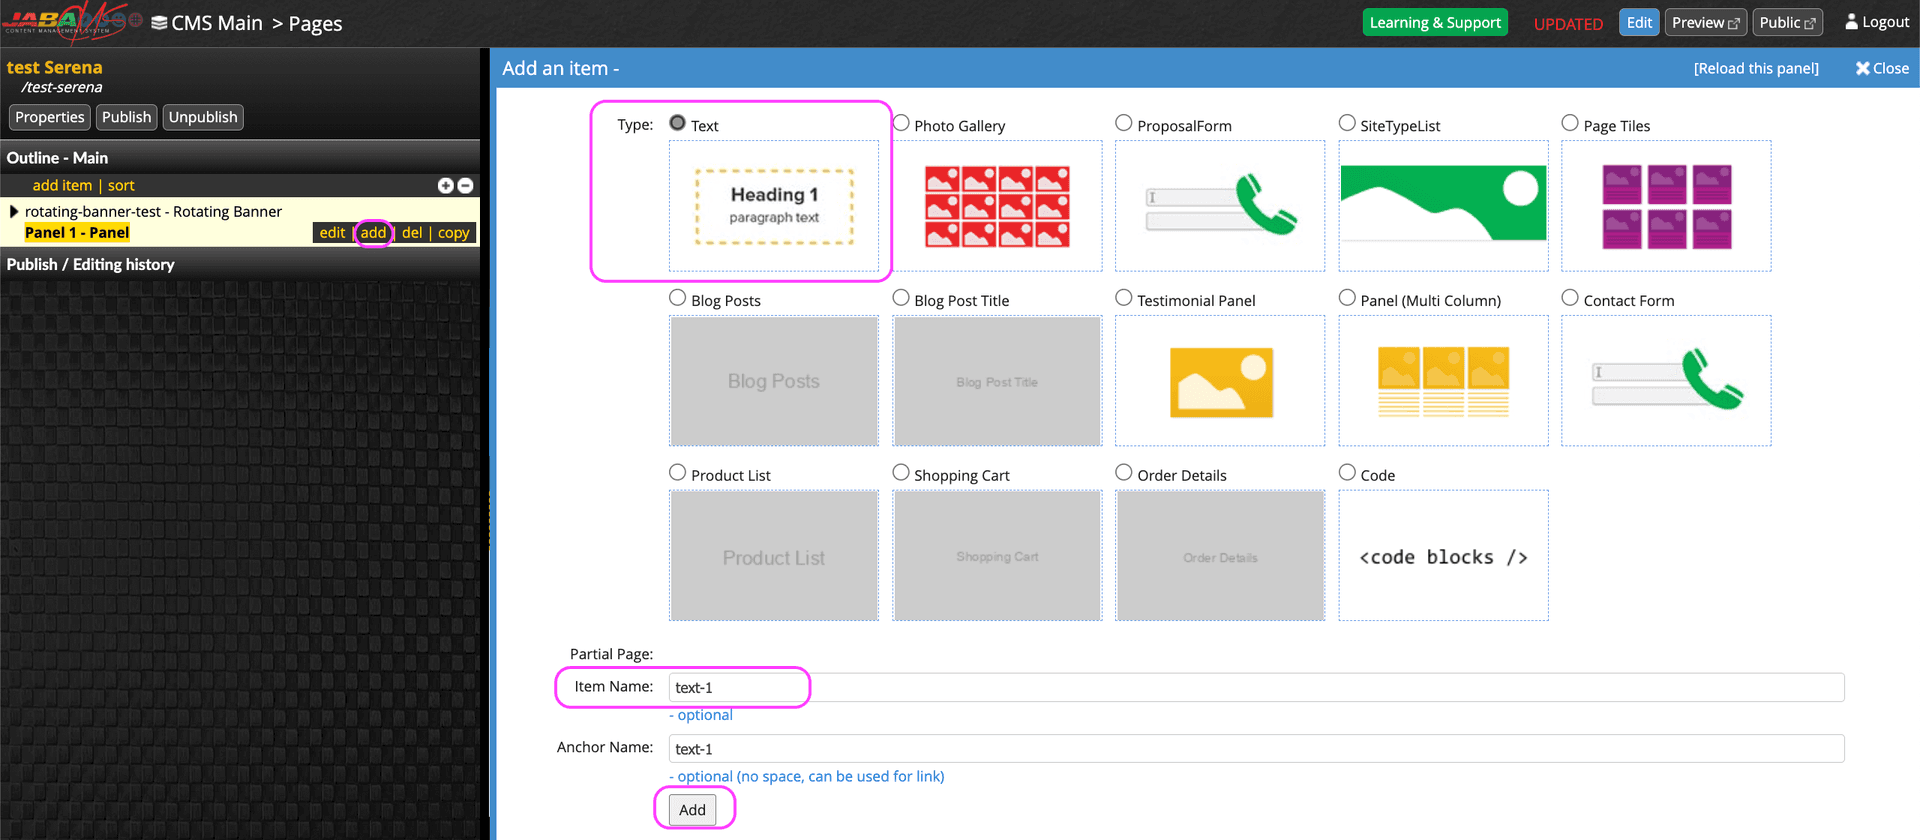
Add a Text Box
Add text to your textbox.
- Enter you text into the text box that you want to be visible on the webpage.
- Select save or save html in the left panel to ensure the text you add is saved.
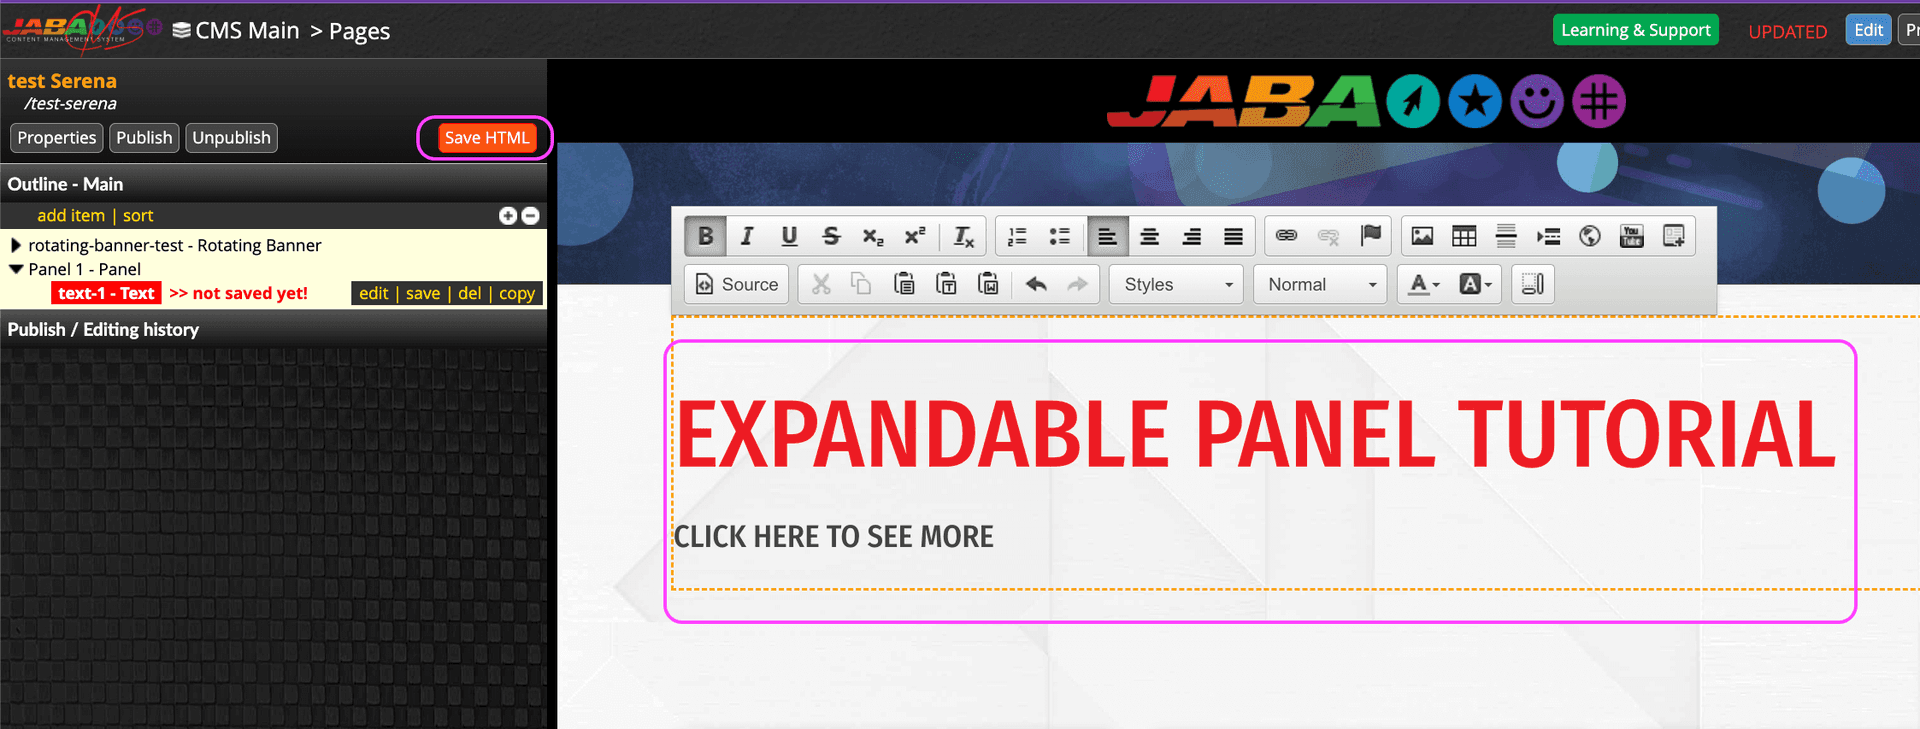
 Add a Text to your text Box
You are then going to add an Expandable Panel.
- Select add item.
- Select Expandable Panel and enter your unique item name
- Note: When you enter the Item Name it will auto fill the Anchor Name field and this will be the anchor name you will link your text panel to to open the Expandable Panel.
- Select Add.
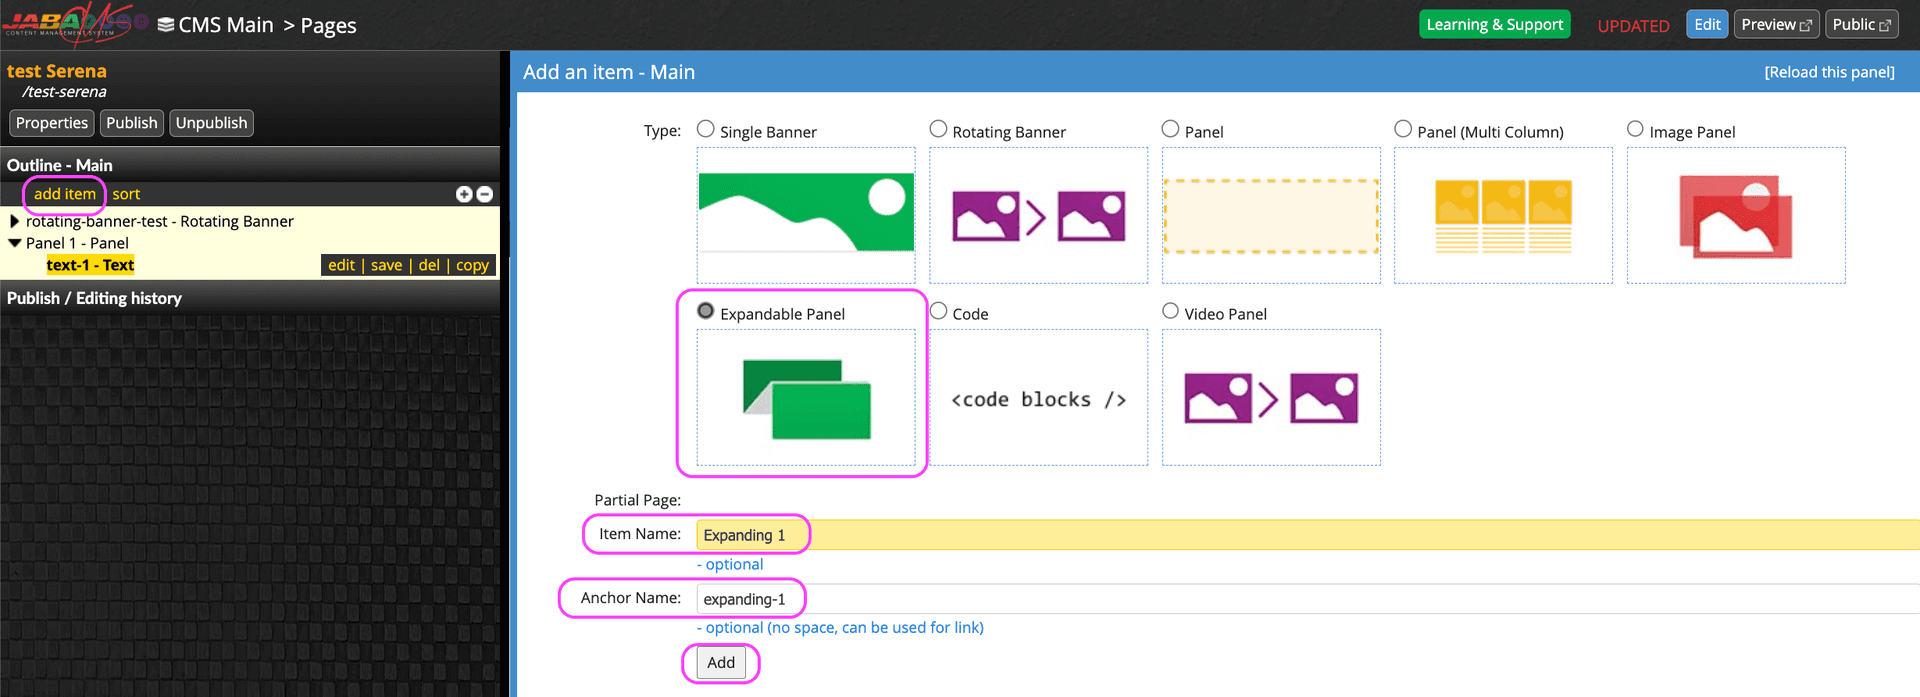
Add an Expandable Panel
Add a text box to your Expandable Panel.
- Select the newly created Expandable Panel (very last item in the list by default).
- Select add.
- Select Text.
- Enter your item name.
- Select Add
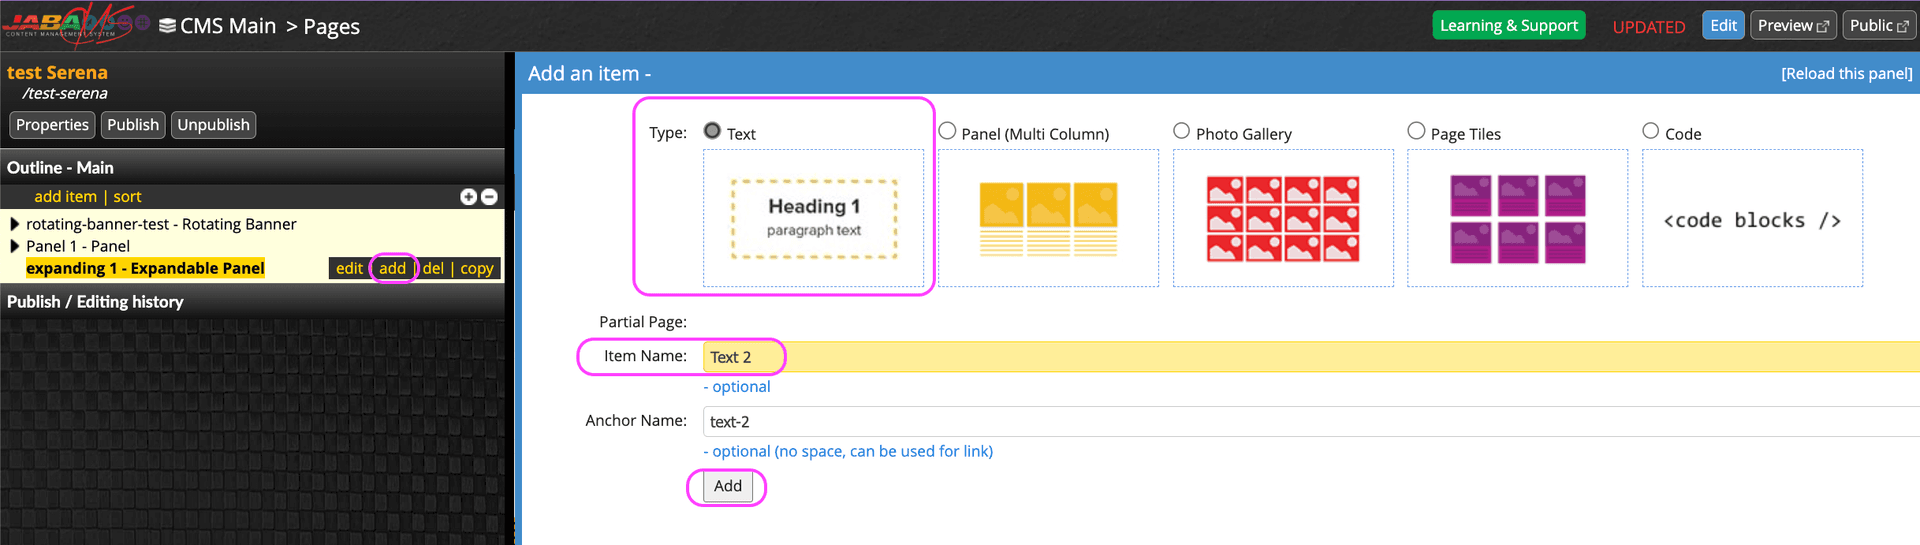
Add a Text Box
Add text to your Expandable Panel.
- Add your text into the text box of Expandable Panel that you want hidden until users click the expanding link.
- Select save or save html in the left panel to ensure the text you added is saved.
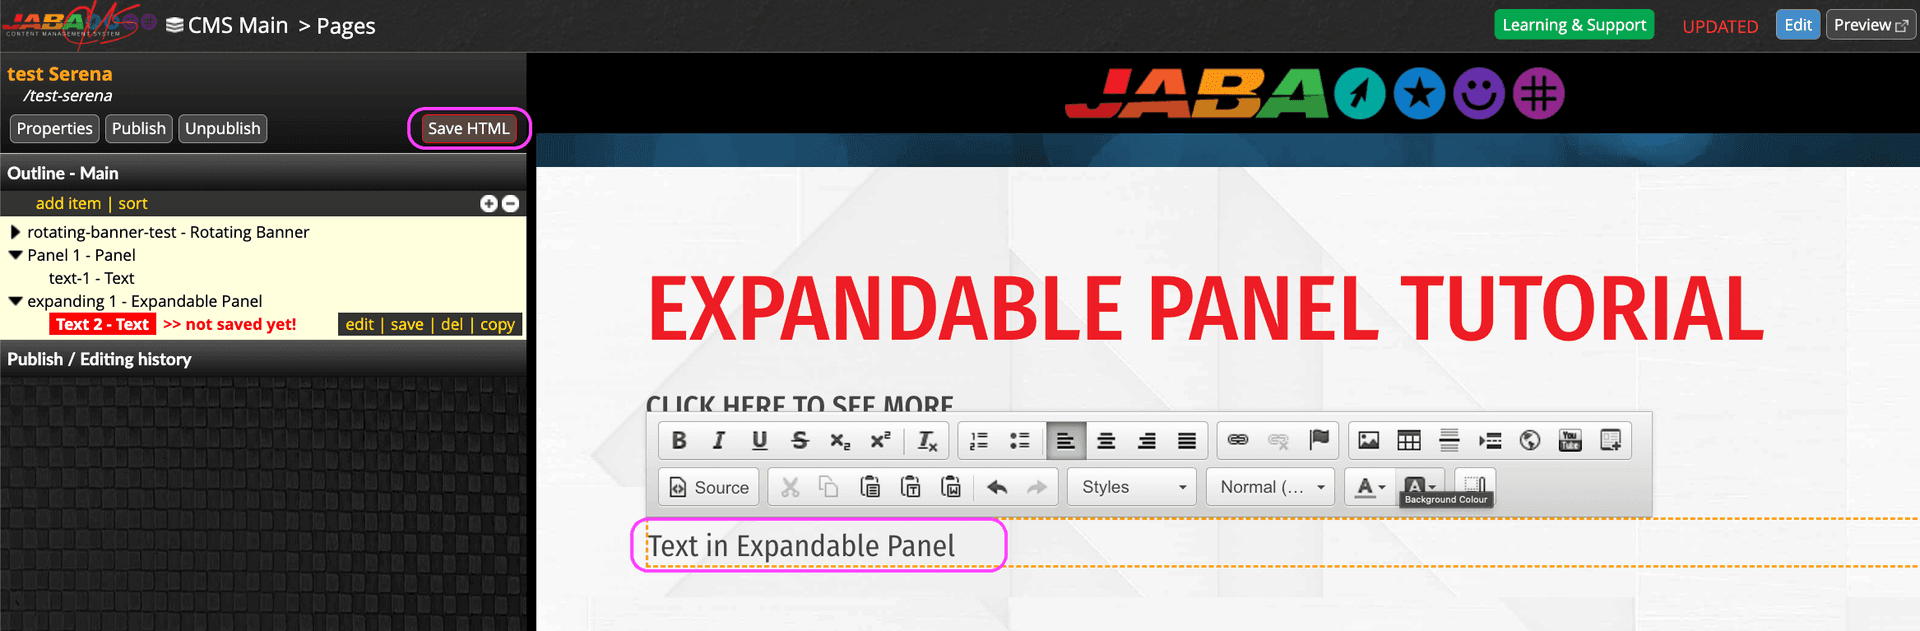
Add the hidden text
You are now going to create a hyperlink to open your Expandable Panel.
- Select the text box inside within the first panel you created panel and highlight the text you want to link to the Expandable Panel. We recommend linking to text that says something such as: read more +.
- Select the chain link icon in the toolbar.
- Select the drop down list under Link Type and choose Link to anchor in text.
- Choose your expandable panel anchor name from the drop down list in By anchor name.
- Select OK.
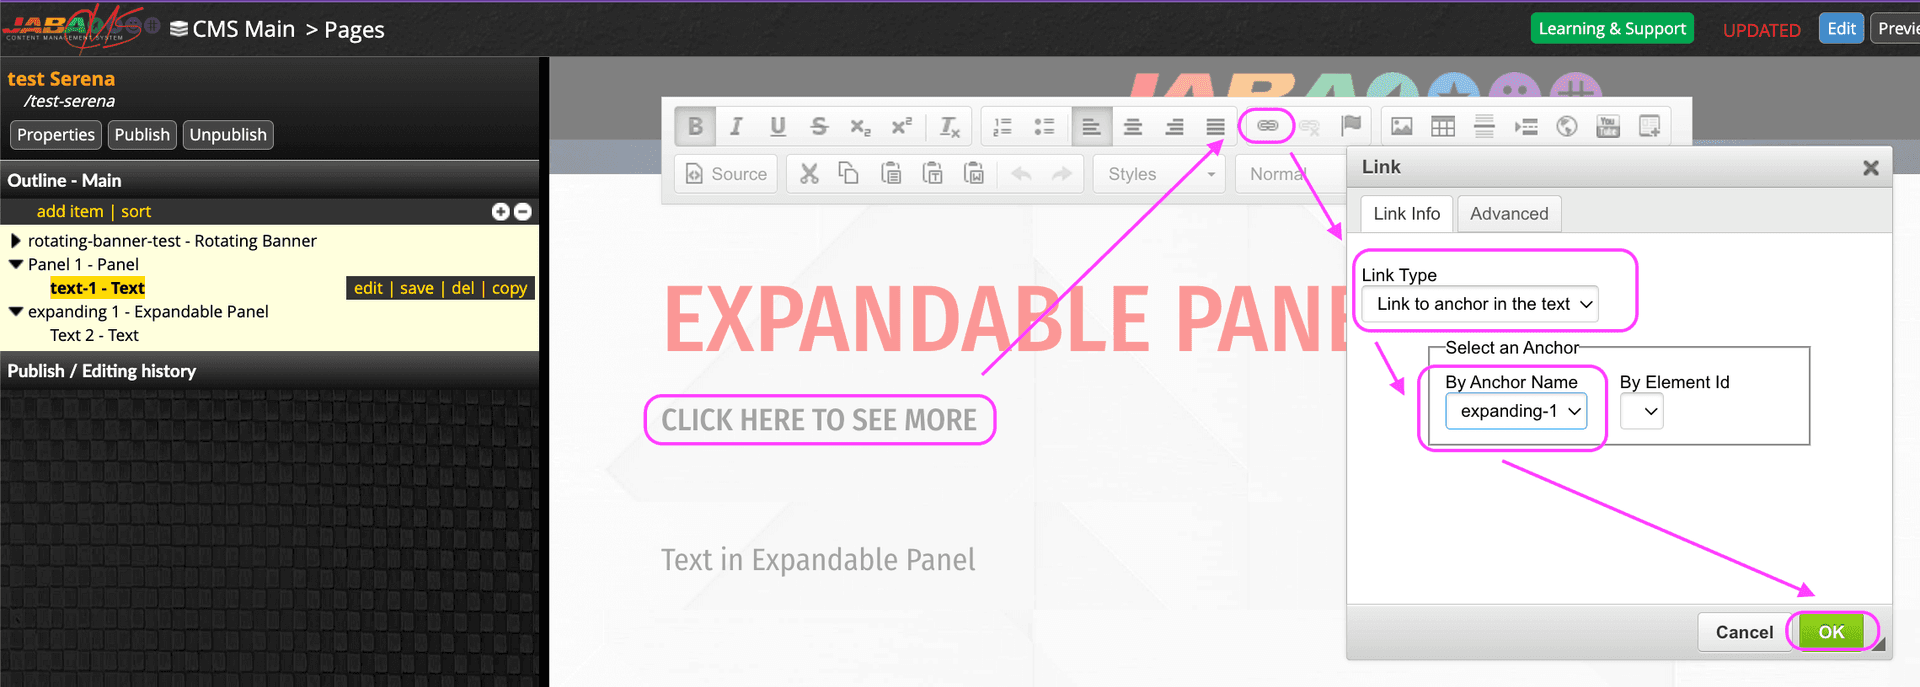
Hyperlink the Expandable Panel
Select the hyperlinked text that you linked to your expandable text panel. Select the Styles button in the toolbar and select Button to convert the text link into a button for users to click on if you wish.
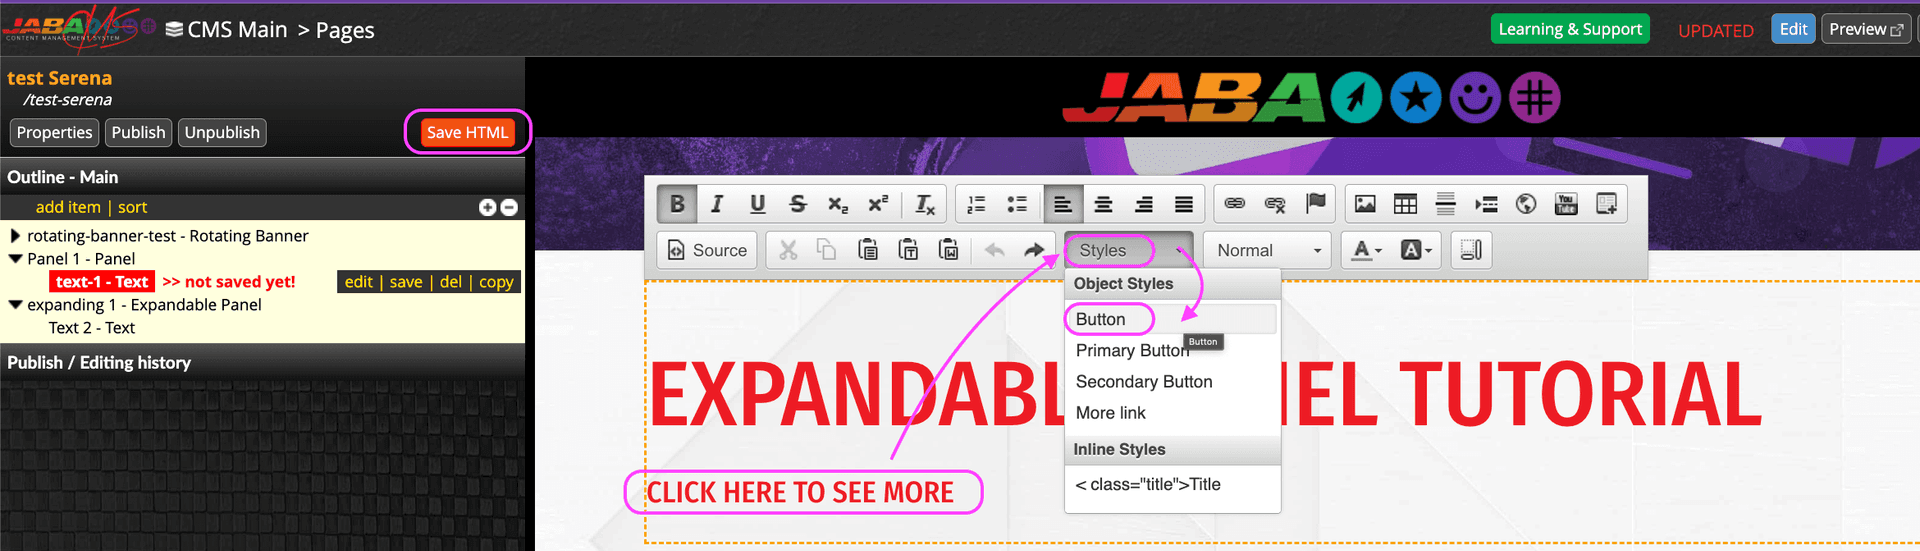
Choose the Button option
- Save your changes in the Text Panel.
- Preview your changes to ensure the expandable text panel works as intended.
- Publish your page.
Note: If you would like to create a multi column panel inside of an Expandable Panel, you can select add on the newly created Expandable Panel and add Multi Column.
See the Adding Multi Columned Content section to see how to set up you multi column.
 Updating the Contact Form
Update your contact form email address receiever or update your contact footer details. Also learn how to add the ability for users to attach files to their enquiry submissions.
Choose the page /partials/common-footer from the CMS directory to access your common contact footer.
Updating the Text on your Contact Form
You can edit the text on your contact form by selecting the text panel.
- Edit the text as required.
- save your changes.
- Preview the form to ensure it is correct.
- Publish the common page.
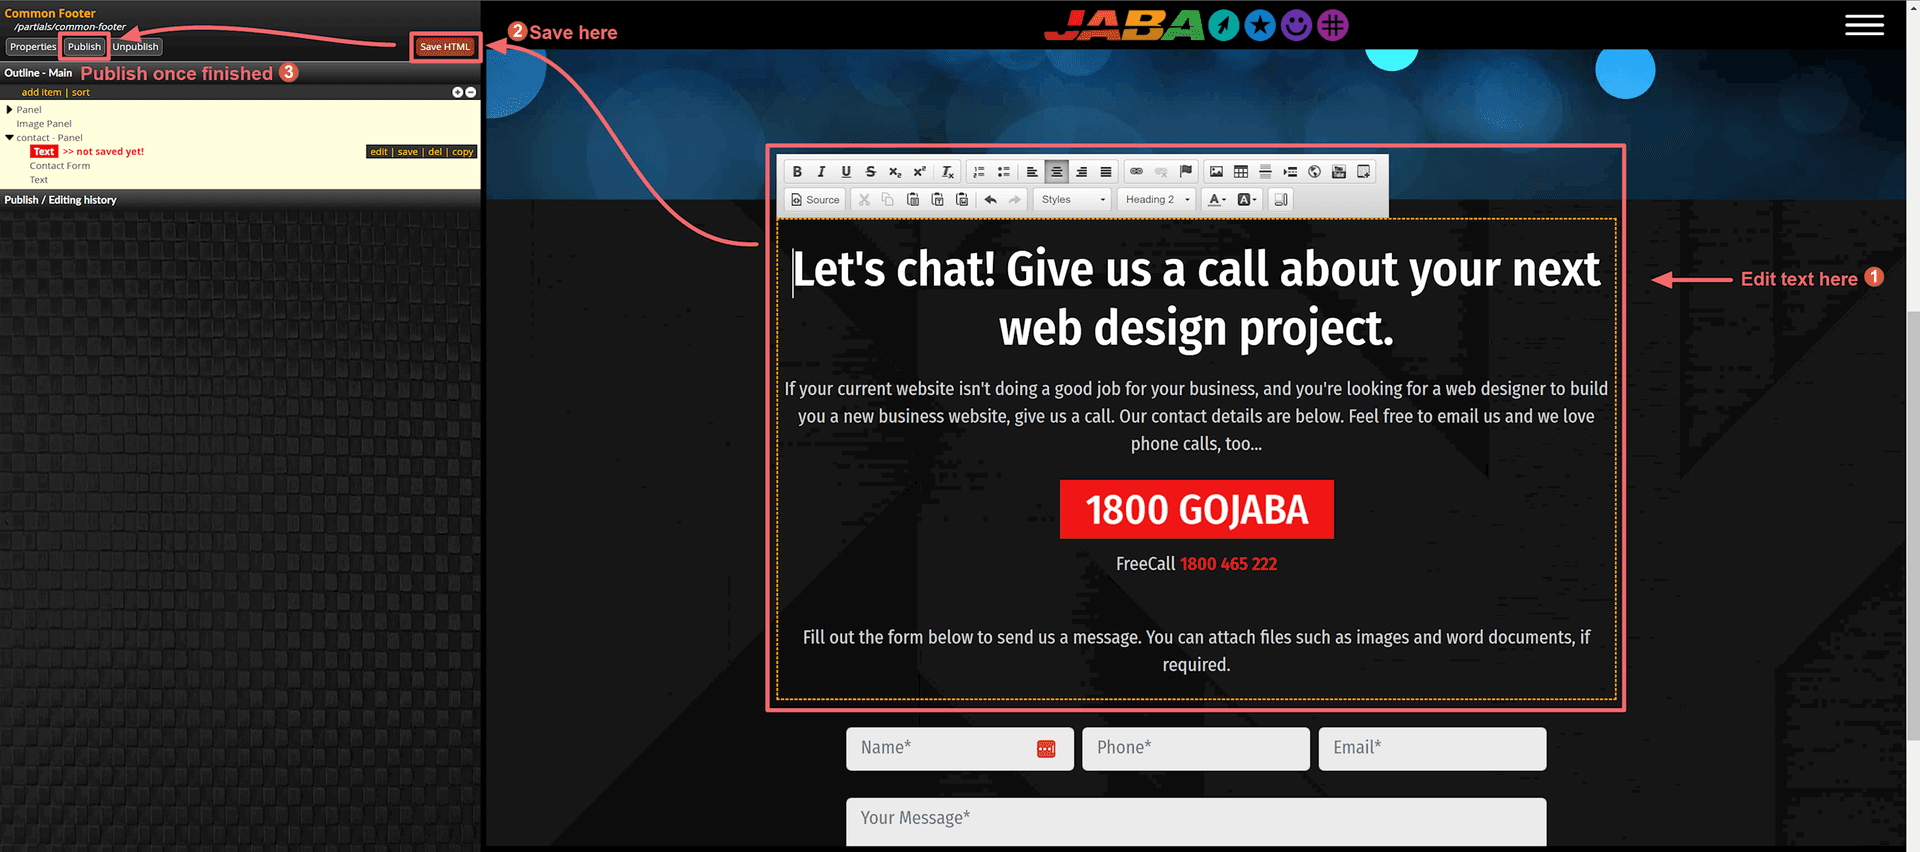
Updating Contact Form Text
Updating the Phone Number in your Contact Form
You can edit the phone number on your contact form by selecting the text panel.
- Delete the existing phone number.
- Replace with the new phone number.
- Highlight the new phone number.
- Select the link icon in the toolbar.
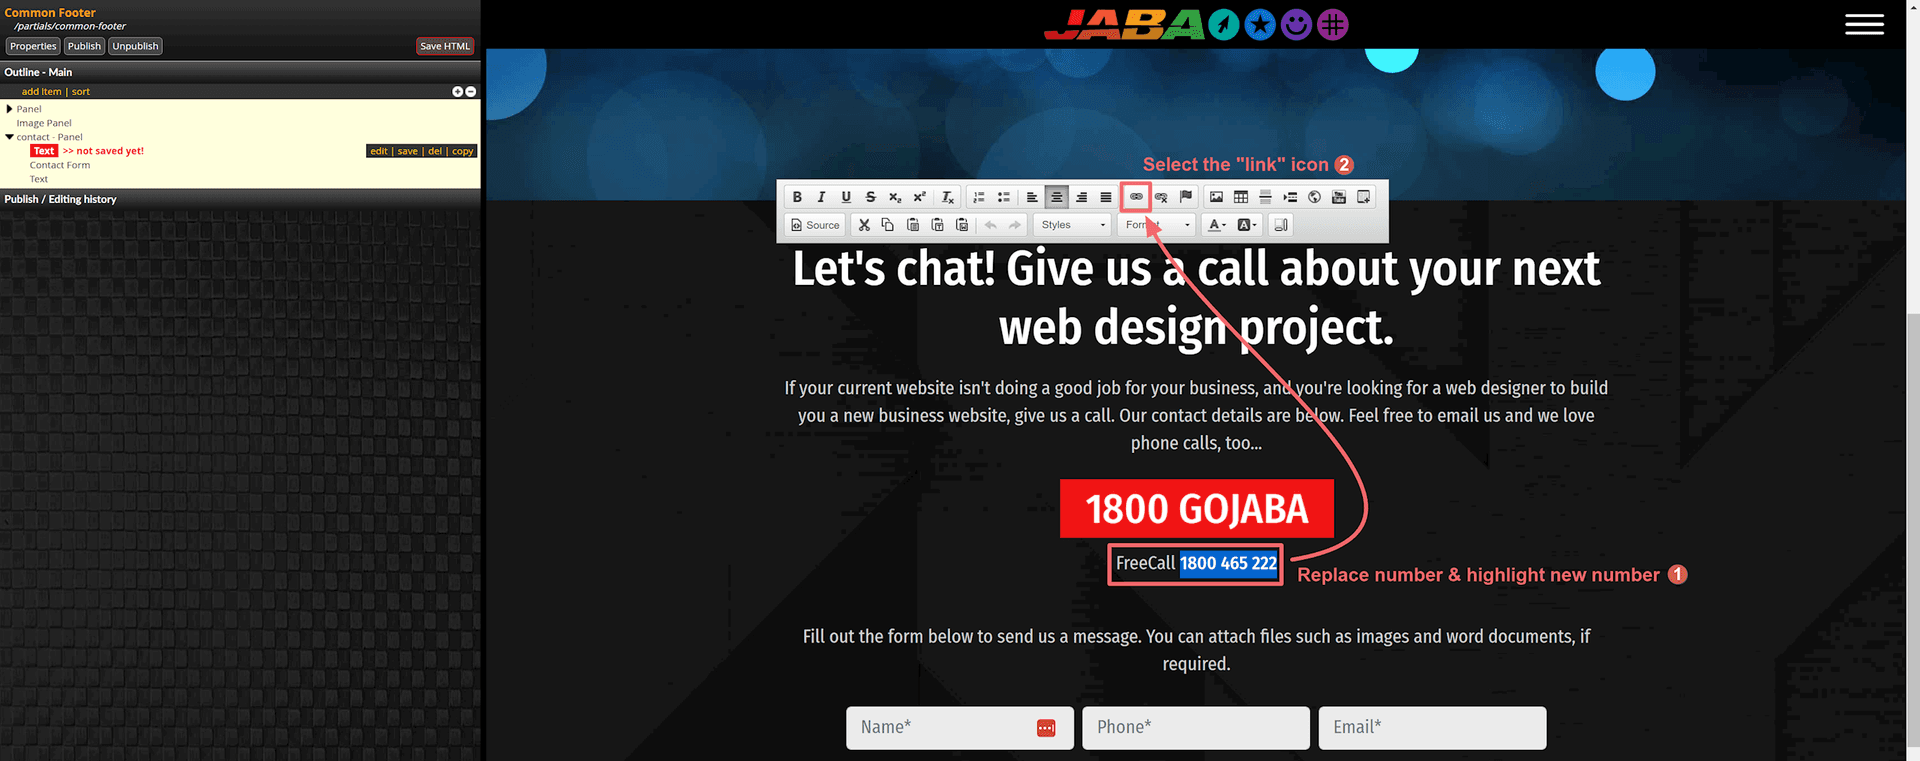
Updating Contact Form Phone Number
- Select Link Type as URL
- Select Protocol as <other>
- In the URL enter tel: <insert phone number here>
Note: Don't forget the area code in the phone number. - Remove all spaces.
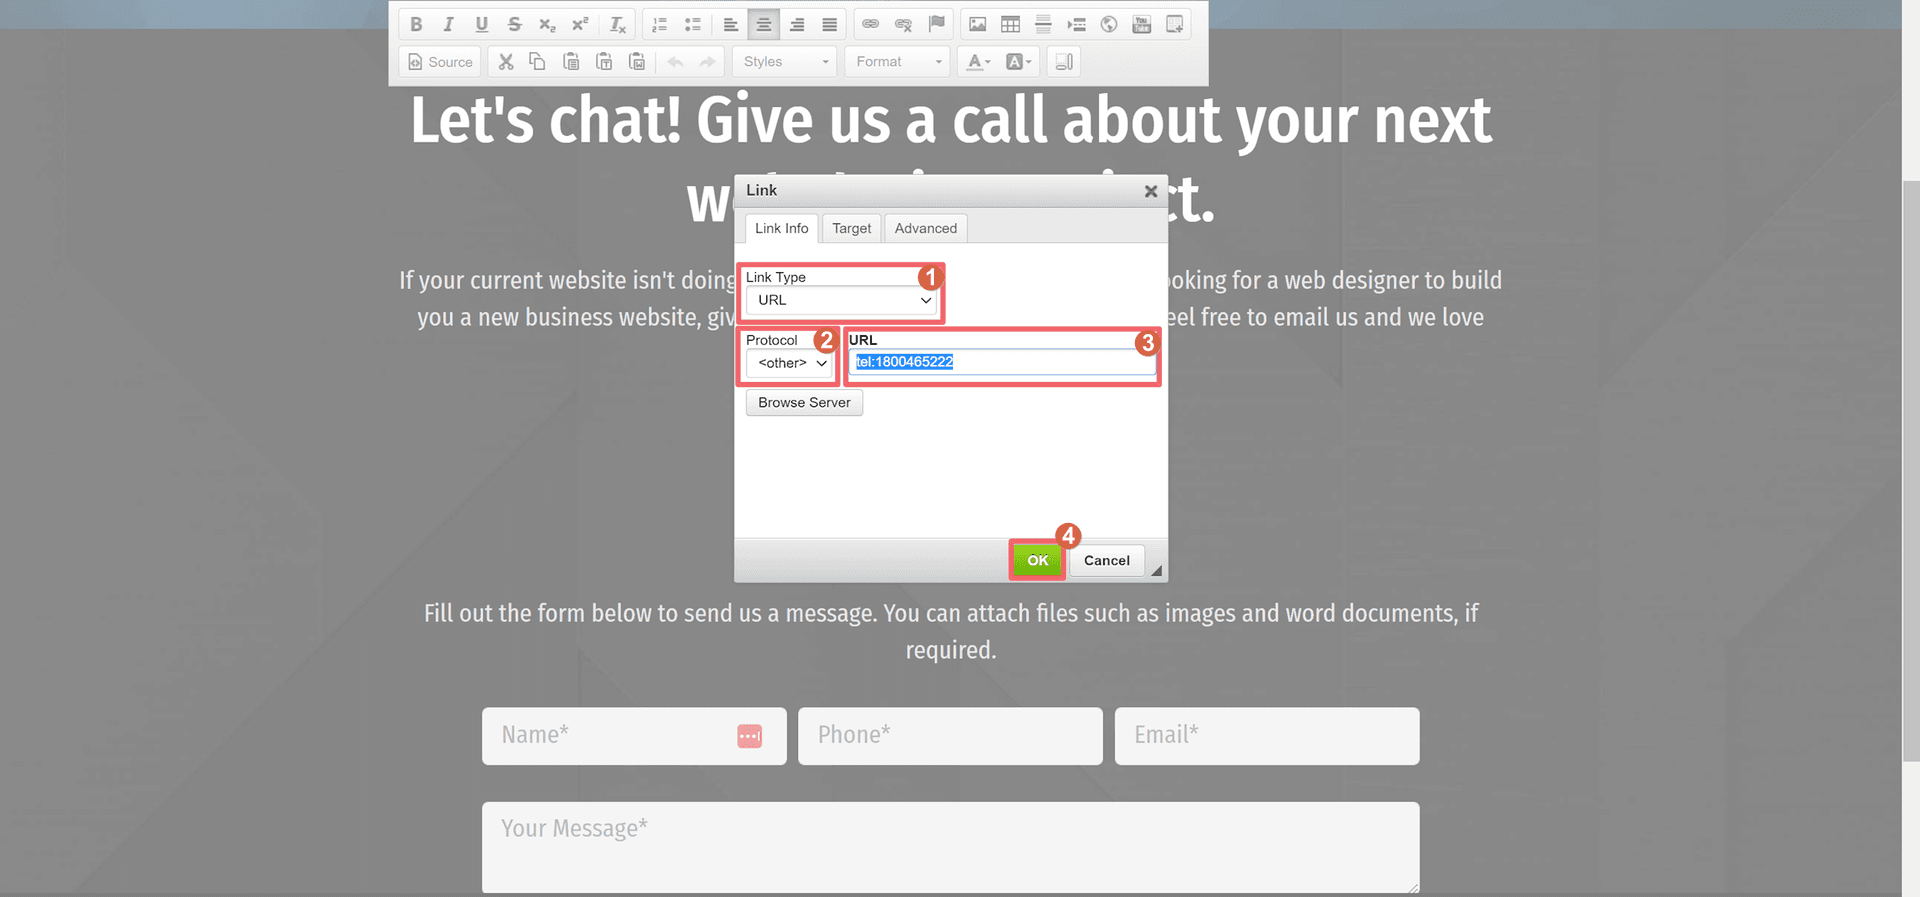
Updating Contact Page Phone Number
- Press OK.
- save your changes.
- Preview the form to ensure it is correct.
- Publish the common page.
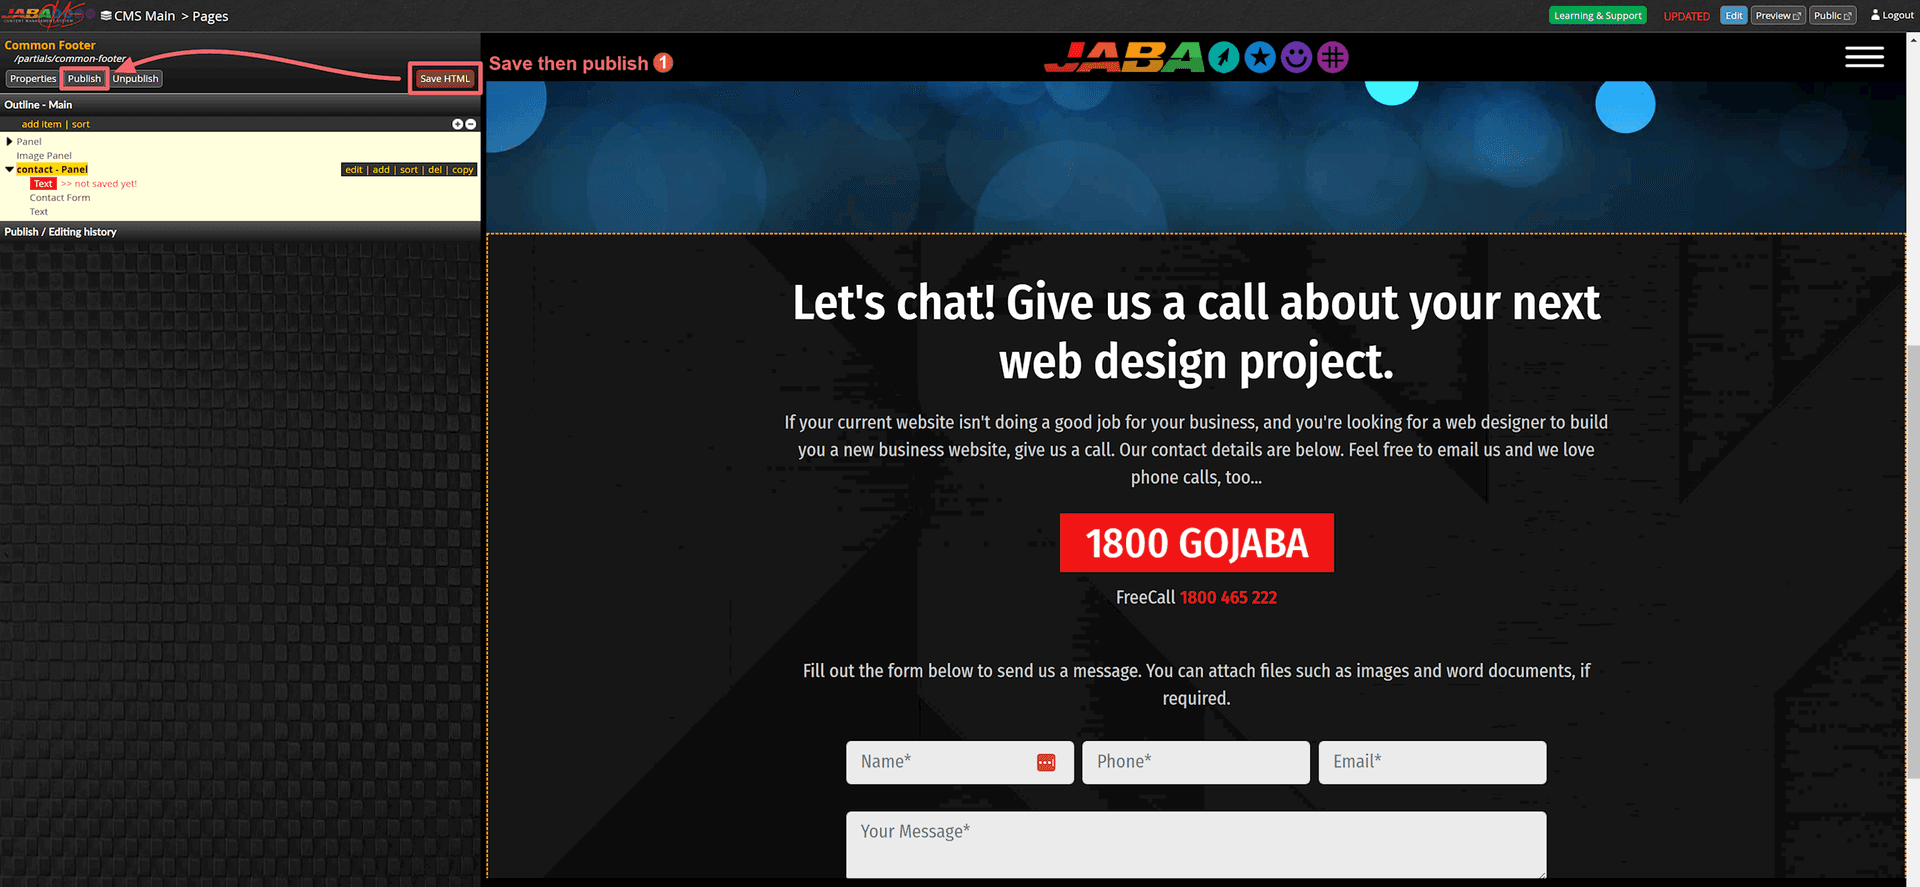
Updating Contact Form Phone Number
Updating the Email Receiver for the Contact Form
You can change and add additional email recievers to the common contact form. The recievers will get a copy of any enquiries that are submited into the website form via their entered email.
- Select Contact Form panel.
- Select edit
- Change the Email Receiver to the new email address. You can add additonal email addressed separated by a comma if you wish.
- Select Save
- Preview the form to ensure it is correct.
- Publish the common page.

Updating Contact Email Receiver
*Note: please test the contact form after you change your email by filling out a test enquiry, pressing submit and checking you recieve a copy of the test enquiry.
File Attachements
You can add a file attachment option to your contact form if you require enquirers to send you an attachment.
- Select Contact Form.
- Select edit.
- In the File Attachment option select Yes if you want file attachments.
- In the Filte Attachment option select No if you don't want file attachments.
- Select Save.
- Preview the form to ensure it is correct.
- Publish the common page.

Updating Contact Form Attachment
 Create a New Page
Learn how to create a new blank page in the CMS or make a copy of an existing page.
You can create a new page or you can copy an existing page and edit the copied page.
Create a New Page
- Select the CMS Pages option in the left side panel.
- Select the + Add Page button.
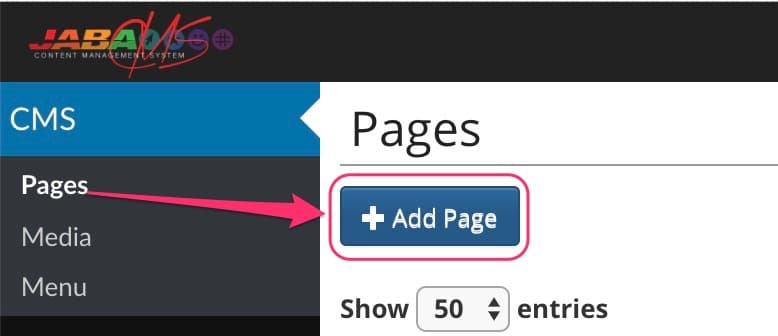
Create a New Page
- Select Default.
- Enter the new unique page name into the Title field.
- The new page URL will auto fill from the page title you added.
- Select Add
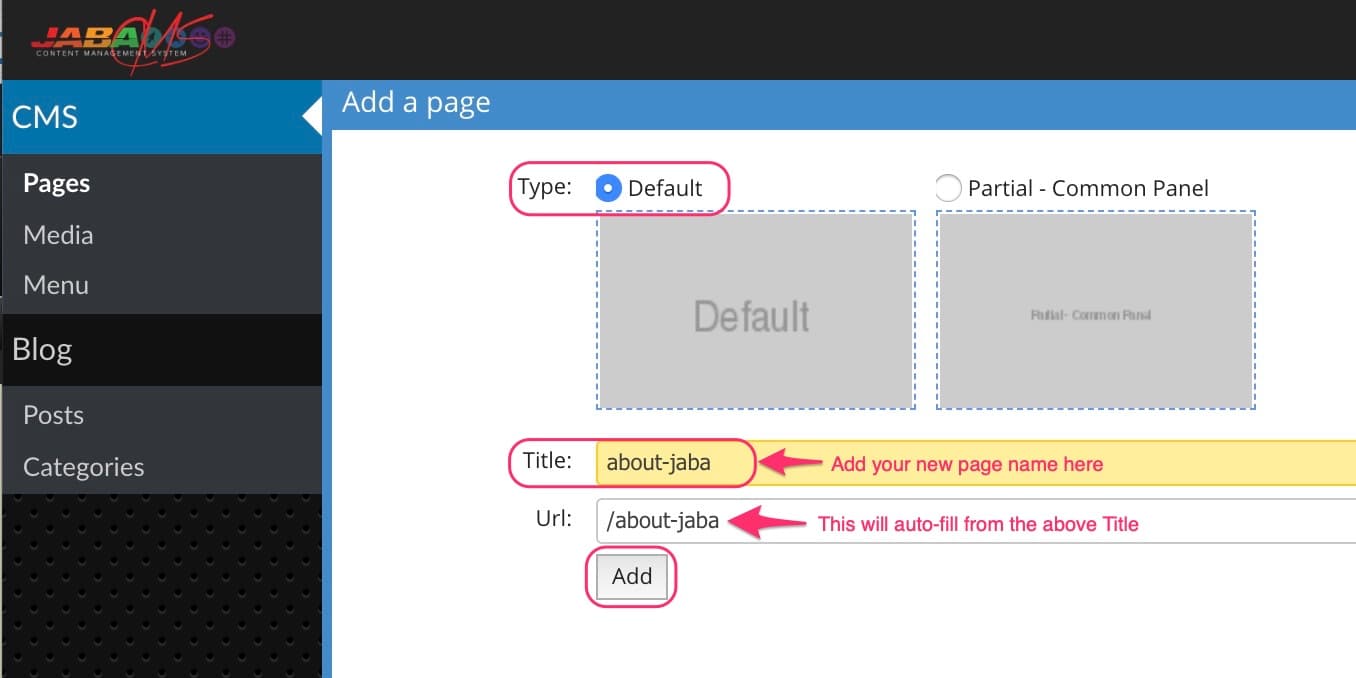
Add the New Page
- You will be on the new page you just created.
- Begin entering the new page elements and content.
Copy an Existing Page
You can make a copy an existing page if you want to use the same structure and alter the elements and content of the page instead of starting with a blank page.
- Choose the page from the CMS directory that you wish to copy.
- Select the Properties button.
- Select the copy tab at the top.
- Enter the URL of the new page you want to create into the Copy this page: field Please note: the new URL must start with "/"
- Select the Copy button to the right of the URL field.

Copy an Existing Page
- A pop up will appear to confirm. Press OK.
- You will now be on the newly copied page.
- Begin editing the elements and content into the copied page.
Don't forget to update the Properties tab for the tile and meta data images and text. You can find out more about meta data properties in the Editing Meta Data section.
 Embedding a Video or Google Map
Understand how the embedding tools work. Use these tools to embed YouTube videos and Google Map listings.
Adding a YouTube video inside your website text
To add a YouTube video inside the text panel, you will need to edit the text panel on the page you have selected.
- Click on the text you wish to edit. A yellow dotted line will appear around the text box and a toolbar will appear directly above or below the text panel.
- In the toolbar, select Embed YouTube Video
Press the YouTube icon
- A pop up box will appear.
- Copy and Paste the YouTube URL into Paste YouTube Video URL field.
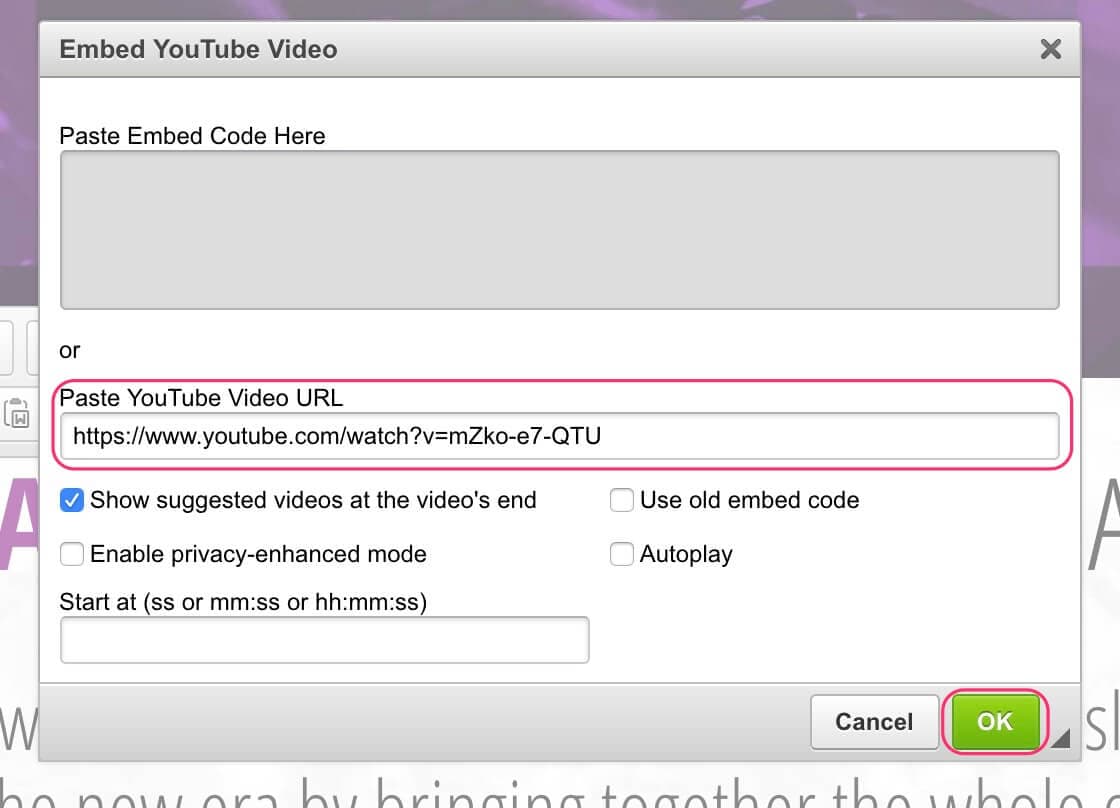
Paste the YouTube URL
- Press OK.
- Press Save.
- Preview the page to ensure it is correct.
- Publish the page.
Embedding a Google Map or Other Embed
To add a Google Map inside a text panel, you will need to edit the text panel on the page you have selected.
- Click on the text you wish to edit. A yellow dotted line will appear around the text box and a toolbar will appear directly above or below the text panel.
- In the toolbar, select Embed Code
- PLEASE NOTE: if you do not have the Embed button you can alternatively use the Youtube Button, and enter your Google Map code where it says "Paste Embed Code Here"
Press the Embed icon
- A pop up box will appear.
- Name the map in the Code Name field.
- Copy and paste the Google Map embed code into the Embed Code field.
- Press OK.
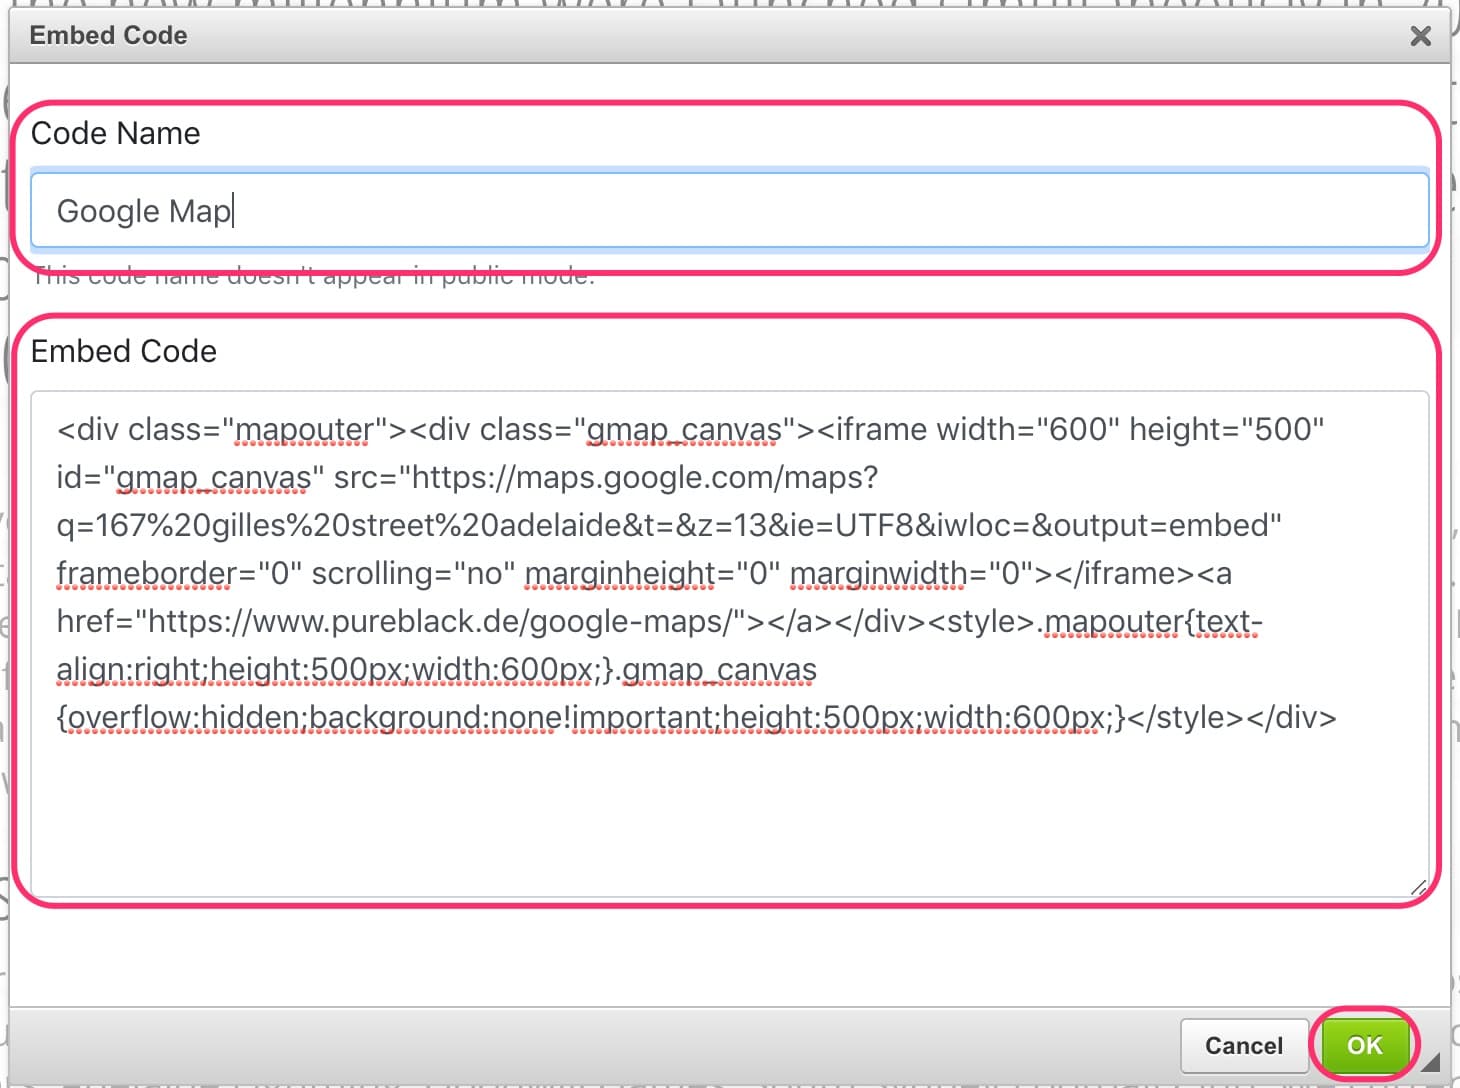
Paste the Google Maps Embed Code
- Press Save.
- Preview the page to ensure it is correct.
- Publish the page.
 Hiding a Page from Search Engines
Learn how to hide pages or test pages from being indexed by search engines.
You may create a page that will be useful for your website but you might not want it to be indexed by search engines.
You can use the properties settings in your selected cms web page to set your page to Hide from sitemap.xml so that it is hidden from your websites search engine sitemap.
- Choose the page from the CMS directory that you wish to hide from the search engine sitemap.
- Select Properties in the top left corner of the screen.
- Select the Hide from sitemap.xml checkbox
- Select Update Page Information
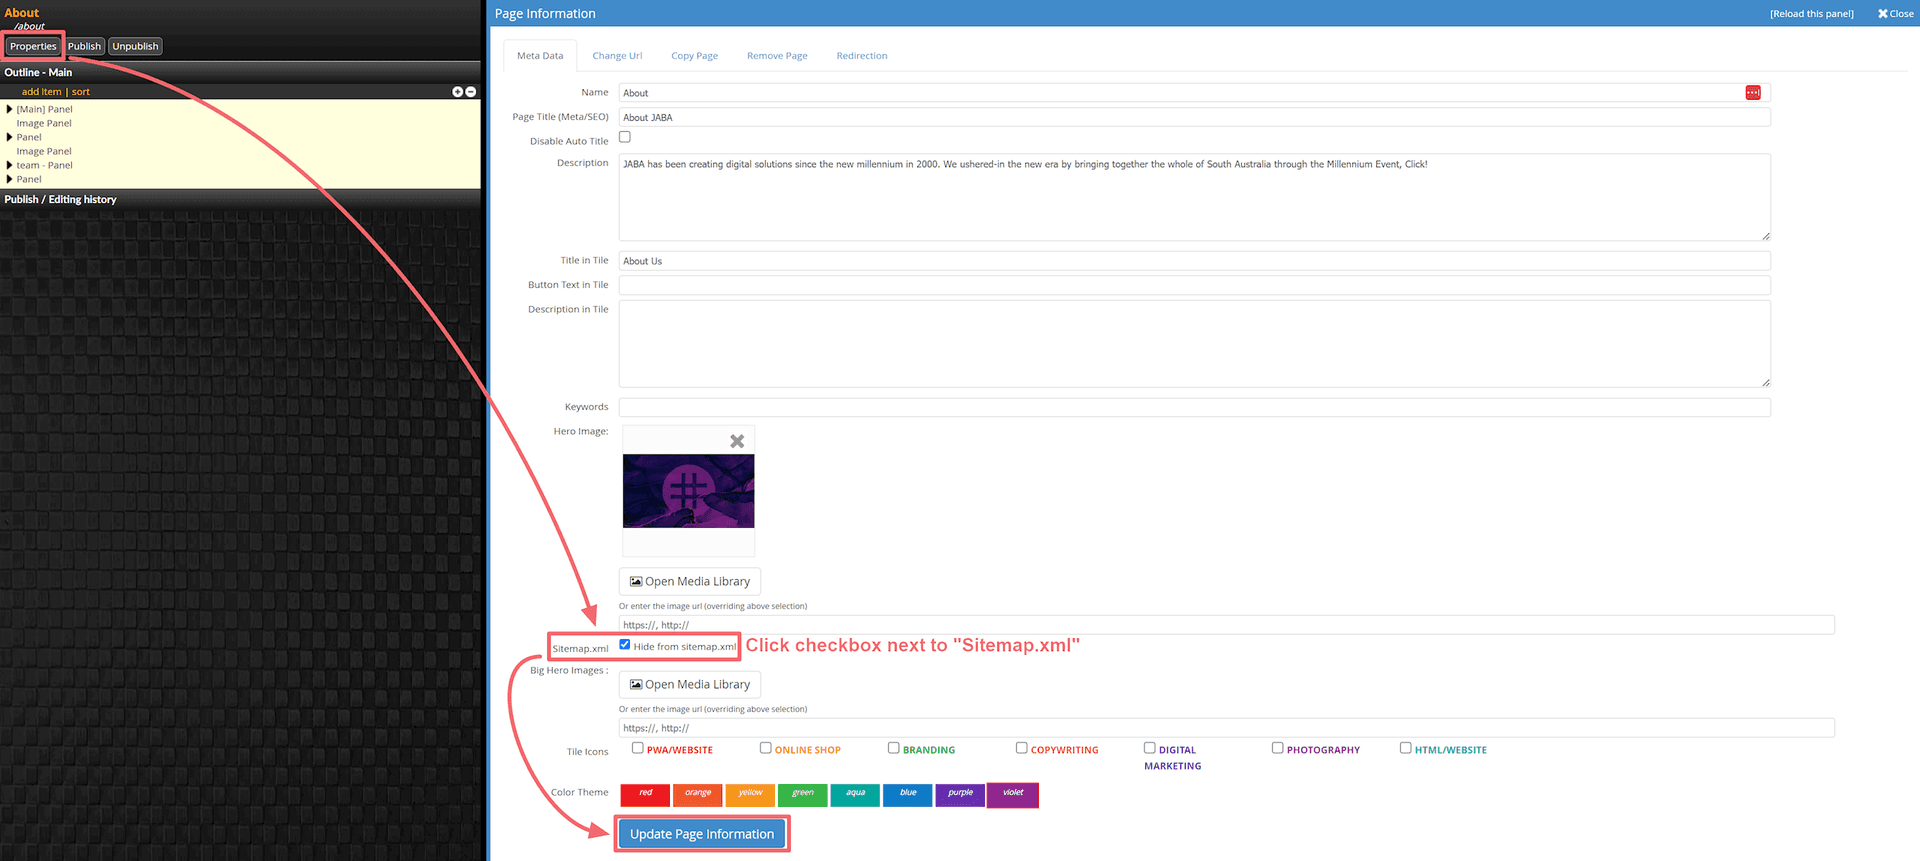
Hide Page from Sitemap
- Publish the Page.
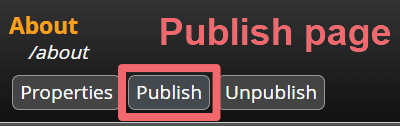
The page is now hidden from your search engine sitemap.
 Redirecting a Page
Learn how to redirect a page on your website to a different URL. Send your website users to the correct page rather than the wrong one.
Redirecting a Page (301)
If you want a particular page on your website to point to a different url when users visit the old page url, you can set this in the selected webpage's properties in the CMS.
- Choose the page from the CMS directory that you wish to redirect.
- Select Properties
- Select the Redirection tab
- Enter the URL of the page you wish the page to redirect to in the Set Redirection field
- Leave the check box for Permanent(301) selected
- Select Set

Redirect a Page in Properties
- In the top left corner, there will be a red bar that says Redirecting to "<URL name>"
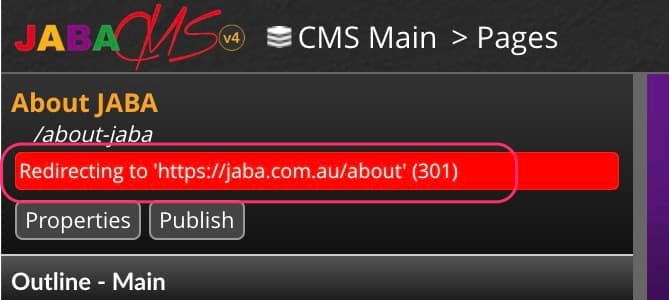
Showing Redirection is Set
- Publish the page.
- The page will now redirect to the URL entered when someone visits it.
Removing a Page Redirection (301)
To remove a page redirect you reverse the steps that you did to create the page redirection as above.
- Choose the page from the CMS directory that you wish to remove the redirection from.
- Select Properties
- Select Clear

Removing a Page Redirection
- Select Publish
- The red bar in the top left corner showing the redirection URL will no longer be visible and the page will no longer redirect users away from it.
 Edit History - Reverting, Previewing and Publishing
Understand the preview and publish history tool and learn how to see previous changes or undo your changes in the CMS.
Sometimes you may accidently change something on a web page and want to revert back to a previous version of the page's history. You may also want to preview previous page versions to see changes or past content.
You can preview and revert back to previous published or edited versions of a webpage on your CMS by using the panel under your page elements on the left side of your screen.
- Previewing Your Publish History
- Choose the page from the CMS directory that you wish to preview a pervious version.
- Click the Publish / Editing History bar at the bottom of the left side panel to open the history of this page.
- Look through the previous publish and edit history listings to find the day and time of the pervious version you want to preview.
- Once identified select view on that item and your previous page version will show on the right hand side.
- The previous version name will appear in the top right corner of the page.
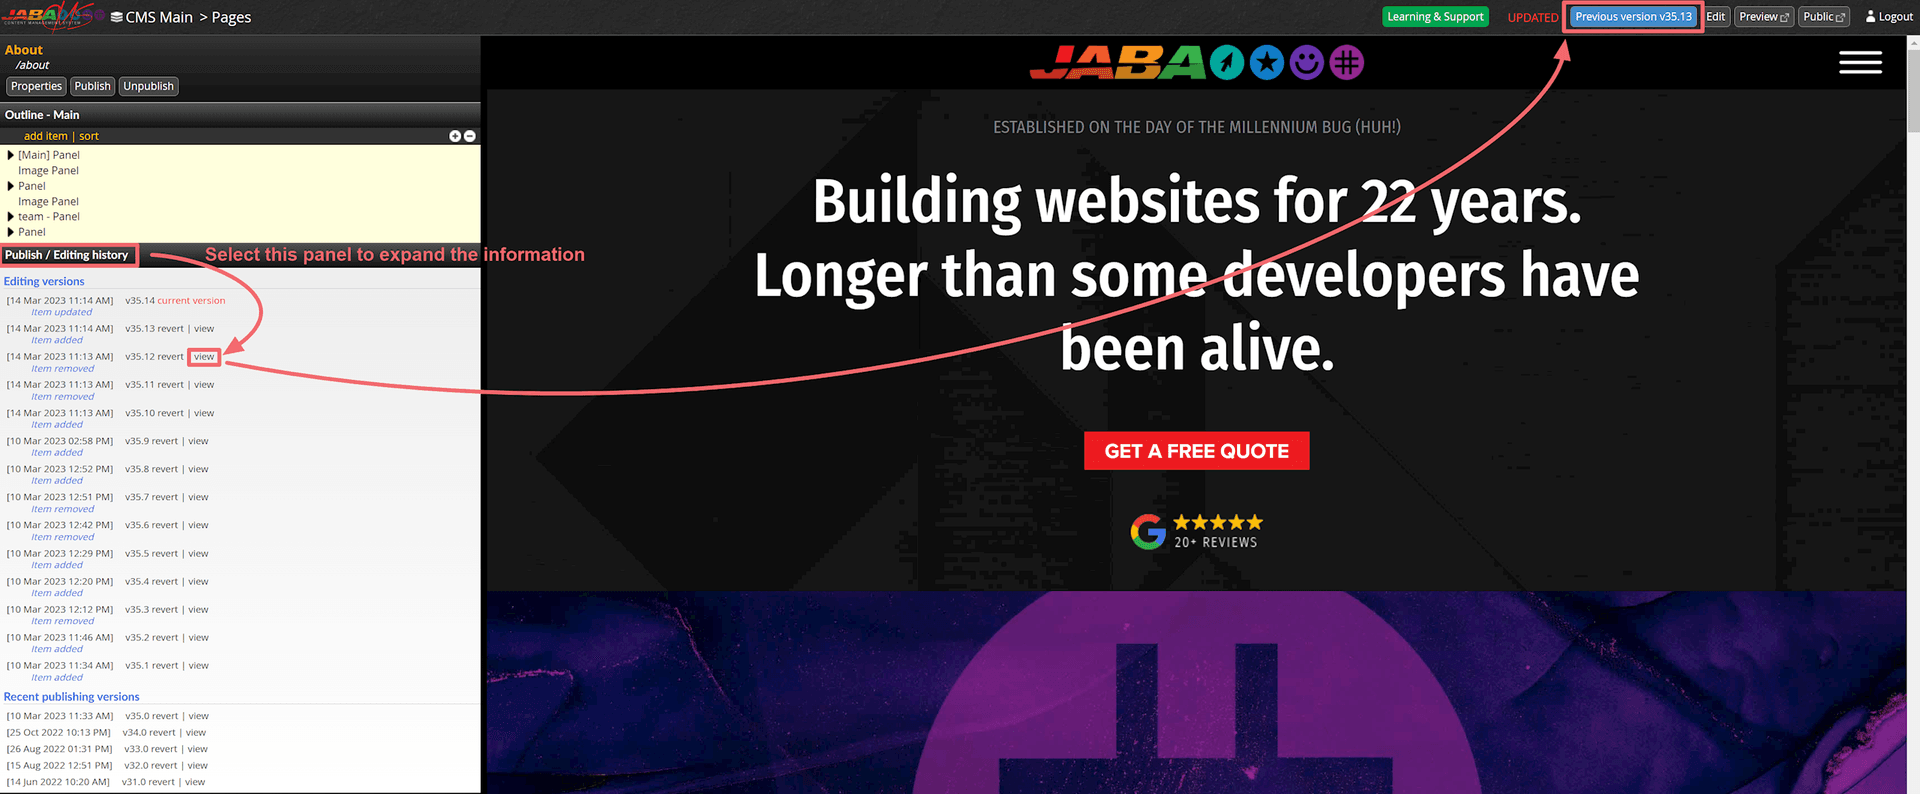
Preview a Previous Page Version
Revert the Webpage to a Previous Version
If you wish to revert to the previous version you just previewed, select revert to the left of the view button.
- A pop up box will appear. Press OK to proceed with the revert.
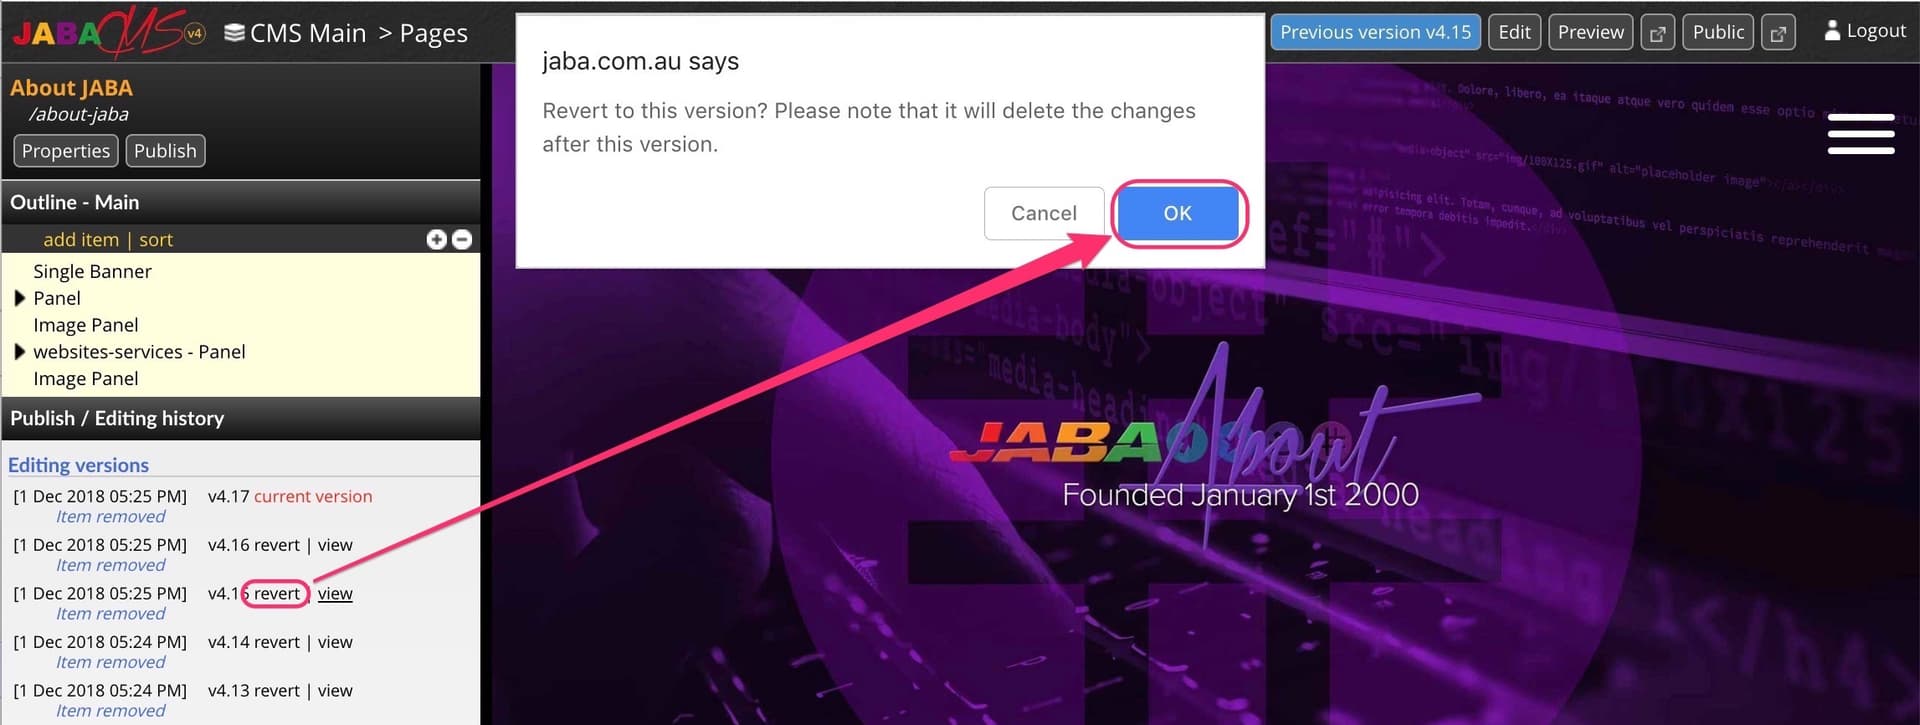
Revert to a Previous Page Version
- You will now need to publish the page so that the public can see the reverted version of the page.
 Deleting a Page
You can delete a page on your website if it is no longer needed via the properties on your selected webpage in the CMS. *Please note that once a page is deleted, it CANNOT be recovered.
If you want to keep a page on your website's CMS but no longer have it published to the public you should hide the page from the sitemap (so search engines can't find it anymore) and then unpublish the page.
Deleting an Existing Page
- Choose the page on the CMS you wish to delete.
- Select Properties in the top left corver of the screen
- Select the Remove Page tab
- Select the Remove Page button
- Select OK
- The page will now be deleted permanently.
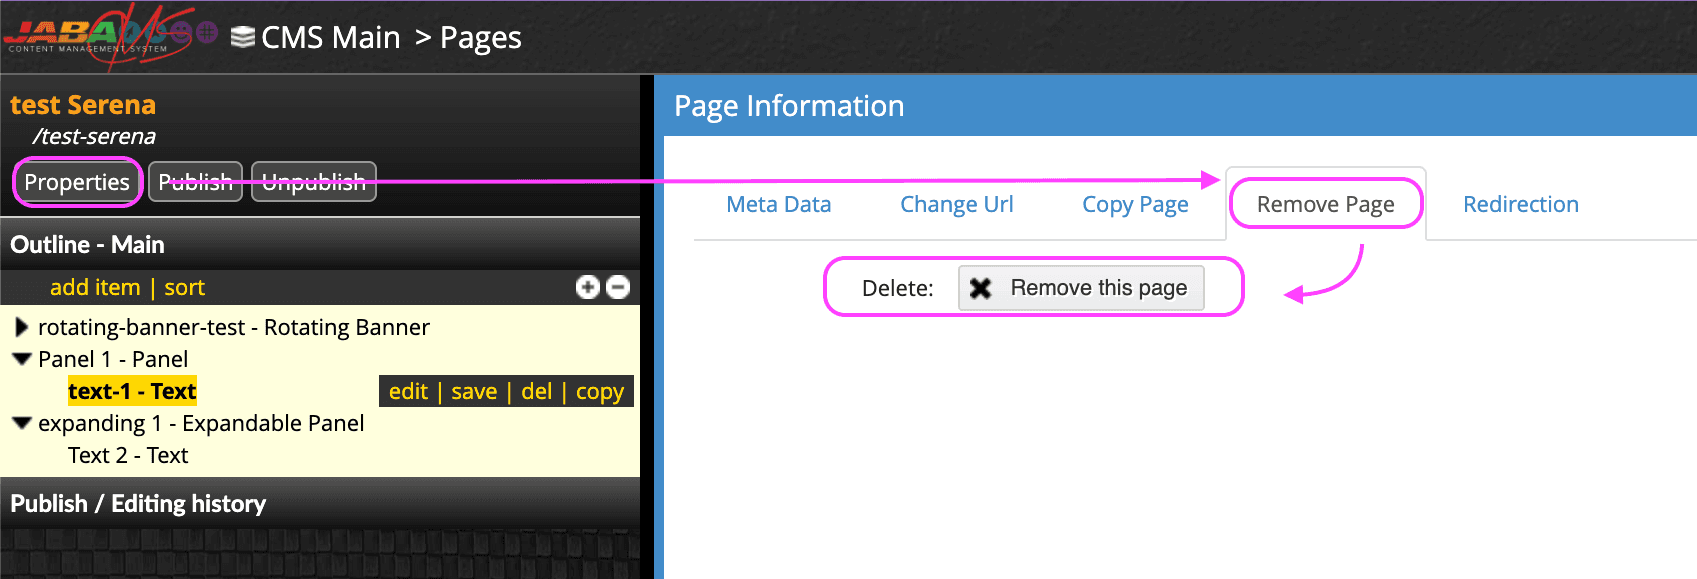
Delete a Page